
Configuring your Compute installation involves many
configuration files: the nova.conf file,
the api-paste.ini file, and related Image
and Identity management configuration files. This section
contains the basics for a simple multi-node installation, but
Compute can be configured many ways. You can find networking
options and hypervisor options described in separate
chapters.
The configuration file nova.conf is
installed in /etc/nova by default. A
default set of options are already configured in
nova.conf when you install
manually.
Create a nova group, so you can set
permissions on the configuration file:
$ sudo addgroup nova
The nova.conf file should have its
owner set to root:nova, and mode set to
0640, since the file could contain your
MySQL server’s username and password. You also want to ensure
that the nova user belongs to the
nova group.
$ sudo usermod -g nova nova
$ chown -R username:nova /etc/nova
$ chmod 640 /etc/nova/nova.conf
Most configuration information is available in the nova.conf
configuration option file, which is in the /etc/nova directory.
You can use a particular configuration option file by using the option
(nova.conf) parameter when running one of the
nova-* services. This inserts configuration option definitions from
the given configuration file name, which may be useful for debugging or performance
tuning.
If you want to maintain the state of all the services, you can use the
state_path configuration option to indicate a top-level directory for
storing data related to the state of Compute including images if you are using the Compute
object store.
You can place comments in the nova.conf file by entering a new line
with a # sign at the beginning of the line. To see a listing of all
possible configuration options, refer to the tables in this guide. Here are some general
purpose configuration options that you can use to learn more about the configuration option
file and the node.
| Configuration option=Default value | Description |
| bindir=/usr/local/bin | (StrOpt) Directory where nova binaries are installed |
| compute_topic=compute | (StrOpt) the topic compute nodes listen on |
| console_topic=console | (StrOpt) the topic console proxy nodes listen on |
| consoleauth_topic=consoleauth | (StrOpt) the topic console auth proxy nodes listen on |
| disable_process_locking=False | (BoolOpt) Whether to disable inter-process locks |
| host=docwork | (StrOpt) Name of this node. This can be an opaque identifier. It is not necessarily a hostname, FQDN, or IP address. However, the node name must be valid within an AMQP key, and if using ZeroMQ, a valid hostname, FQDN, or IP address |
| host=127.0.0.1 | (StrOpt) Host to locate redis |
| lock_path=None | (StrOpt) Directory to use for lock files. |
| memcached_servers=None | (ListOpt) Memcached servers or None for in process cache. |
| my_ip=192.168.122.99 | (StrOpt) ip address of this host |
| notification_driver=[] | (MultiStrOpt) Driver or drivers to handle sending notifications |
| notification_topics=notifications | (ListOpt) AMQP topic used for OpenStack notifications |
| notify_api_faults=False | (BoolOpt) If set, send api.fault notifications on caught exceptions in the API service. |
| notify_on_state_change=None | (StrOpt) If set, send compute.instance.update notifications on instance state changes. Valid values are None for no notifications, "vm_state" for notifications on VM state changes, or "vm_and_task_state" for notifications on VM and task state changes. |
| pybasedir=/home/docwork/openstack-manuals-new/tools/autogenerate-config-docs/nova | (StrOpt) Directory where the nova python module is installed |
| report_interval=10 | (IntOpt) seconds between nodes reporting state to datastore |
| rootwrap_config=/etc/nova/rootwrap.conf | (StrOpt) Path to the rootwrap configuration file to use for running commands as root |
| service_down_time=60 | (IntOpt) maximum time since last check-in for up service |
| state_path=$pybasedir | (StrOpt) Top-level directory for maintaining nova's state |
| tempdir=None | (StrOpt) Explicitly specify the temporary working directory |
The following sections describe many of the configuration
option settings that can go into the
nova.conf files. Copies of each
nova.conf file need to be copied to each
compute node. Here are some sample
nova.conf files that offer examples of
specific configurations.
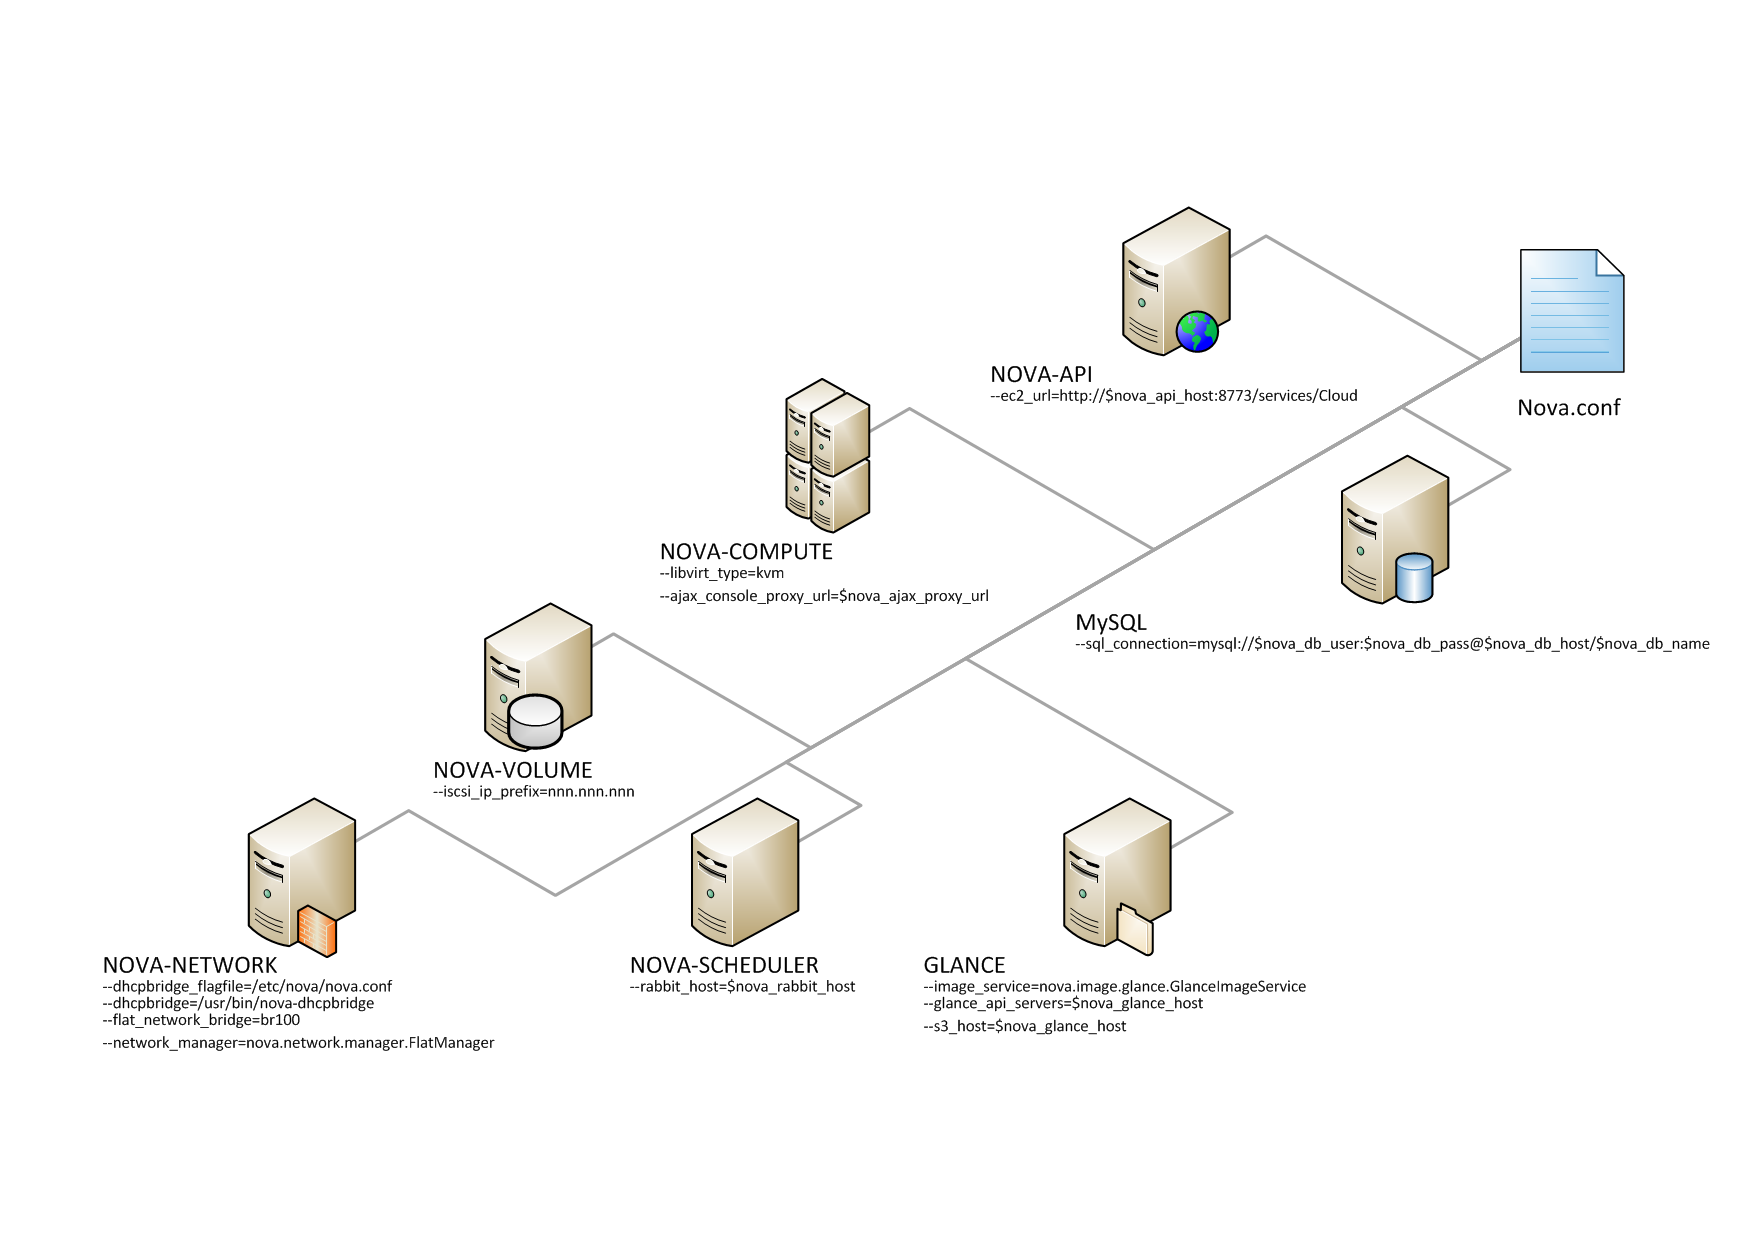
Here is a simple example nova.conf
file for a small private cloud, with all the cloud controller
services, database server, and messaging server on the same
server. In this case, CONTROLLER_IP represents the IP address
of a central server, BRIDGE_INTERFACE represents the bridge
such as br100, the NETWORK_INTERFACE represents an interface
to your VLAN setup, and passwords are represented as
DB_PASSWORD_COMPUTE for your Compute (nova) database password,
and RABBIT PASSWORD represents the password to your message
queue installation.
[DEFAULT]

# LOGS/STATE
verbose=True
logdir=/var/log/nova
state_path=/var/lib/nova
lock_path=/var/lock/nova
rootwrap_config=/etc/nova/rootwrap.conf

# SCHEDULER
compute_scheduler_driver=nova.scheduler.filter_scheduler.FilterScheduler

# VOLUMES
# configured in cinder.conf

# COMPUTE
libvirt_type=qemu
compute_driver=libvirt.LibvirtDriver
instance_name_template=instance-%08x
api_paste_config=/etc/nova/api-paste.ini

# COMPUTE/APIS: if you have separate configs for separate services
# this flag is required for both nova-api and nova-compute
allow_resize_to_same_host=True

# APIS
osapi_compute_extension=nova.api.openstack.compute.contrib.standard_extensions
ec2_dmz_host=192.168.206.130
s3_host=192.168.206.130

# RABBITMQ
rabbit_host=192.168.206.130

# GLANCE
image_service=nova.image.glance.GlanceImageService
glance_api_servers=192.168.206.130:9292

# NETWORK
network_manager=nova.network.manager.FlatDHCPManager
force_dhcp_release=True
dhcpbridge_flagfile=/etc/nova/nova.conf
firewall_driver=nova.virt.libvirt.firewall.IptablesFirewallDriver
# Change my_ip to match each host
my_ip=192.168.206.130
public_interface=eth0
vlan_interface=eth0
flat_network_bridge=br100
flat_interface=eth0

# NOVNC CONSOLE
novncproxy_base_url=http://192.168.206.130:6080/vnc_auto.html
# Change vncserver_proxyclient_address and vncserver_listen to match each compute host
vncserver_proxyclient_address=192.168.206.130
vncserver_listen=192.168.206.130

# AUTHENTICATION
auth_strategy=keystone
[keystone_authtoken]
auth_host = 127.0.0.1
auth_port = 35357
auth_protocol = http
admin_tenant_name = service
admin_user = nova
admin_password = nova
signing_dirname = /tmp/keystone-signing-nova

# DATABASE
[database]
connection=mysql://nova:[email protected]/nova
This example nova.conf file is from
an internal Rackspace test system used for
demonstrations.
[DEFAULT]

# LOGS/STATE
verbose=True
logdir=/var/log/nova
state_path=/var/lib/nova
lock_path=/var/lock/nova
rootwrap_config=/etc/nova/rootwrap.conf

# SCHEDULER
compute_scheduler_driver=nova.scheduler.filter_scheduler.FilterScheduler

# VOLUMES
# configured in cinder.conf

# COMPUTE
libvirt_type=qemu
compute_driver=libvirt.LibvirtDriver
instance_name_template=instance-%08x
api_paste_config=/etc/nova/api-paste.ini

# COMPUTE/APIS: if you have separate configs for separate services
# this flag is required for both nova-api and nova-compute
allow_resize_to_same_host=True

# APIS
osapi_compute_extension=nova.api.openstack.compute.contrib.standard_extensions
ec2_dmz_host=192.168.206.130
s3_host=192.168.206.130

# RABBITMQ
rabbit_host=192.168.206.130

# GLANCE
image_service=nova.image.glance.GlanceImageService
glance_api_servers=192.168.206.130:9292

# NETWORK
network_manager=nova.network.manager.FlatDHCPManager
force_dhcp_release=True
dhcpbridge_flagfile=/etc/nova/nova.conf
firewall_driver=nova.virt.libvirt.firewall.IptablesFirewallDriver
# Change my_ip to match each host
my_ip=192.168.206.130
public_interface=eth0
vlan_interface=eth0
flat_network_bridge=br100
flat_interface=eth0

# NOVNC CONSOLE
novncproxy_base_url=http://192.168.206.130:6080/vnc_auto.html
# Change vncserver_proxyclient_address and vncserver_listen to match each compute host
vncserver_proxyclient_address=192.168.206.130
vncserver_listen=192.168.206.130

# AUTHENTICATION
auth_strategy=keystone
[keystone_authtoken]
auth_host = 127.0.0.1
auth_port = 35357
auth_protocol = http
admin_tenant_name = service
admin_user = nova
admin_password = nova
signing_dirname = /tmp/keystone-signing-nova

# DATABASE
[database]
connection=mysql://nova:[email protected]/nova
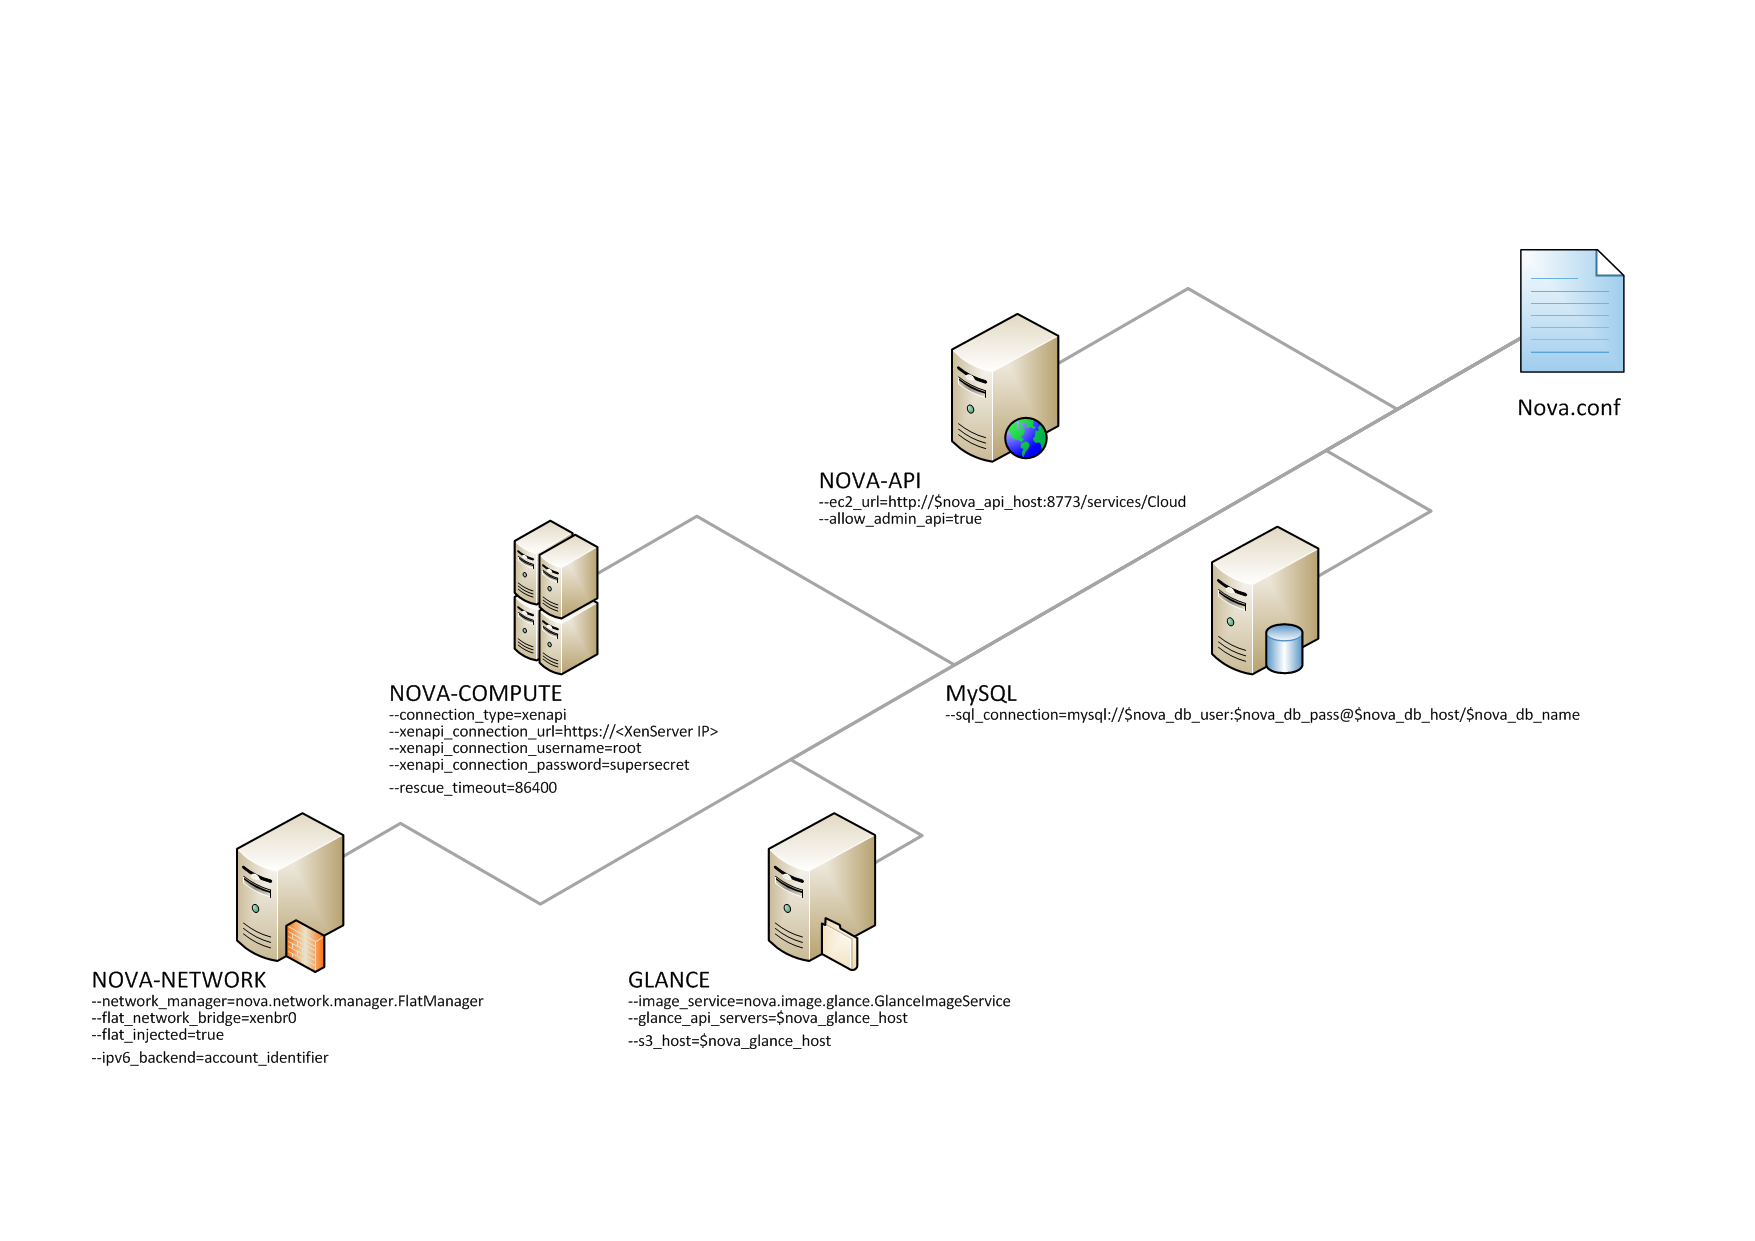
This example nova.conf file is from
an internal Rackspace test system.
verbose
nodaemon
network_manager=nova.network.manager.FlatManager
image_service=nova.image.glance.GlanceImageService
flat_network_bridge=xenbr0
compute_driver=xenapi.XenAPIDriver
xenapi_connection_url=https://<XenServer IP>
xenapi_connection_username=root
xenapi_connection_password=supersecret
xenapi_image_upload_handler=nova.virt.xenapi.image.glance.GlanceStore
rescue_timeout=86400
use_ipv6=true

# To enable flat_injected, currently only works on Debian-based systems
flat_injected=true
ipv6_backend=account_identifier
ca_path=./nova/CA

# Add the following to your conf file if you're running on Ubuntu Maverick
xenapi_remap_vbd_dev=true
[database]
connection=mysql://root:<password>@127.0.0.1/nova
You can use nova.conf file to configure where Compute logs events, the level of
logging, and log formats.
To customize log formats for OpenStack Compute, use these configuration option settings.
| Configuration option=Default value | Description |
| debug=False | (BoolOpt) Print debugging output (set logging level to DEBUG instead of default WARNING level). |
| default_log_levels=amqplib=WARN,sqlalchemy=WARN,boto=WARN,suds=INFO,keystone=INFO,eventlet.wsgi.server=WARN | (ListOpt) list of logger=LEVEL pairs |
| fatal_deprecations=False | (BoolOpt) make deprecations fatal |
| fatal_exception_format_errors=False | (BoolOpt) make exception message format errors fatal |
| instance_format=[instance: %(uuid)s] | (StrOpt) If an instance is passed with the log message, format it like this |
| instance_uuid_format=[instance: %(uuid)s] | (StrOpt) If an instance UUID is passed with the log message, format it like this |
| log_config=None | (StrOpt) If this option is specified, the logging configuration file specified is used and overrides any other logging options specified. Please see the Python logging module documentation for details on logging configuration files. |
| log_date_format=%Y-%m-%d %H:%M:%S | (StrOpt) Format string for %%(asctime)s in log records. Default: %(default)s |
| log_dir=None | (StrOpt) (Optional) The base directory used for relative --log-file paths |
| log_file=None | (StrOpt) (Optional) Name of log file to output to. If no default is set, logging will go to stdout. |
| log_format=None | (StrOpt) DEPRECATED. A logging.Formatter log message format string which may use any of the available logging.LogRecord attributes. This option is deprecated. Please use logging_context_format_string and logging_default_format_string instead. |
| logging_context_format_string=%(asctime)s.%(msecs)03d %(process)d %(levelname)s %(name)s [%(request_id)s %(user)s %(tenant)s] %(instance)s%(message)s | (StrOpt) format string to use for log messages with context |
| logging_debug_format_suffix=%(funcName)s %(pathname)s:%(lineno)d | (StrOpt) data to append to log format when level is DEBUG |
| logging_default_format_string=%(asctime)s.%(msecs)03d %(process)d %(levelname)s %(name)s [-] %(instance)s%(message)s | (StrOpt) format string to use for log messages without context |
| logging_exception_prefix=%(asctime)s.%(msecs)03d %(process)d TRACE %(name)s %(instance)s | (StrOpt) prefix each line of exception output with this format |
| publish_errors=False | (BoolOpt) publish error events |
| syslog_log_facility=LOG_USER | (StrOpt) syslog facility to receive log lines |
| use_stderr=True | (BoolOpt) Log output to standard error |
| use_syslog=False | (BoolOpt) Use syslog for logging. |
| verbose=False | (BoolOpt) Print more verbose output (set logging level to INFO instead of default WARNING level). |
See the section called “Hypervisors” for details.
There are different methods of authentication for the OpenStack Compute project, including no authentication. The preferred system is the OpenStack Identity Service, code-named Keystone.
To customize authorization settings for Compute, see these
configuration settings in nova.conf.
| Configuration option=Default value | Description |
| api_rate_limit=False | (BoolOpt) whether to use per-user rate limiting for the api. |
| auth_strategy=noauth | (StrOpt) The strategy to use for auth: noauth or keystone. |
To customize certificate authority settings for Compute, see
these configuration settings in
nova.conf.
| Configuration option=Default value | Description |
| ca_file=cacert.pem | (StrOpt) Filename of root CA |
| ca_file=None | (StrOpt) CA certificate file to use to verify connecting clients |
| ca_path=$state_path/CA | (StrOpt) Where we keep our root CA |
| cert_file=None | (StrOpt) Certificate file to use when starting the server securely |
| cert_manager=nova.cert.manager.CertManager | (StrOpt) full class name for the Manager for cert |
| cert_topic=cert | (StrOpt) the topic cert nodes listen on |
| crl_file=crl.pem | (StrOpt) Filename of root Certificate Revocation List |
| key_file=private/cakey.pem | (StrOpt) Filename of private key |
| key_file=None | (StrOpt) Private key file to use when starting the server securely |
| keys_path=$state_path/keys | (StrOpt) Where we keep our keys |
| project_cert_subject=/C=US/ST=California/O=OpenStack/OU=NovaDev/CN=project-ca-%.16s-%s | (StrOpt) Subject for certificate for projects, %s for project, timestamp |
| use_project_ca=False | (BoolOpt) Should we use a CA for each project? |
| user_cert_subject=/C=US/ST=California/O=OpenStack/OU=NovaDev/CN=%.16s-%.16s-%s | (StrOpt) Subject for certificate for users, %s for project, user, timestamp |
To customize Compute and the Identity service to use LDAP as
a backend, refer to these configuration settings in
nova.conf.
| Configuration option=Default value | Description |
| ldap_dns_base_dn=ou=hosts,dc=example,dc=org | (StrOpt) Base DN for DNS entries in ldap |
| ldap_dns_password=password | (StrOpt) password for ldap DNS |
| ldap_dns_servers=['dns.example.org'] | (MultiStrOpt) DNS Servers for ldap dns driver |
| ldap_dns_soa_expiry=86400 | (StrOpt) Expiry interval (in seconds) for ldap dns driver Statement of Authority |
| [email protected] | (StrOpt) Hostmaster for ldap dns driver Statement of Authority |
| ldap_dns_soa_minimum=7200 | (StrOpt) Minimum interval (in seconds) for ldap dns driver Statement of Authority |
| ldap_dns_soa_refresh=1800 | (StrOpt) Refresh interval (in seconds) for ldap dns driver Statement of Authority |
| ldap_dns_soa_retry=3600 | (StrOpt) Retry interval (in seconds) for ldap dns driver Statement of Authority |
| ldap_dns_url=ldap://ldap.example.com:389 | (StrOpt) URL for ldap server which will store dns entries |
| ldap_dns_user=uid=admin,ou=people,dc=example,dc=org | (StrOpt) user for ldap DNS |
You can configure Compute to use both IPv4 and IPv6 addresses for
communication by putting it into a IPv4/IPv6 dual stack mode. In IPv4/IPv6
dual stack mode, instances can acquire their IPv6 global unicast address
by stateless address autoconfiguration mechanism [RFC 4862/2462].
IPv4/IPv6 dual stack mode works with VlanManager and FlatDHCPManager
networking modes. In VlanManager, different 64bit global routing prefix is used for
each project. In FlatDHCPManager, one 64bit global routing prefix is used
for all instances.
This configuration has been tested with VM images
that have IPv6 stateless address autoconfiguration capability (must use
EUI-64 address for stateless address autoconfiguration), a requirement for
any VM you want to run with an IPv6 address. Each node that executes a
nova-* service must have python-netaddr
and radvd installed.
On all nova-nodes, install python-netaddr:
$ sudo apt-get install python-netaddr
On all nova-network nodes install radvd and configure IPv6
networking:
$ sudo apt-get install radvd
$ sudo bash -c "echo 1 > /proc/sys/net/ipv6/conf/all/forwarding"
$ sudo bash -c "echo 0 > /proc/sys/net/ipv6/conf/all/accept_ra"
Edit the nova.conf file on all nodes to
set the use_ipv6 configuration option to True. Restart all
nova- services.
When using the command nova network-create you can add a fixed range for IPv6 addresses. You must specify public or private after the create parameter.
$ nova network-create public --fixed-range-v4fixed_range_v4--vlanvlan_id--vpnvpn_start--fixed-range-v6fixed_range_v6
You can set IPv6 global routing prefix by using the --fixed_range_v6
parameter. The default is: fd00::/48. When you use
FlatDHCPManager, the command uses the original value of
--fixed_range_v6. When you use VlanManager, the
command creates prefixes of subnet by incrementing subnet id. Guest VMs uses this prefix for
generating their IPv6 global unicast address.
Here is a usage example for VlanManager:
$ nova network-create public --fixed-range-v4 10.0.1.0/24 --vlan 100 --vpn 1000 --fixed-range-v6 fd00:1::/48
Here is a usage example for FlatDHCPManager:
$ nova network-create public --fixed-range-v4 10.0.2.0/24 --fixed-range-v6 fd00:1::/48
| Configuration option=Default value | Description |
| fixed_range_v6=fd00::/48 | (StrOpt) Fixed IPv6 address block |
| gateway_v6=None | (StrOpt) Default IPv6 gateway |
| ipv6_backend=rfc2462 | (StrOpt) Backend to use for IPv6 generation |
| use_ipv6=False | (BoolOpt) use ipv6 |
![[Note]](../common/images/admon/note.png) | Note |
|---|---|
Only cloud administrators can perform live migrations. If your cloud is configured to use cells, you can perform live migration within but not between cells. |
Migration enables an administrator to move a virtual machine instance from one compute host to another. This feature is useful when a compute host requires maintenance. Migration can also be useful to redistribute the load when many VM instances are running on a specific physical machine.
The migration types are:
Migration (or non-live migration). The instance is shut down (and the instance knows that it was rebooted) for a period of time to be moved to another hypervisor.
Live migration (or true live migration). Almost no instance downtime. Useful when the instances must be kept running during the migration.
The types of live migration are:
Shared storage-based live migration. Both hypervisors have access to shared storage.
Block live migration. No shared storage is required.
Volume-backed live migration. When instances are backed by volumes rather than ephemeral disk, no shared storage is required, and migration is supported (currently only in libvirt-based hypervisors).
The following sections describe how to configure your hosts and compute nodes for migrations by using the KVM and XenServer hypervisors.
Prerequisites
Hypervisor: KVM with libvirt
Shared storage:
NOVA-INST-DIR/instances//var/lib/nova/instances) has to be mounted by shared storage. This guide uses NFS but other options, including the OpenStack Gluster Connector are available.Instances: Instance can be migrated with iSCSI based volumes
| Notes |
|---|---|
|
Example Compute installation environment
Prepare at least three servers; for example,
HostA,HostB, andHostC.HostAis the Cloud Controller, and should run these services:nova-api,nova-scheduler,nova-network,cinder-volume, andnova-objectstore.HostBandHostCare the compute nodes that runnova-compute.Ensure that
NOVA-INST-DIRstate_pathin thenova.conffile) is the same on all hosts.In this example,
HostAis the NFSv4 server that exportsNOVA-INST-DIR/instancesHostBandHostCmount it.
Procedure 2.1. To configure your system
Configure your DNS or
/etc/hostsand ensure it is consistent across all hosts. Make sure that the three hosts can perform name resolution with each other. As a test, use the ping command to ping each host from one another.$ ping HostA $ ping HostB $ ping HostC
Ensure that the UID and GID of your nova and libvirt users are identical between each of your servers. This ensures that the permissions on the NFS mount works correctly.
Follow the instructions at the Ubuntu NFS HowTo to setup an NFS server on
HostA, and NFS Clients onHostBandHostC.The aim is to export
NOVA-INST-DIR/instancesHostA, and have it readable and writable by the nova user onHostBandHostC.Using your knowledge from the Ubuntu documentation, configure the NFS server at
HostAby adding this line to the/etc/exportsfile:NOVA-INST-DIR/instances HostA/255.255.0.0(rw,sync,fsid=0,no_root_squash)Change the subnet mask (
255.255.0.0) to the appropriate value to include the IP addresses ofHostBandHostC. Then restart the NFS server:$ /etc/init.d/nfs-kernel-server restart $ /etc/init.d/idmapd restart
Set the 'execute/search' bit on your shared directory.
On both compute nodes, make sure to enable the 'execute/search' bit to allow qemu to be able to use the images within the directories. On all hosts, run the following command:
$ chmod o+x
NOVA-INST-DIR/instancesConfigure NFS at HostB and HostC by adding this line to the
/etc/fstabfile:HostA:/ /
NOVA-INST-DIR/instances nfs4 defaults 0 0Make sure that you can mount the exported directory can be mounted:
$ mount -a -v
Check that HostA can see the "
NOVA-INST-DIR/instances/$ ls -ld
NOVA-INST-DIR/instances/drwxr-xr-x 2 nova nova 4096 2012-05-19 14:34 nova-install-dir/instances/
Perform the same check at HostB and HostC, paying special attention to the permissions (nova should be able to write):
$ ls -ld
NOVA-INST-DIR/instances/drwxr-xr-x 2 nova nova 4096 2012-05-07 14:34 nova-install-dir/instances/
$ df -k
Filesystem           1K-blocks      Used Available Use% Mounted on
/dev/sda1            921514972   4180880 870523828   1% /
none                  16498340      1228  16497112   1% /dev
none                  16502856         0  16502856   0% /dev/shm
none                  16502856       368  16502488   1% /var/run
none                  16502856         0  16502856   0% /var/lock
none                  16502856         0  16502856   0% /lib/init/rw
HostA:        921515008 101921792 772783104  12% /var/lib/nova/instances  ( <--- this line is important.)
Update the libvirt configurations so that the calls can be made securely. These methods enable remote access over TCP and are not documented here, please consult your network administrator for assistance in deciding how to configure access.
SSH tunnel to libvirtd's UNIX socket
libvirtd TCP socket, with GSSAPI/Kerberos for auth+data encryption
libvirtd TCP socket, with TLS for encryption and x509 client certs for authentication
libvirtd TCP socket, with TLS for encryption and Kerberos for authentication
Restart libvirt. After you run the command, ensure that libvirt is successfully restarted:
$ stop libvirt-bin && start libvirt-bin
$ ps -ef | grep libvirt
root 1145 1 0 Nov27 ? 00:00:03 /usr/sbin/libvirtd -d -l
Configure your firewall to allow libvirt to communicate between nodes.
For information about ports that are used with libvirt, see the libvirt documentation By default, libvirt listens on TCP port 16509 and an ephemeral TCP range from 49152 to 49261 is used for the KVM communications. As this guide has disabled libvirt auth, you should take good care that these ports are only open to hosts within your installation.
You can now configure options for live migration. In most cases, you do not need to configure any options. The following chart is for advanced usage only.
| Configuration option=Default value | Description |
| live_migration_bandwidth=0 | (IntOpt) Maximum bandwidth to be used during migration, in Mbps |
| live_migration_flag=VIR_MIGRATE_UNDEFINE_SOURCE, VIR_MIGRATE_PEER2PEER | (StrOpt) Migration flags to be set for live migration |
| live_migration_retry_count=30 | (IntOpt) Number of 1 second retries needed in live_migration |
| live_migration_uri=qemu+tcp://%s/system | (StrOpt) Migration target URI (any included "%s" is replaced with the migration target hostname) |
By default, the Compute service does not use the libvirt
live migration functionality. To enable this functionality,
add the following line to the nova.conf
file:
live_migration_flag=VIR_MIGRATE_UNDEFINE_SOURCE,VIR_MIGRATE_PEER2PEER,VIR_MIGRATE_LIVE
The Compute service does not use libvirt's live migration by default because there is a risk that the migration process never ends. This can happen if the guest operating system dirties blocks on the disk faster than they can migrated.
Prerequisites
Compatible XenServer hypervisors. For more information, see the Requirements for Creating Resource Pools section of the XenServer Administrator's Guide.
Shared storage. An NFS export, visible to all XenServer hosts.
Note For the supported NFS versions, see the NFS VHD section of the XenServer Administrator's Guide.
To use shared storage live migration with XenServer hypervisors, the hosts must be joined to a XenServer pool. To create that pool, a host aggregate must be created with special metadata. This metadata is used by the XAPI plug-ins to establish the pool.
Procedure 2.2. To use shared storage live migration with XenServer hypervisors
Add an NFS VHD storage to your master XenServer, and set it as default SR. For more information, please refer to the NFS VHD section in the XenServer Administrator's Guide.
Configure all the compute nodes to use the default sr for pool operations. Add this line to your
nova.confconfiguration files across your compute nodes:sr_matching_filter=default-sr:true
Create a host aggregate:
$ nova aggregate-create <name-for-pool> <availability-zone>
The command displays a table that contains the ID of the newly created aggregate.
Now add special metadata to the aggregate, to mark it as a hypervisor pool:
$ nova aggregate-set-metadata <aggregate-id> hypervisor_pool=true
$ nova aggregate-set-metadata <aggregate-id> operational_state=created
Make the first compute node part of that aggregate:
$ nova aggregate-add-host <aggregate-id> <name-of-master-compute>
At this point, the host is part of a XenServer pool.
Add additional hosts to the pool:
$ nova aggregate-add-host <aggregate-id> <compute-host-name>
Note At this point, the added compute node and the host are shut down, to join the host to the XenServer pool. The operation fails, if any server other than the compute node is running/suspended on your host.
Prerequisites
Compatible XenServer hypervisors. The hypervisors must support the Storage XenMotion feature. See your XenServer manual to make sure your edition has this feature.
| Notes |
|---|---|
|
Resize (or Server resize) is the ability to change the flavor of a server, thus allowing it to upscale or downscale according to user needs. For this feature to work properly, some underlying virt layers may need further configuration; this section describes the required configuration steps for each hypervisor layer provided by OpenStack.
