5. Command Line Interface

Besides the GOS-Admin Interface there is the possibility to use the command line interface of the GSM. Some settings like a Syslog server are currently only accessible via this interface. This chapter shows how to perform these changes.

5.1. Command line

The CLI can be accessed via serial console or SSH. However, SSH access is possibly deactivated and has to be enabled via the CLI or the GOS-Admin-Menu through the serial console (see section SSH Access).

Access via SSH from UNIX/Linux can be done directly via command line:

$ ssh admin@<gsm>

Replace gsm with the IP address or DNS name of the GSM appliance. To verify the host-key, its checksum can be displayed via serial port prior. To do this in the GOS-Admin-Menu, change into the submenu Remote and select SSH Fingerprint.

While the GOS-Admin-Menu offers a simple menu controlled access for the configuration of the GSM appliance, the command line allows for a much more powerful access to the system. However, in the Command-Line-Interface (CLI) you have to enter the commands in the command line.

Access to the command line via serial port is described in the respective section of the setup guide. Login is preformed with user admin (see section Log in as admin). The factory default password is admin. Alternatively SSH can be used to log in (see section SSH Access).

To avoid typos the Tab key can be utilized. It automatically completes entered commands.

Try it: Enter gos on the GSM command line and press the Tab key. The characters change automatically to gos-admin-menu.

gsm: gos<tab>

5.2. Configuring settings

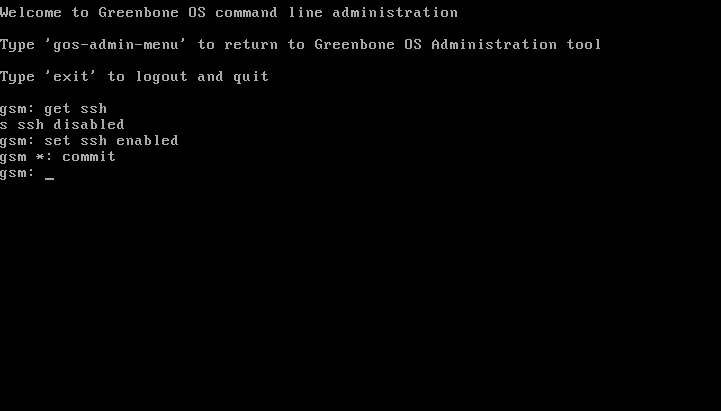
All changes in the settings that are being performed in the CLI are not activated immediately. As soon as a setting is changed in the CLI the prompt changes and indicates that there is an unsaved change. An asterisk at the prompt indicates a change that is not activated yet.

_images/gsm-commit.png

Commit in the CLI

commit or rollback allows the decision between accepting or reverting of a change.

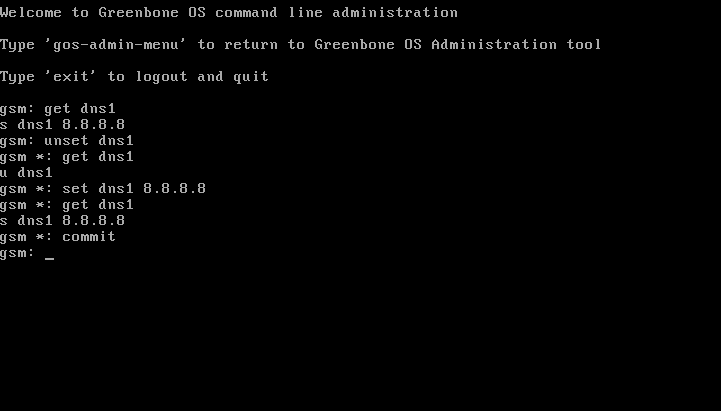
In addition the get command shows if a variable is currently get. This is indicated with an s at the beginning of the line. A u indicates that the variable currently is not set. Clearing of a variable is possible with the command unset. Variables can be configured with set.

_images/gsm-unset.png

set and unset in the CLI

5.3. Users and passwords

Like the GOS-Admin-Menu the CLI offers the possibility to change the password of the administrator and to create a web administrator (scan administrator respectively). It features many additional powerful commands.

5.3.1. Admin password change

The command passwd changes the password of the CLI administrator. This is the password required when logging in via serial console or via SSH. To change the password enter the command passwd.

gsm: passwd
Changing password for admin.
(current) UNIX password: old-password
Enter new UNIX password: new-password
Retype new UNIX password: new-password
passwd: password updated successfully

5.3.2. Creating a web administrator (scan administrator)

To create a web administrator the CLI use the command addadmin. This command expects the user name and password of the creating Administrator.

gsm: addadmin webadmin:kennwort
Creating user with temporary password.
User created with password 'b759489e-c0ba-40eb-90c1-c165b641700c'.
Setting password to desired value.
User was successfully created.

5.3.3. Superuser

On the GSM command line the command shell starts a UNIX command line as unprivileged user admin. Any UNIX command can be executed.

This superuser is not identical and as such independent from the Super Admin that can be created for the web interface (see section Super Admin).

To obtain root rights (superuser) on the GSM appliance the command su needs to be entered. In the factory default settings this is only possible when connected locally via serial console. When logging in via SSH access to root is blocked. For day-to-day operation the admin user should be enough. The enabling of root access should only be done by exception and by consulting with Greenbone support.

To enable login as root the variable superuser must be set.

gsm: get superuser
s superuser disabled
gsm: set superuser enabled
gsm *: commit
gsm: get superuser
s superuser enabled

After this change a reboot of the GSM appliance is required!

When enabling superuser access a secure password for the root user should be set, too. The superuserpassword variable can be used to set the root password. By default the password is disabled.

gsm: get superuserpassword
s superuserpassword disabled

gsm: set superuserpassword kennwort
gsm *: commit
gsm:

5.4. Certificates

The GSM appliance basically can use two types of certificates:

  • Self-signed certificates
  • Certificates issued by an external certificate authority

The use of self-signed certificates is the easiest way. It poses, however, the lowest security and more work for the user:

  • The trust of a self-signed certificate can only be checked manually by the user through examination of the finger print of the certificate.
  • Self-signed certificates cannot be revoked. Once they are accepted by the user in the browser they are stored permanently in the browser. If an attacker gains access to the corresponding private key a man-in-the –middle attack on the connection protected by the certificate can be launched.

The use of a certificate issued by a certificate authority has several advantages:

  • All clients trusting the authority can verify the certificate directly and establish a security connection. No warning is displayed in the browser.
  • The certificate can be revoked easily by the certificate authority. If the clients have the ability to check the certificate status they can decline a certificate that may still be within its validity period but has been revoked. As mechanisms the Certificate Revocation Lists (CRLs) or Online Certificate Status Protocol (OCSP) can be used.
  • Especially when multiple systems within an organization serve SSL protected information the use of an organizational CA simplifies the management drastically. All clients simply have to trust the organizational CA to accept all of the certificates issued by the CA.

All modern operating systems support the creation and management of their own certificate authority. Under Microsoft Windows Server the Active Directory Certificate Services support the administrator in the creation of a root CA. For Linux systems various options are available. One option is described in the IPSec-Howto.

When creating and exchanging certificates it needs to be considered that the admin verifies how the systems are accessed later before creating the certificate. The IP address or the DNS name respectively, is stored when creating the certificate. Additionally after creating the certificate a reboot is required so that all services can use the new certificate. This needs to be taken into consideration when changing certificates.

5.4.1. Self-signed certificates

To support a quick setup the GSM supports self-signed certificates. However, by factory default of many variants such a certificate is not pre-installed and must be created by the administrator. The GSM ONE, however, already comes with a pre-installed certificate. Please refer to section Self-signed certificate.

Self-signed certificates can be easily created in the command line. Alternatively the admin can create a self-signed certificate via the GOS-Admin-Menu (SSL-Self-Signed). Before creating the certificate the admin needs to verify how the GSM is accessed later. Is it accessed via IP address (https://192.168.15.5) or a DNS name (https://gsm.example.com)?

The IP address or the DNS name respectively, must be entered when creating the certificate. It can only be changed at a later point by creating a new certificate.

After creating the certificate a reboot is required so all services can use the new certificate.

gsm: sslselfsign
Generating a 2048 bit RSA private key
.+++
........................................................................................................+++
unable to write ’random    state ’
writing new private key to ’selfcert.pem ’
-----
You are about to be asked to enter information that will be incorporated
into your certificate request.
What you are about to enter is what is called a Distinguished Name or a DN.
There are quite a few fields but you can leave some blank
For some fields there will be a default value ,
If you enter ’.’, the field will be left blank.
-----
Country Name (2 letter code) [DE]: DE
State or Province Name (full name) [ Niedersachsen ]: Bundesland
Locality Name (eg , city) [Hildesheim ]: Stadt
Organization Name (eg , company) [Greenbone Networks Customer ]: Firma
Organizational Unit Name (eg , section) [ Vulnerability Management Team ]: Abteilung
IP -address of the GSM , or it ’s FQDN (HOSTNAME.DOMAINNAME) []: 192.168.155.180
Email Address of the GSM Administrator []: [email protected]

To read and display the certificate use the sslcatself.

5.4.2. Certificate by an external certificate authority

To import a certificate by an external certificate authority switch to the command line. Exit the GSM-Admin-Menu to get to the GSM prompt: gsm:.

Note

Certificate data is transferred via copy/paste so it makes sense to perform this task via a SSH connection. SSH access possibly must be activated (see section SSH Access).

Now disable the support of self-signed certificates by entering set selfsigssl disabled. This disables the variable selfsigssl. Confirm the change via commit.

The next step depends on whether you require a certificate signing request (CSR) which will be subsequently signed by a certificate authority or whether you already have a key and signed certificate you would like to use for this GSM.

A new certificate signing request can be created with sslreq. Please enter your data correctly. Especially of importance is the common-name (CN). It must correspond to the browser entry later. If you access the GSM via IP address enter the IP address here. When using the server name enter the name here.

gsm: set selfsigssl disabled
gsm *: commit
gsm: sslreq
Generating a 2048 bit RSA private key
.....................................................................+++
..+++
unable to write ’random state ’
writing new private key to ’tckey.pem ’
-----
You are about to be asked to enter information that will be incorporated
into your certificate request.
What you are about to enter is what is called a Distinguished Name or a DN.
There are quite a few fields but you can leave some blank
For some fields there will be a default value ,
If you enter ’.’, the field will be left blank.
-----
Country Name (2 letter code) [DE]: DE
State or Province Name (full name) [ Niedersachsen ]: Bundesland
Locality Name (eg , city) [Hildesheim ]: Stadt
Organization Name (eg , company) [Greenbone Networks Customer ]: Firma
Organizational Unit Name (eg , section) [ Vulnerability Management Team ]: Abteilung
IP -address of the GSM , or it ’s FQDN (HOSTNAME.DOMAINNAME) []: 192.168.155.180
Email Address of the GSM Administrator []: [email protected]

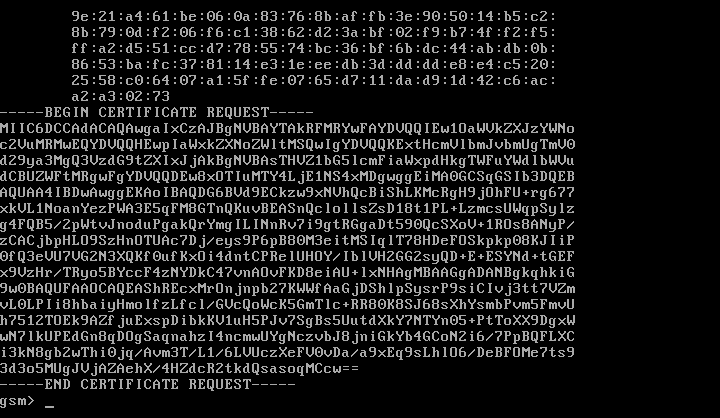
The certificate signing request will be displayed in the terminal directly after. The command sslcatkey can be used in case the entries need to be re-entered.

_images/gsm-sslreq2.png

The certificate signing request is in the paragraph between BEGIN CERTIFICATE REQUEST and END CERTIFICATE REQUEST

The certificate signing request displayed now needs to be sent to a certificate authority with the request for signature.

After the signed certificate is received back from the certificate authority it must be transferred back again to the GSM in PEM format (Base64). The command ssldownload is used to transfer the certificate with copy/paste and the entry is completed by entering Ctrl-D on an empty line.

If you already have a key and a signed certificate you would like to use for this GSM, the command certdownload must be used instead to transfer the key and certificate to the GSM. The command expects the key and certificate in PEM format (Base64) and the entry is completed by entering Ctrl-D on an empty line.

Note

When importing the certificates there could be warnings. The Greenbone OS itself checks for validity of the certificate. A list of certificate authorities that is stored within the Greenbone OS is used for this. If the issuing authority is not known to the Greenbone OS a warning is displayed during the import of the certificate. They can be ignored as the GSM does not have to verify the validity of the certificate later anymore. It is important that the browsers that are used to connect to the GSM trust the certificate authority.

5.5. Appliance Management

This section covers the CLI commands for the management of the appliance. This includes reboot and shutdown, the setting up of the network configuration and the configuration of mail servers and logging servers.

5.5.1. Reboot and shutdown of the appliance

To shut down the appliance enter the shutdown command in the CLI. Depending on the model in use it can happen that the appliance does not shut itself off automatically. However, as soon as the shutdown is performed the appliance can be powered off.

gsm: shutdown
Are you sure you want to shutdown the system?
y/n?
y

Possible running scan processes can be restarted after reboot.

To reboot the appliance enter the reboot command in the CLI.

gsm: reboot
Are you sure you want to reboot the system?
y/n? y

A reboot or shutdown will be declined if essential administrative changes are running on the appliance such as an upgrade.

5.5.2. Network configuration

The network configuration in the CLI is preformed via the setting of variables. A commit is always required after. The following parameters can be set.

5.5.2.1. hostname

The name of the appliance appears in the scan reports and in the Syslog messages on a central logging server. It makes sense to choose a descriptive name. The following characters can be used:

  • lower case and upper case letters a-z A-Z
  • numbers 0-9
  • dash -
gsm: get hostname
s hostname gsm
gsm: set hostname gsm-frankfurt
gsm *: commit
gsm: get hostname
s hostname gsm -frankfurt

5.5.2.2. domainname

The domain name like the hostname appears in the scan reports and the Syslog messages on a central logging server. Furthermore the configured domain will be used automatically with emails as the sending domain. Additionally the domain name is appended to not fully qualified hostname as such suffix.

The domain name can use the same characters as the hostname.

gsm: get domainname
s domainname greenbone.net
gsm: set domainname musterfirma.de
gsm *: commit
gsm: get domainname
s domainname musterfirma.de

5.5.2.3. DNS server

The GSM appliance supports up to three DNS servers. At least one DNS server is required. Additional servers will only be used at an outage of the first server.

Three variables are available:

  • dns1
  • dns2
  • dns3

To delete a DNS server use the unset command.

gsm: get dns2
s dns2 8.8.4.4
gsm: unset dns2
gsm *: commit
gsm: get dns2
u dns2

5.5.2.4. IP Addresses

The GSM appliances come with up to 24 network adapters. Each of these adapters can be configured with an IPv4 and an IPv6 address. When using IPv4 addresses the keyword dhcp can be entered. An IP address will be assigned via DHCP. The variables are.

  • address_ethX_ipv4
  • address_ethX_ipv6

For X any number between 0 and 23 can be entered. This depends on the hardware in use.

gsm: get address_eth0_ipv4
s address_eth0_ipv4 dhcp
gsm: set address_eth0_ipv4 192.168.155.108/24
gsm *: commit
gsm: get address_eth0_ipv6
u address_eth0_ipv6
gsm: set address_eth0_ipv6 2001:db8:0:1::1/64
gsm *: commit
gsm:

After configuring the IP addresses a reboot is required so that the addresses are in actual use.

To delete an IP address use the command unset. When deleting and IPv4 address it only deactivates this address. The IPv6 address is still reachable.

Tip

Basically the IPv6-link-local-address is always active on every network adapter as well. If IPv6 should be disabled the ipv6support variable is used. It deactivates IPv6 support for the entire appliance. The link-local-addresses will disabled as well.

5.5.2.5. Default Gateway

To configure the default gateway use the variable default_route_ipv4. When using DHCP to assign IP addresses the default route will also be set via DHCP unless with the variable default_route_ipv4 a router is set explicitly.

gsm: get default_route_ipv4
u default_route_ipv4
gsm: set default_route_ipv4 192.168.155.1
gsm *: commit
gsm:

Only the IPv4 default gateway can be configured via the CLI. Complex routing settings must be done via the expert network configuration (see section Expert Network Configuration).

5.5.2.6. Network Time Protocol

To synchronize the appliance with central time servers the GSM appliance supports the NTP-Protocol. Two NTP servers the appliance will use for time synchronization can be configured. The appliance will chose the most suitable server. During an outage of a server the other server will be used automatically.

The variables ntp_server1 and ntp_server2 are available. Both variables require an IP address as an entry. The entry of a DNS name is not allowed.

gsm: set ntp_server1 192.53.103.104
gsm *: commit

To test the use and functionality of the protocol use the ntpq command.

gsm: ntpq
remote refid st t when poll reach delay offset jitter
==============================================================================
*ptbtime1.ptb.de .PTB. 1 u 245 1024 377 14.131 -0.432 0.495
+ptbtime2.ptb.de .PTB. 1 u 1012 1024 377 13.544 0.015 0.354
   LOCAL (0) .LOCL. 10 l 53h 64 0 0.000 0.000 0.000

You can determine the configured NTP server, polling, reachability, time delay, offset and jitter. The asterisk (*) in the first column indicates which server the appliance currently synchronizes with.

5.5.2.7. Mail Server

If you want to send reports after completion of a scan automatically via email the appliance needs to be configured with a mail server. The appliance itself does not come with a mail server.

Confirm that the mail server that the mail server accepts emails sent form the appliance. The appliance does not store emails in case of delivery failure. A second delivery attempt at a later time will not be attempted. On the mail server possible spam protection such as grey listing must be deactivated for the appliance. Authentication using a username and password is also not supported by the appliance. The authentication must be done IP based!

To configure the mail server use the mailhub variable.

gsm: get mailhub
s mailhub mail.greenbone.net
gsm: set mailhub mx.musterfirma.de
gsm *: commit

5.5.2.8. Central Logging Server

The GSM appliance allows for the configuration of a central logging server for the collection of the logs. The GSM appliance uses the Syslog protocol. Central collection of the logs allows for central analysis, management and monitoring of logs. Additionally the logs are also stored locally.

Two logging servers can be configured. Both will be used. As transport layer both UDP (default) and TCP can be used. TCP ensures delivery of the logs even when packet loss occurs. If packet loss occurs during a transmission vie UDP the log messages will be lost.

Two variables can be configured:

  • syslog_server1
  • syslog_server2

The format is as follows:

[udp|tcp://]ip[:port]

Example:

gsm: set syslog_server1 tcp://192.168.0.5:2000
gsm *: commit

If no port is specified the default port 514 will be used. If the protocol is not specified UDP will be used.

5.5.2.9. SNMP

The GSM appliance supports SNMP. The SNMP support can both be used for sending of traps through alerts (see section Alerts) as well as the monitoring of vital parameters of the appliance.

The supported parameters are specified in a Management Information Base (MIB) file. The current MIB is available from the Greenbone tech [doc] portal.

The GSM appliance supports SNMP version 3 for read access and SNMPv1 for traps.

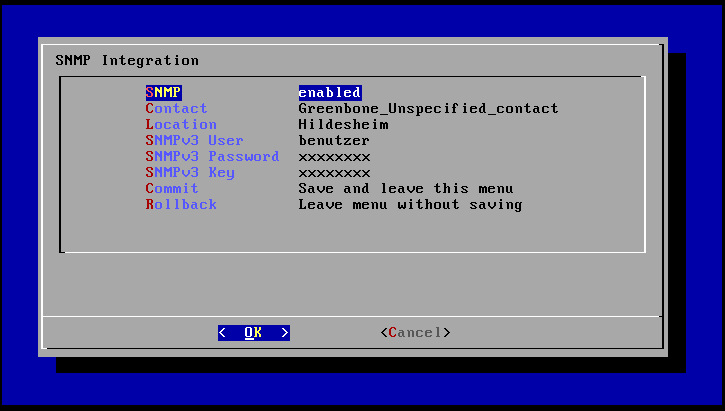
The simplest way to configure the SNMPv3 is via the GOS-Admin-Menu under section Remote and SNMP Configuration. There is it also explained that the GSM will transfer the SNMPv3 user password with SHA-1 and use AES as encryption.

Sending traps is configured in the GOS-Admin-Menu under Network and SNMP.

_images/snmpv3.png

SNMPv3 configuration

Alternatively the following variables allow for the configuration of the SNMP access:

  • snmp
  • snmp_key
  • snmp_password
  • snmp_user
  • snmp_location
  • snmp_contact
  • snmp_trap
  • snmp_trapcommunity
  • snmp_trapreceiver

For sending alerts as SNMP traps use the following parameters.

gsm: set snmp_trap enabled
gsm *: set snmp_trapcommunity public
gsm *: commit
gsm: get snmp_trapreceiver
s snmp_trapreceiver 192.168.0.1

To configure read access for SNMP via CLI, use the respective variables snmp_key, snmp_password, and snmp_user.

Afterwards test read access of the SNMP service under Linux/Unix with snmpwalk:

$ snmpwalk -v 3 -l authPriv -u user -a sha -A password -x aes -X key 192.168.155.180
iso .3.6.1.2.1.1.1.0 = STRING: "Greenbone Security Manager"
iso .3.6.1.2.1.1.5.0 = STRING: "gsm"
...

The following information may be gathered:

  • Uptime
  • Network interfaces
  • Memory
  • Harddisk
  • Load
  • CPU

5.5.3. Expert Network Configuration

The GOS-Admin-Menu and the variables currently only allow for simple network configuration. The configuration of VLANs or multiple static routes is not possible.

To make respective changes in the configuration an expert mode exists. It requires the input of all settings via script. The creation, editing and activation of this script is covered in this section.

Once the expert mode is used IP addresses can no longer be changed via the GOS-Admin-Menu or variables!

To use the expert mode it must be activated first. Execute the following command in the CLI (see section Command line). Afterwards an reboot is required.

gsm: set netmode expert
gsm *: commit
gsm: reboot
Are you sure you want to reboot the system?
y/n? y

To revert back to normal mode at the later date use the command set netmode default.

Note that you need to execute commit to enable the set netmod command. After editing the file expertnet.sh a reboot is required to commit the settings.

Currently the command set netmode expert puts the appliance in a state whereby the user has to enter the entire configuration manually. To save them permanently the commands must be entered in within the expertnet.sh file and made executable (see below).

To edit the file change into shell mode. Enter the command shell:

gsm: shell
ATTENTION:
The shell command should only be used by expert users.
To leave the expert mode , type ’exit ’.
admin@gsm :~$ ls -l expertnet.sh
-rwxr --r-- 1 admin admin 131 May 4 2012 expertnet.sh
admin@gsm :~$ _

Since you are in the Greenbone shell the files in the home directory can be displayed with the command ls. The file expertnet.sh is located here. The file can be customized with an editor. vi, vim or nano can be used for editing. If you are not familiar with the editor vi or vim please use nano as the editor. It displays help at the bottom of the window. The keyboard combinations listed all are executed with the Control key: Ctrl-O saves the file.

If the file has not been edited its content looks as follows:

# This script can be used to set custom network parameters like
# VLANS , source based routing and firewall restrictions on the GSM

Editing on a different system and copying the file afterwards with secure copy is not possible. The GSM does not support secure copying via SSH.

The first change in the file is to insert a first line so that the file looks as follows:

#!/bin/sh
# This script can be used to set custom network parameters like
# VLANS , source based routing and firewall restrictions on the GSM

The first line directs the Greenbone OS to interpret the file using the /bin/sh shell. Without this line the file will not be executed later. In order for the file to be able to be executed the file rights need to be configured directly. Enter the following command in the command line:

admin@gsm :~$ chmod 755 expertnet.sh

All network configurations require the command ip. The alternate commands ifconfig, route and vconfig should not be used. Their support can be limited in the future.

To avoid problems with the paths on the appliance the command ip should always be executed with the entire path: /bin/ip

5.5.3.1. Configuration of IP addresses

Configuration of IP addresses can easily be achieved with the ip command. The configuration is done in three steps:

  1. Activation of the network adapter
  2. Configuration of the first IP address
  3. Configuration of optional additional IP addresses on the same network adapter

After activating the network adapter a delay of 10 second should be included to allow enough time for the network adapter to auto-negotiate. For consistency in the example this is also done for the loopback adapter.

/bin/ip link set lo up
sleep 10s
/bin/ip addr add 127.0.0.1/8 dev lo
/bin/ip link set eth0 up
sleep 10s
/bin/ip addr add 192.168.81.10/24 dev eth0
/bin/ip -f inet6 addr add 2607: f0d0 :2001::10/114 dev eth0

The first three lines activate and configure the loopback interface. This network adapter should not be forgotten in the script. Without the loopback interface the GSM will not work.

The command ip can activate multiple IP addresses on the same network adapter. ip addr add allows to add additional IP addresses. The do not replace the existing IP address. To delete an IP address ip addr del is required explicitly.

5.5.3.2. VLAN support

If switches are configured so that multiple VLANs with Tags (VLAN IDs [1] combined with an IEEE 802.1q [2] - trunk [3]) are transferred to the GSM they have to be disassembled on the GSM respectively. Sub-interfaces need to be configured on the physical network adapter. These sub-interfaces are also created with the ip command.

/bin/ip link set eth1 up
sleep 10
/bin/ip link add link eth1 name eth1 .91 type vlan id 91
/bin/ip link set eth1 .91 up
/bin/ip addr add 192.168.81.26/24 dev eth1 .91

The third command creates a sub-interface called eth1.91 on network adapter eth1. The name can be freely chosen. For example, names like ServerNet or MailDMZ can be used. The flag type vlan instructs the command so that a tagged VLAN is disassembled respectively. id 91 selects the actual VLAN ID.

The additional lines activate the sub-interface and configure the IP address. Multiple IPv4 and IPv6 addresses can be configured as well.

In case a VLAN trunk is a native VLAN the physical network adapter can be configured with an IP address. If no native VLAN was configured an IP address for the physical network adapter is not required. However, remember to activate the physical network adapter if this is the case!

5.5.3.3. Static Routing

Most networks only have one gateway. This gateway often is referred to as default gateway. Sometimes historically grown networks use different routers for different destinations. If these routers do not communicate data through dynamic routing protocols client systems often require static routes for those destinations. The expert configuration allows for configuration of unlimited static routes.

When using expert configuration the default gateway also needs to be configured in the expertnet.sh file. If IPv4 and IPv6 is used for each protocol a separate default gateway needs to be configured. If auto-configuration is used with IPv6 the default gateway can be omitted.

To set a route also use the ip command with the route argument:

/bin/ip route add default via 192.168.81.1
/bin/ip -f inet6 route add default via 2607: f0d0 :2001::1

The keyword default is dissolved into 0.0.0.0/0 or ::/0 respectively.

To add additional routes the following syntax can be used:

/bin/ip route add 192.168.0.0/24 via 192.168.81.5

A route for network 192.168.0.0/24 is set using the router 192.168.81.5.

5.6. Remote Access

To access the GSM appliance remotely basically four options are available

HTTPS
This is the usual option for the creation, execution and analysis of the vulnerability scans. This option is activated by default and cannot be deactivated. Configuration is only possible for the timeout of the automatic logout when the HTTPS session is inactive.
SSH
This option allows the possibility to access the command line, CLI and GOS-Admin-Menu of the GSM appliance. This access is deactivated by default and must be activated first. This can be done via serial console for example.
OMP (OpenVAS Management Protocol)
The OpenVAS Management Protocol (OMP) allows for the communication with other Greenbone products (i.e. an additional GSM). It can also be used for the communication of in-house software with the appliance (see section OpenVAS Management Protocol).
SNMP
Read access of the GSM is possible via SNMPv3 (see section SNMP)

5.6.1. HTTPS Timeout

The timeout value can be set in the GOS-Admin-Menu (Remote/HTTPS Timeout) as well as the command line. In the CLI use the variable webtimeout:

gsm: get webtimeout
s webtimeout 15
gsm: set webtimeout 1
gsm *: commit
gsm: get webtimeout
s webtimeout 1

The value of the timeout can be between 1 and 1440 minutes (1 day).

5.6.2. SSH Access

SSH access can also be configured in the GOS-Admin-Menu (Remote/SSH) or the CLI. In the CLI use the variable ssh. It can have the value enabled or disabled Additionally the variable can be deleted:

gsm: get ssh
s ssh enabled
gsm: set ssh disabled
gsm *: commit
gsm: get ssh
s ssh disabled

In the GOS-Admin-Menu there is the additional possibility to display the fingerprint of the public key (host key)of the appliance.

5.6.3. OpenVAS Management Protocol (OMP)

The OpenVAS Management Protocol can be activated via the GOS-Admin-Menu (Remote/OMP) or the CLI. In the CLI use the variable public_omp:

gsm: get public_omp
s public_omp disabled
gsm: set public_omp enabled
gsm *: commit
gsm: get public_omp
s public_omp enabled

5.7. Upgrade and Feeds

On the command line system upgrades can be performed and feed synchronization can be configured. Commands and variables are available for these tasks.

5.7.1. Upgrading the appliance

The command systemupgrade executes an upgrade. The status can be displayed with the command systemupgradestatus or show schedule.

Please take note of the Upgrade section.

5.7.2. Feed Synchronization

To configure the synchronization feeds several variables are available: feedsync, syncport and synctime. Alternatively the configuration is possible via the GOS-Admin-Menu under Feed.

_images/feed.png

Feed configuration

feedsync
The automatic synchronization can be enabled or disabled.
syncport
The port for the feed synchronization can be configured. By default the port is 24/tcp. Alternatively port 443/tcp can be used. Other ports cannot be used.
synctime
The daily time for synchronization of the feed can be configured. This should be outside of regular business hours. The time of 10:00am-12:59am is the maintenance window of the feed and as such cannot be used. Times inside this window are rejected. These times are always UTC.
gsm: get synctime
s synctime 06:25
gsm: set synctime 11:30
syntax error in value
gsm: set synctime 13:30
gsm *: commit
gsm: get synctime
s synctime 13:30

Alternatively the feed can be started from the command line. Execute the command feedstartsync. The commands feedsyncstatus and feedversion can be used to monitor the current status.

5.7.3. Proxy configuration

Depending on the network environment, it might be necessary to use proxy for the feed and software updates. For both, the feed and software updates, the proxy is configured with this variable:

  • proxy_feed

It expects a http proxy in the syntax of http://proxy_ip[:port].

gsm: get proxy_feed
u proxy_feed
gsm: set proxy_feed http://1.2.3.4:3128
gsm *: commit
gsm: get proxy_feed
s proxy_feed http ://1.2.3.4:3128

Should the proxy require authentication it can be configured via the proxy_credentials variable. This variable expects a username and password separated by a colon:

gsm: get proxy_credentials
u proxy_credentials
gsm: set proxy_credentials user:password
gsm *: commit
gsm: get proxy_credentials
s proxy_credentials user:password

Note

In Windows environments, the credential is expressed as domain\user:password.

5.8. Database and Scanner Management

The Advanced options in the GOS-Admin-Menu provide access to the database management functions and the configuration of additional vulnerability scanners.

5.8.1. Database Management

The GSM uses the SQlite-Database for the internal storage of NVTs, scan results, configurations, etc. Using Advanced/Database statistics the admin can request database statistics. These statistics are logged and can be viewed using Advanced/Database statistics log.

Additionally the database may be optimized using the two commands VACUUM and ANALYZE. Both commands may take several hours to complete. The ANALYZE command gathers statistics about tables and indices. The collected information is stored in internal tables where the query optimizer can use it make better query planning choices. The VACUUM command rebuilds the whole database. This may speed up very fragmented databases.

The VACCUM command displays the results of the optimization after the successful termination:

Sep 28 14:56:22 gsm md main[18958]: Optimized: vacuum. Database file size reduced by 85 MiB (55.9%)

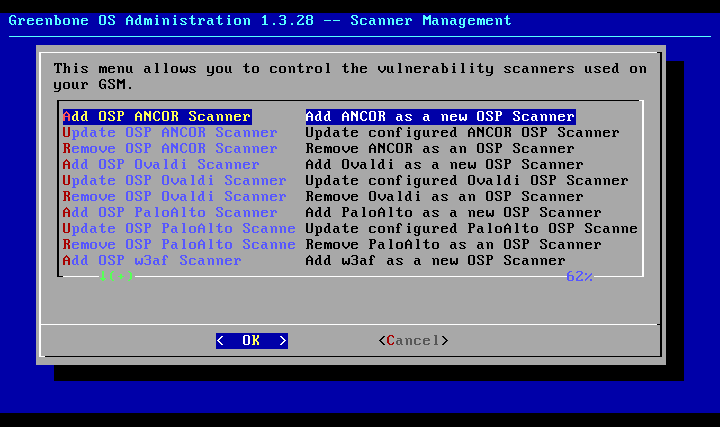
5.8.2. Additional Vulnerability Scanners

The Advanced/Scanner Management option currently (3.1.19) supports the listing of the currently supported vulnerability scanners. Future version will support the configuration of the following vulnerability Scanners:

  • ANCOR
  • Ovaldi
  • Palo Alto
  • w3af
  • Fortinet
_images/osp-scanner.png

Configuration of additional OSP scanners

5.9. Monitoring and Debugging

Different tools for monitoring and debugging of the GSM appliance are available. The GSM-CLI offers access to some UNIX commands and files that can be useful when debugging.

5.9.1. Monitoring and debugging of network functions

If the GSM is not reachable or cannot be reached by all client systems the network configuration must be checked. This is also the case should the GSM not be able to reach all of the target systems when performing a scan. Options of the GOS-Admin-Menu as well as some command line tools can be used to troubleshoot.

The following commands display the current network configuration:

getip

This CLI specific command displays the current network configuration. Internally it uses the UNIX command ip addr show. By adding a specific network adapter the output can be limited:

gsm: getip dev eth0
2: eth0: <BROADCAST ,MULTICAST ,UP ,LOWER_UP > mtu 1500  qdisc pfifo_fast state UP qlen 1000
link/ether 52:54:00:98:36:5 f brd ff:ff:ff:ff:ff:ff
inet 192.168.155.108/24 brd 192.168.155.255 scope global eth0
inet6 fe80 :: dead:beef /64 scope link
valid_lft forever preferred_lft forever
inet6 fe80 ::5054: ff:fe98 :365f/64 scope link
valid_lft forever preferred_lft forever
getroute

This client specific command displays the current IPv4 routing table:

gsm: getroute
192.168.155.0/24 dev eth0 proto kernel scope link src&
192.168.155.108
default via 192.168.155.1 dev eth0
ntpq

This command displays the configured NTP servers and their communication status:

gsm: ntpq
remote refid st t when poll reach delay offset jitter
===========================================================================
+ptbtime1.ptb.de .PTB. 1 u 602 1024 377 14.477 -0.319 9.907
*ptbtime2.ptb.de .PTB. 1 u 44 1024 177 13.580 0.143 0.150
LOCAL (0) .LOCL. 10 l 11d 64 0 0.000 0.000 0.000

The line with the asterisk (*) is the current preferred NTP server. The line with the plus (+) is the NTP backup server.

ip

The command ip is also available in the CLI for the readable network properties. Different information can be displayed.

Display of the network adapters

To display a list of network adapters use the command ip link show. This command displays the network adapters and MAC addresses:

gsm: ip link show
1: lo: <LOOPBACK ,UP ,LOWER_UP > mtu 16436 qdisc noqueue state UNKNOWN mode DEFAULT
         link/loopback 00:00:00:00:00:00 brd 00:00:00:00:00:00
2: eth0: <BROADCAST ,MULTICAST ,UP ,LOWER_UP > mtu 1500 qdisc pfifo_fast state UP mode DEFAULT qlen 1000
         link/ether 52:54:00:98:36:5 f brd ff:ff:ff:ff:ff:ff
Display of the IP addresses

To display the list of IP addresses use the command ip address show. The output reflects the command getip.

gsm: ip link show
1: lo: <LOOPBACK ,UP ,LOWER_UP > mtu 16436 qdisc noqueue state UNKNOWN
     link/loopback 00:00:00:00:00:00 brd 00:00:00:00:00:00
     inet 127.0.0.1/8 scope host lo
     inet6 ::1/128 scope host
     valid_lft forever preferred_lft forever
2: eth0: <BROADCAST ,MULTICAST ,UP ,LOWER_UP > mtu 1500 qdisc pfifo_fast state UP qlen 1000
     link/ether 52:54:00:98:36:5 f brd ff:ff:ff:ff:ff:ff
     inet 192.168.155.180/24 brd 192.168.155.255 scope global eth0
     inet6 fe80 ::5054: ff:fe98 :365f/64 scope link
     valid_lft forever preferred_lft forever
Display of the routes

To display the routing table use the command ip route show. The output reflects the command getroute. To display the IPv6 routes enter ip -6 route show.

gsm: ip -6 route show
2001:4 dd0:ff00:d58 ::1 dev eth0 metric 0 cache
2001:4 dd0:ff00:d58 ::/64 dev eth0 proto kernel metric 256
fe80 ::/64 dev eth0 proto kernel metric 256
default via 2001:4 dd0:ff00:d58 ::1 dev eth0 metric 1024
ARP Cache and Neighbor Cache

The ARP cache contains the MAC addresses of the systems the GSM communicated with directly in the LAN recently. The information can be useful when debugging if a system that is in the same LAN as the GSM is not reachable. The neighbor cache does the same for IPv6 addresses the ARP cache does for IPv4 addresses. On the GSM they are not differentiated and are displayed using the same command. By adding -4 or -6 the output can be limited:

gsm: ip neigh show
fe80 ::216:47 ff:fe7d :11c3 dev eth0 lladdr 00:16:47:7d:11: c3 router STALE
192.168.222.1 dev eth0 lladdr 00:16:47:7d:11: c3 REACHABLE
Monitoring of the IP stack

With the command ip the changes in the routing table, the ARP cache and neighbor cache and the network adapters can be monitored. Use the command ip monitor all. Alternatively only individual sub systems (link, address, route, mroute, neigh., netconf) can be monitored. To cancel monitoring press Ctrl-C.

gsm: ip monitor all
[ROUTE]ff02 ::1 dev eth0 metric 0
               cache
[ROUTE ]2 a01 :198:5 a1 :201: d6ae :52ff:fe96:fe9b via 2001:4 dd0:ff00:d58 ::1 dev eth0 metric 0
               cache
[ROUTE ]2001:4 dd0:ff00:d58 ::1 dev eth0 metric 0
               cache
[ROUTE]Deleted 2a01 :198:5 a1 :201: d6ae :52ff:fe96:fe9b via 2001:4 dd0:ff00:d58::1 dev eth0 metric 0
               cache
[ROUTE ]2 a01 :198:5 a1 :255:5054: ff:fec3 :7266 via 2001:4 dd0:ff00:d58 ::1 dev eth0 metric 0
               cache
[LINK ]4: eth1: <NO -CARRIER ,BROADCAST ,MULTICAST ,UP >
               link/ether
Link status of a network adapter

To check the link status of a network adapter the GSM offers the command ethtool. This command expects additionally the name of the network adapter and can then display the current configuration and status. Interesting for debugging are the negotiated mode and speed and the current link status.

gsm: ethtool eth0
Settings for eth0:
              Supported ports: [ TP MII ]
              Supported link modes: 10 baseT/Half 10 baseT/Full
                                                  100 baseT/Half 100 baseT/Full
              Supported pause frame use: No
              Supports auto - negotiation: Yes
              Advertised link modes: 10 baseT/Half 10 baseT/Full
                                                   100 baseT/Half 100 baseT/Full
              Advertised pause frame use: Symmetric
              Advertised auto - negotiation: Yes
              Link partner advertised link modes: 10 baseT/Half 10 baseT/Full
                                                  100 baseT/Half 100 baseT/Full
              Link partner advertised pause frame use: Symmetric
              Link partner advertised auto - negotiation: No
              Speed: 100Mb/s
              Duplex: Full
              Port: MII
              PHYAD: 32
              Transceiver : internal
              Auto - negotiation: on
              Supports Wake -on: pumbg
              Wake -on: d
              Current message level: 0x00000007 (7)
                                     drv probe link
              Link detected: yes

Footnotes

[1]The 802.1q protocol with a 12bit VID field supports up to 4096 VLANs. Individual VLAN IDs are reserved however.
[2]Today the IEEE 802.1q protocol is the most common VLAN protocol. It has replaced proprietary protocols of individual manufacturers (such as Cisco’s ISL).
[3]Multiple VLANs are marked with tags in a single connection transfer (single interconnect).