Compliance in the IT security world is the primary approach for organizations to keep their information and assets protected and secure.
With cybercrime on the rise, governments see the need to protect their citizens and pass rules and regulations on privacy and IT security in the hopes to protect our identities and assets. Information Security bodies such as the Information Systems Audit and Control Association (ISACA) or the International Organization for Standardization (ISO) publish IT security standards, frameworks and guidelines such as the Control Objectives for Information and Related Technology (COBIT) or the ISO 27000 series which cover information security standards. The German Federal Office for Security in Information Technology (BSI), for example, publishes the IT Baseline Protection Catalogs, or IT-Grundschutz-Kataloge. This is a collection of documents that provide useful information for detecting weaknesses and combating attacks on IT environments. To better protect against credit card data theft the Payment Card Industry Security Standards Council publishes the payment Card Industry Data Security Standard (PCI DSS).
All these privacy laws, standards, frameworks, rules and regulations are to force and assist organizations to implement the appropriate safeguards to protect themselves and their information assets from attacks. In order to implement these laws, standards, frameworks, rules and regulations within an organization the organization will have to create an IT security framework consisting of policies, standards, baselines, guidelines and detailed procedures.
Security scanners such as the Greenbone Security Manager (GSM) can assist IT security professionals to check their IT security safeguards against the aforementioned regulations, standards and frameworks for compliance.
In the following sections we will describe how the GSM can be utilized to perform certain compliance checks.
When performing policy scans there are several groups each with four NVTs that can be configured accordingly. In the policy section of the NVTs database at least two of these four policy NVTs are required to run a policy scan. The four NVT types are:
This NVT performs the actual scan/function of the actual policy scan.
This NVT summarizes any items which match the checks performed by the base NVT.
This NVT summarizes any items which did not match the checks performed by the base NVT.
This NVT sumarizes any items where some error occurred when running the policy scan.
The base NVT must be selected for a policy check since it performs the actual tests. The other three plugins may be selected according to your needs. For example, if matching patterns are of no concern then only the violations plugin should be selected additionally.
File content checks belong to policy audits which don’t explicitly test for vulnerabilities but rather test the compliance of file contents (e.g. configuration files) regarding a given policy.
GSM provides a policy module to check if a file content is compliant with a given policy.
In general this is an authenticated check, i.e. the scan engine will have to log into the target system to perform the check.
The file content check can only be performed on systems supporting the command grep
. Normally this means Linux or Linux-like systems.
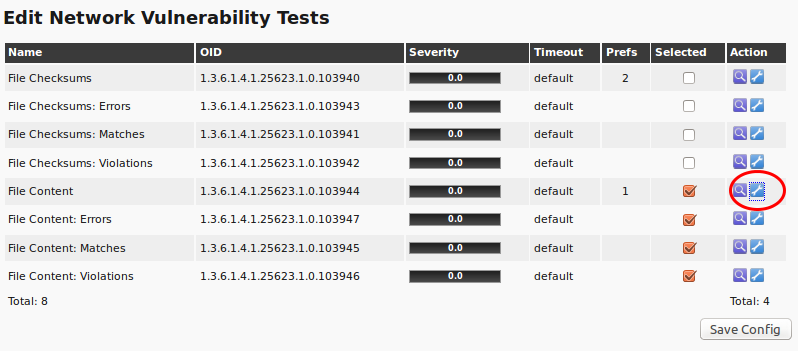
Four different NVT’s provide the file content check:
The NVT File Content must be selected for a file content check since it performs the actual tests. The other three plugins may be selected according to your needs. E.g. if just not matching patterns are of concern then only the plugin File Content: Violations should be additionally selected.
A reference file with the patterns to check and some other entries must be created. Following is an example:
filename|pattern|presence/absence
/tmp/filecontent_test|^paramter1=true.*$|presence
/tmp/filecontent_test|^paramter2=true.*$|presence
/tmp/filecontent_test|^paramter3=true.*$|absence
/tmp/filecontent_test_notthere|^paramter3=true.*$|absence
This file must contain the row filename|pattern|presence/absence.
The subsequent rows contain each a test entry.
Each row contains three elements which are separated by |
.
The first field contains the path and file name, the second field the pattern to check and the third field indicates if a pattern has to be present or absent.
The pattern to check, the second element in the row, is defined as a regular expression and will be checked in the file accordingly.
Select the file with Browse and select Upload file. The file upload will be started by clicking Save Config.
By clicking on the icon it is possible to download the already uploaded reference file. Select Replace existing file with: to upload a new reference file. The possibilities to change is only available if the scan configuration is not in use. This is done to ensure immutable audit-compliant scan results.
The file content tests report any result per default as log messages. By sectioning the reporting plugins in three different NVT’s it is now possible to create distinct overrides on the severity according your needs.
In the following picture the severities of File Content: Violations and File Content: Errors have been changed which will be shown in the reports accordingly.
Here (policy_file_content_example.xml) is an example scan configuration with all the relevant NVT’s for the file content test to download. The corresponding test file (filecontent_test) should be downloaded and extracted to the /tmp/ directory on the target system.
Now create an new task and start it for the target system where you saved test files. Please note that this has to be an authenticated scan with the appropriate SSH Credentials.
The overrides can be created either before or after a scan. The latter is easier since you can create the appropriate reference through a simple click in the result page.
The registry is a database in Windows that contains important information about system hardware, installed programs and settings, and profiles of each of the user accounts on your computer. Windows continually refers to the information in the registry [1].
Due to the nature of the Windows registry every program/application installed under windows will register itself in the Windows registry and as such has a registry entry. Even malware and other malicious code usually leaves traces within the windows registry. The registry now can be utilized to search for specific application or malware related information such as version levels and numbers. Also missing or changed registry settings could point to a potential security policy violation on an endpoint. GSM provides a policy auditing module to verify registry entries on target systems. This module checks for the presence or absence of registry settings as well as registry violations. Since the registry is unique to Windows systems this check can only be run on Windows systems. To access the registry on the target system the check needs to authenticate on the target system.
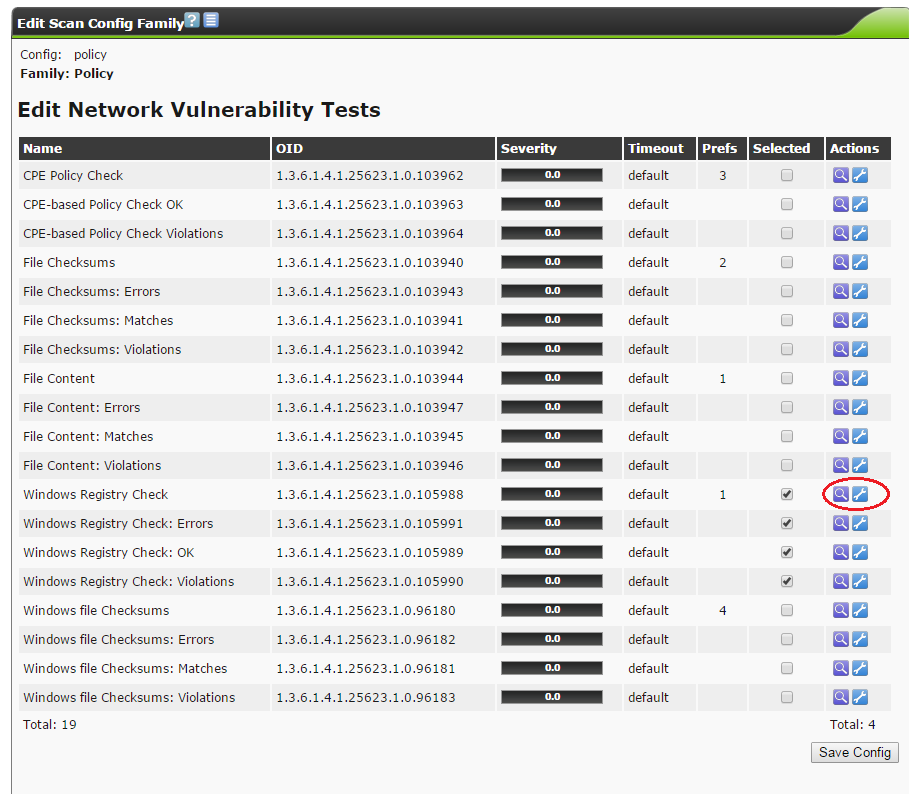
Four different NVT’s provide the registry content check:
The plugin Windows Registry Check must be selected for a registry check since it performs the actual tests. The other three plugins may be selected according to the needs. E.g. just entries with wrong regsitry content are of concern then only the plugin Windows Registry Check: Violations should be additionally selected.
A file with the reference registry content must be created: Following is an example:
Present|Hive|Key|Value|ValueType|ValueContent
TRUE|HKLM|SOFTWARE\Macromedia\FlashPlayer\SafeVersions|8.0|REG_DWORD|33
TRUE|HKLM|SOFTWARE\Microsoft\Internet Explorer
TRUE|HKLM|SOFTWARE\Microsoft\Internet Explorer|Version|REG_SZ|9.11.10240.16384
TRUE|HKLM|SOFTWARE\Microsoft\Windows\CurrentVersion\Policies\system|DWORD:
LocalAccountTokenFilterPolicyREG_DWORD|1
FALSE|HKLM|SOFTWARE\Virus
TRUE|HKLM|SOFTWARE\ShouldNotBeHere
This file must contain the row Present|Hive|Key|Value|ValueType|ValueContent.
The subsequent rows contain each a test entry.
Each row contains a regsitry entry to be checked.
Each row contains six elements which are separated by |
.
The first field sets if a registry entry should be present or not, the second the hive the registry entry is located in, the third the key, the fourth the value, the fifth the value type and the sixth the value content.
Select the file with Browse and select Upload file. The file upload will be started by clicking Save Config.
By clicking on the icon it is possible to download the already uploaded reference file. Select Replace existing file with: to upload a new reference file. The option to change is only available if the scan configuration is not in use. This is done to ensure immutable audit-compliant scan results.
The registry content tests report any result per default as log messages. By sectioning the reporting plugins in three different NVT’s it is now possible to create distinct overrides on the severity according your needs.
In the figure Severity overrides applied for Windows registry checks. the severities of Registry Content: Violations and Registry Content: Errors have been changed which will be shown in the reports accordingly.
Here (policy_registry_ScanConfig.xml) is an example scan configuration with all relevant NVT’s for the registry test to download. The corresponding testfiles (Registry_test.txt) should be downloaded to the /tmp/ directory on the target system.
Now create a new task and start it for the target system where you saved test files.
The overrides can be created either before or after a scan. The latter is easier since you can create the appropriate reference through a simple click in the result page.
File checksum checks belong to policy audits which don’t explicitly test for vulnerabilities but rather test the integrity of files. GSM provides a policy auditing module to verify file integrity on target systems. This module checks the file content by MD5 or SHA1 checksums. In general this is an authenticated check, i.e. the scan engine will have to log into the target system to perform the check. The file checksum check can only be performed on systems supporting checksums. Normally this means Linux or Linux-like systems. GSM provides however as well a module for checksum checks for Windows systems (see Windows).
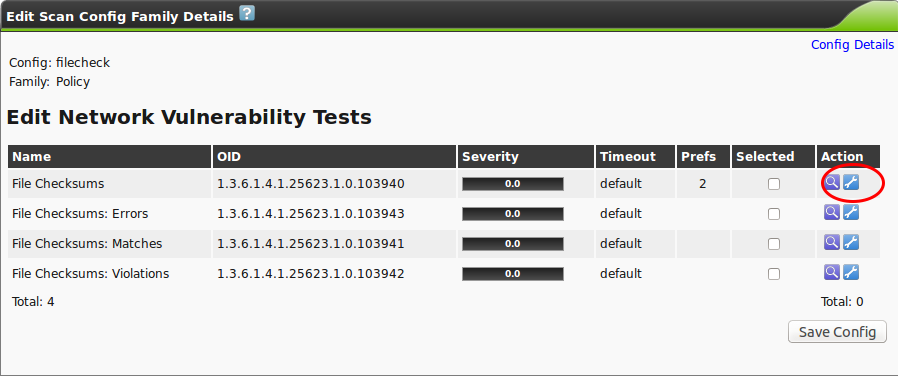
Four different NVT’s provide the file checksum check:
The plugin File Checksums must be selected for a file checksum check since it performs the actual tests. The other three plugins may be selected according to the needs. E.g. just files with wrong checksums are of concern then only the plugin File Checksums: Violations should be additionally selected.
A file with the reference checksums must be created. Following is an example:
Checksum|File|Checksumtype
6597ecf8208cf64b2b0eaa52d8169c07|/bin/login|md5
ed3ed98cb2efa9256817948cd27e5a4d9be2bdb8|/bin/bash|sha1
7c59061203b2b67f2b5c51e0d0d01c0d|/bin/pwd|md5
This file must first contain the row Checksum|File|Checksumtype.
The subsequent rows contain each a test entry.
Each row contain three elements which are separated by |
.
The first field contains the checksum in hex, the second field the path and file name and the third field the checksum type.
Currently MD5 and SHA1 checksums are supported.
Note
Checksums and checksum type must be lowercase.
Select the file with Browse and select Upload file. The file upload will be started by clicking Save Config.
By clicking on the icon it is possible to download the already uploaded reference file. Select Replace existing file with: to upload a new reference file. The possibilities to change is only available if the scan configuration is not in use. This is done to ensure immutable audit-compliant scan results.
The checksum tests report any result per default as log messages. By sectioning the reporting plugins in three different NVT’s it is now possible to create distinct overrides on the severity according your needs.
In the figure Severity overrides applied for file checksum checks. the severities of File Checksum: Violations and File Checksum: Errors have been changed which will be shown in the reports accordingly.
Here (policy_file_checksums_example.xml) is an example scan configuration with all relevant NVT’s for the checksum test to download.
The corresponding testfiles (policy_file_checksums_testfiles) should be downloaded and extracted to the /tmp/ directory on the target system.
This can be done e.g. by tar xvC /tmp/ testfiles_checksum_check.tar.gz
.
Now create a new task and start it for the target system where you saved test files. Please note that this has to be an authenticated scan with the appropriate SSH Credentials.
The overrides can be created either before or after a scan. The latter is easier since you can create the appropriate reference through a simple click in the result page.
GSM provides a similar module for Windows systems for checksum checks. Since Windows doesn’t provide an internal program for creating checksums it has to be installed one either manually or automatically by the NVT. GSM uses ReHash (http://rehash.sourceforge.net/) for creating checksums on Windows systems.
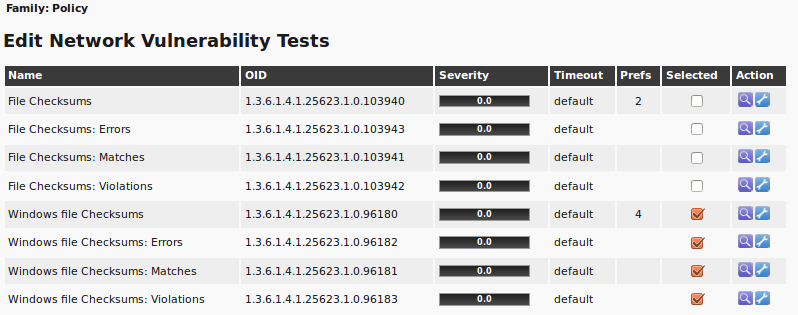
As for Linux systems the NVT’s for checksum checks are located under the Policy family.
Please note the two operating modes for these checks: Either a before manually on the target system installed tool will be used or the tool ReHash will automatically be installed and if requested as well deinstalled on the target system during the checking routine.
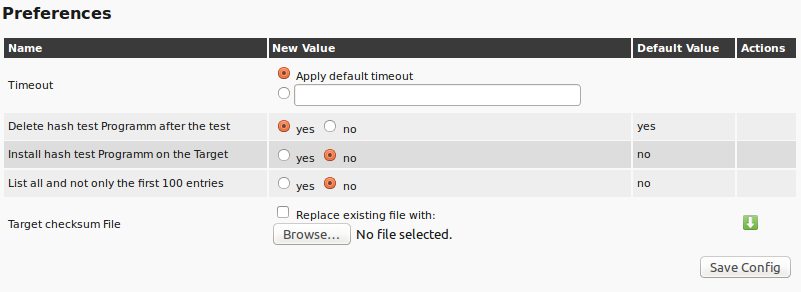
Through the preferences it can be set if the checksum program ReHash should be deleted after the check or not. The program can be left on the target system to e.g. speed up recurring tests and therefore don’t have to be transfered each time. It can further be set if the checksum program should be installed automatically on the target system. If not it has to be manually installed (under C:\Windows\system32 on 32-bit system) or C:\Windows\SysWOW64 (on 64-bit systems)) and has to be executable for the authenticated user. The file with the reference checksums must be uploaded in the preferences as it is done for the Linux checksum check. The file has the same structure as the one for Linux.
A sample configuration (sample_config-Windows_file_Policy.xml ) with all needed NVT’s for the Windows checksum check can be downloaded here. The corresponding example files (windows_checksums_testfiles.zip) can be downloaded and must be saved on the target system.
For Tasks and Overrides please proceed as described above.
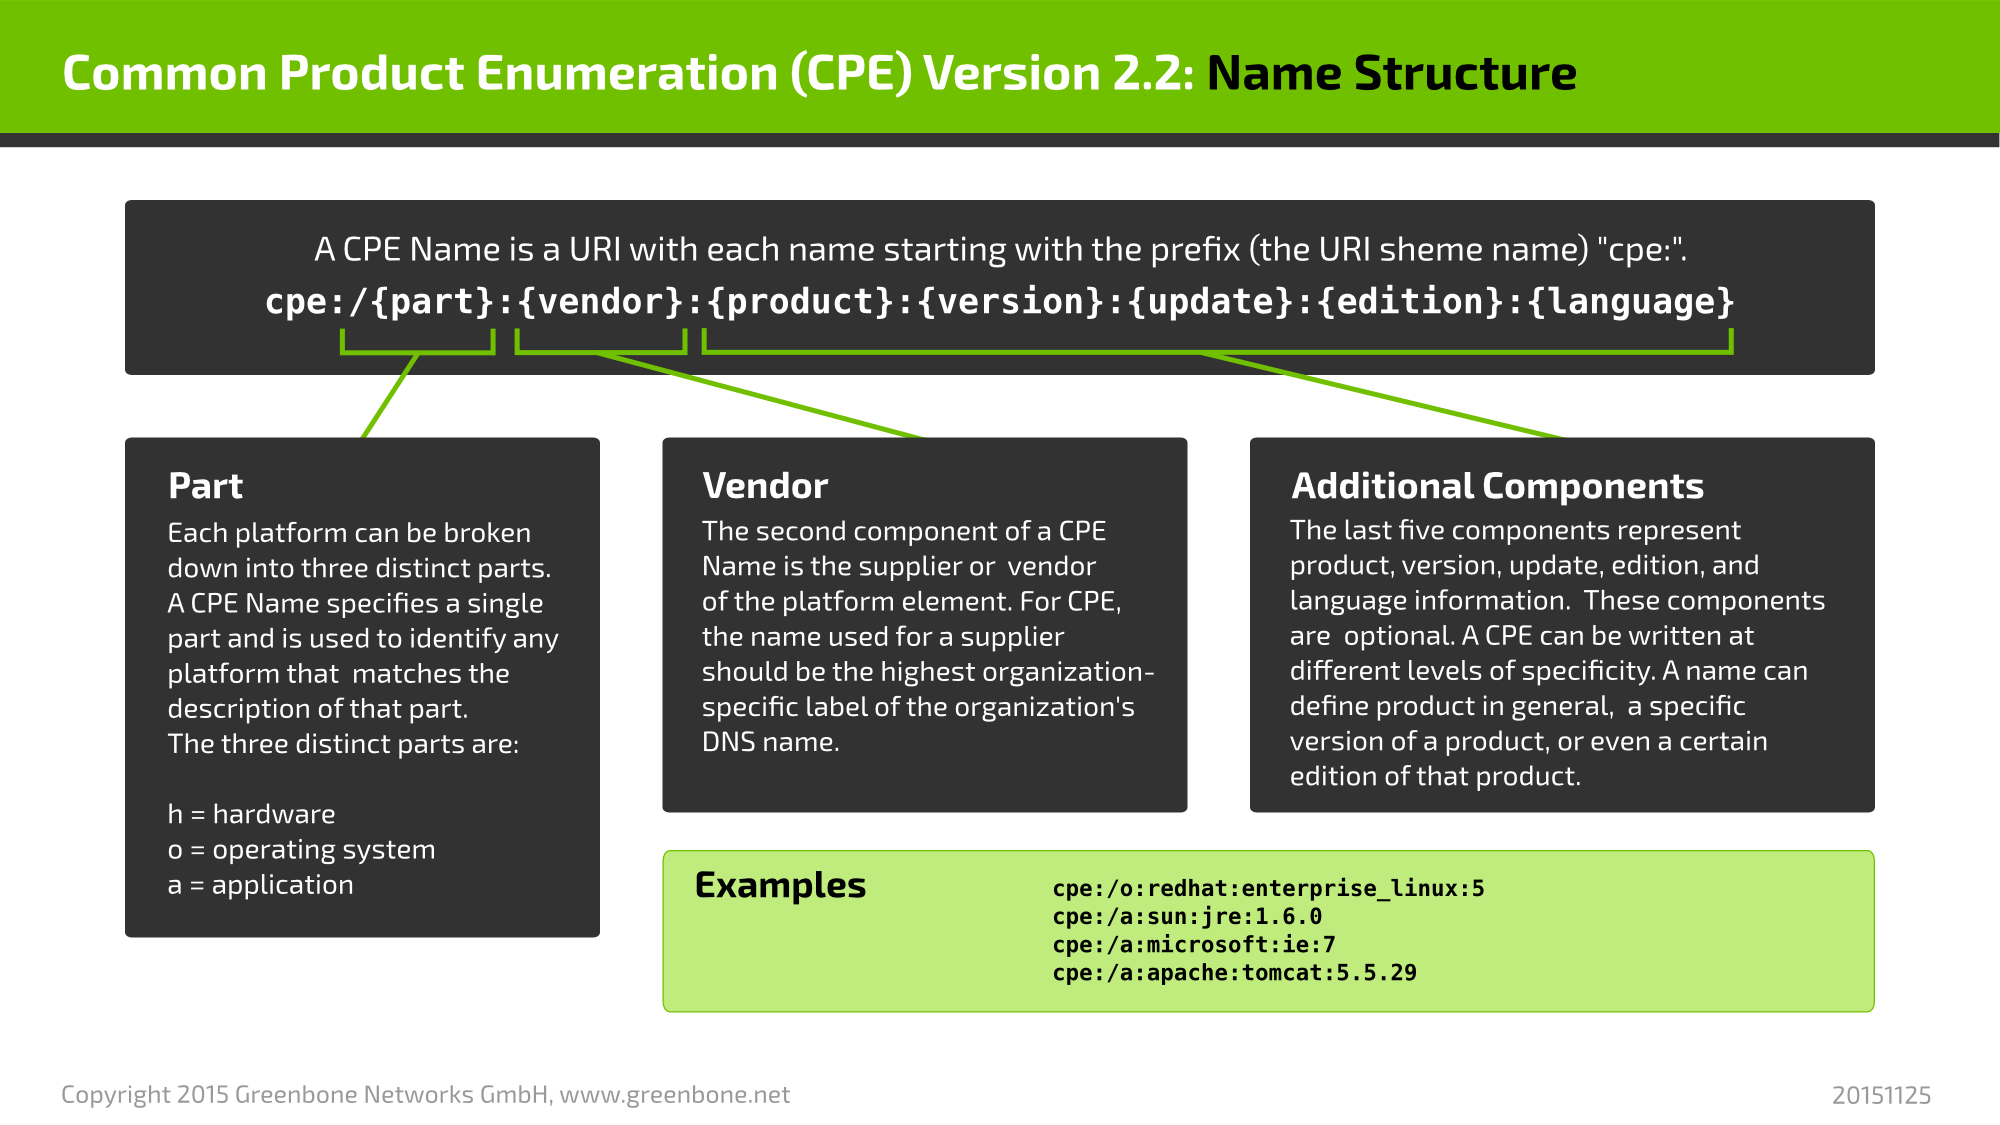
CPE stands for Common Product Enumeration. It is a structured naming scheme for information technology systems, platforms, and packages.
In other words: CPE provides a unique identifier for virtually any software product that is known for a vulnerability.
The CPE dictionary is maintained by U.S. National Institute for Standards and Technology (NIST) and was developed by the MITRE Corporation (MITRE) and NIST. Close to the end of 2014 MITRE announced that all intellectual property associated with CPE has been transferred to NIST. MITRE still maintains CVE (Common Vulnerability Enumeration) and other relevant security standards.
With any executed scan, CPEs for the identified products are stored. This happens independently of whether the product actually reveals a security problem or not. On this basis it is possible to describe simple security policies and the checks for compliance with these. With the Greenbone Security Manager it is possible to describe policies to check for the presence as well as for the absence of a product. These cases can be associated with a severity to appear in the scan report.
This example demonstrates how to check the compliance of a policy regarding specific products in a IT infrastructure and how the reporting with the corresponding severity can be done.
cpe:/a:microsoft:ie:9
cpe:/a:clamav:clamav:0.98
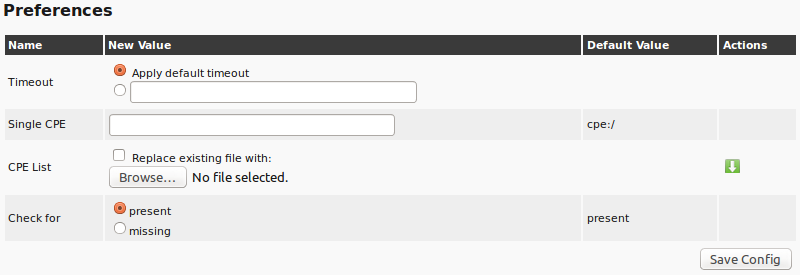
For this example we have a policy where the stated CPEs must be present to comply. This means we want to know especially if there are some installations which violate this policy (e.g. missing or not wrong products/versions).
Confirm your changes with Save Config.
Policy checks report the results in general as “Log” messages. If you want to change this you have to create an override. In this example violations of the policy should be reported with an elevated severity.
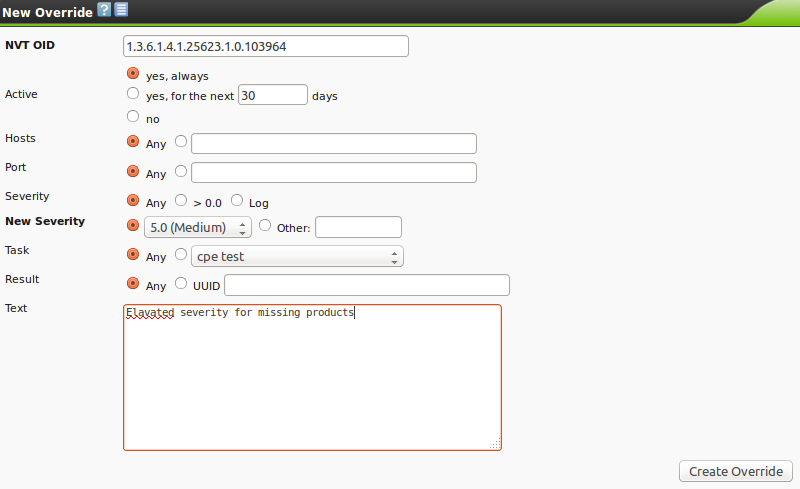
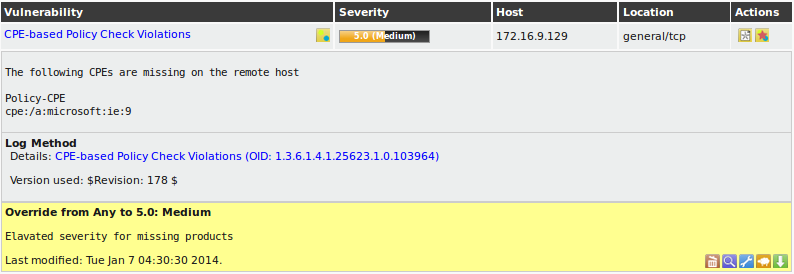
For this a new override has to be created through the Scan Management. The OID in this case will be “1.3.6.1.4.1.25623.1.0.103964” (for the NVT CPE-based Policy Check Violations) and a new severity of 5.0 (Medium) will be set.
Internet Explorer 9 on the other hand haven’t been found on the target system which will be reported as a medium risk as defined in the override.
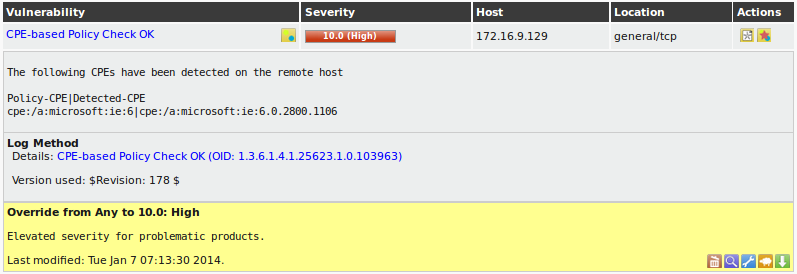
This example demonstrates how the presence of a certain product in an IT infrastructure is classified as a severe problem and reported as such.
Execute steps 1 to 3 of the above described method for finding checking policy compliance.
Note that when choosing a general scan like Full and Fast both cases are treated the same, presence of the product as a running service and presence of the product on a hard drive.
This essentially means that if you want to ensure the desired product indeed runs as a service you should avoid running NVTs that check for the simple presence on the file system or in a registry. If you don’t want to go into such details right now, you still have the option to look into the report details in order to check for false positives and false negatives.
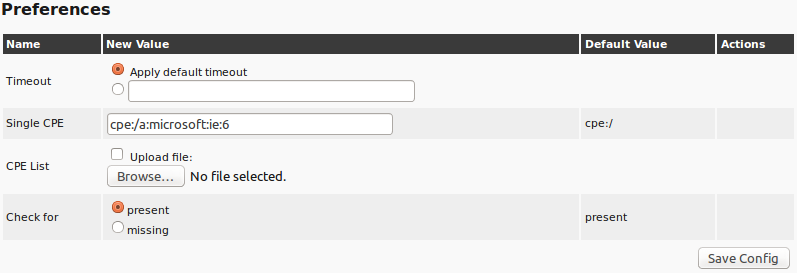
This time a single CPE (Internet Explorer 6) will be searched.
In this case we have to set that the entered CPE must be “present”.
Confirm your changes with Save Config.
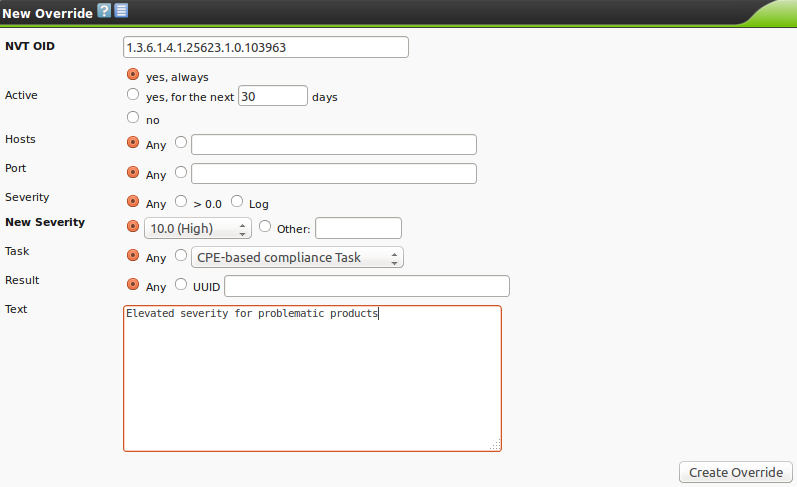
Policy checks report the results in general as “Log” messages. If you want to change this you have to create an override. In this example violations of the policy should be reported with an elevated severity.
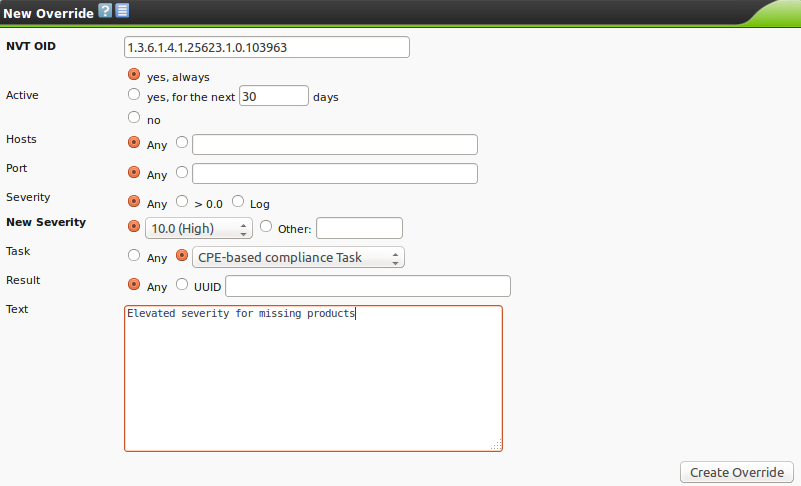
For this, a new override has to be created through the Scan Management. The OID in this case will be “1.3.6.1.4.1.25623.1.0.103963” (for the NVT CPE-based Policy Check OK) and a new severity of 10.0 (High) will be set.
In case the pure presence of a product should be considered, you should apply local security checks by configuring remote access via the Credentials feature. Execute step 6 to 9 in the example above to enable local security checks, to create a new task with the target systems and to start it.
As soon as the status changes to Done the complete report is available. At any time you can review the intermediate results.
To only show the results of the CPE-based policy checks, you can apply a suitable filter (search text “cpe”).
This example shows how the absence of a certain product in your IT infrastructure is defined as a severe problem and reported as such.
Execute steps 1 to 3 of the above described method for finding problematic products.
Note that when choosing a general scan like Full and Fast both cases are treated the same, presence of the product as a running service and presence of the product on a hard drive.
This essentially means that if you want to ensure the desired product indeed runs as a service you should avoid running NVTs that check for the simple presence on the file system or in a registry. If you don’t want to go into such details right now, you still have the option to look into the report details in order to check for false positives and false negatives.
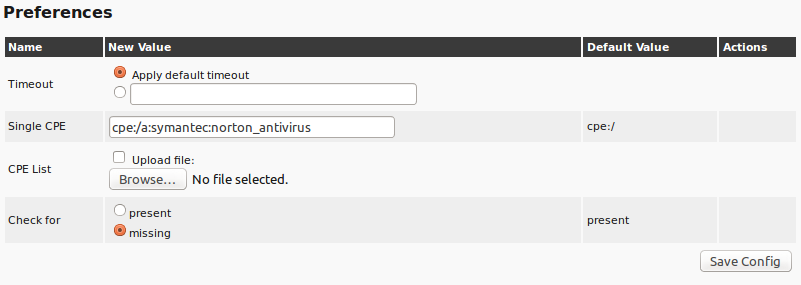
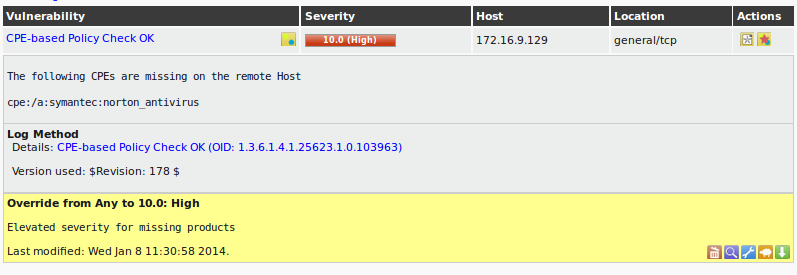
This time the configuration of CPE-based Policy Check will be set up to check if Norton Antivirus is present on the target system. In this case it will be reported if it is “missing”.
Policy checks report the results in general as “Log” messages. If you want to change this you have to create an override. In this example violations of the policy should be reported with an elevated severity.
For this, a new override has to be created through the Scan Management. The OID in this case will be “1.3.6.1.4.1.25623.1.0.103963” (for the NVT CPE-based Policy Check OK) and a new severity of 10.0 (High) will be set.
For checking simply the availability of a product installation, local security checks can improve the detection rate. If just running network services should be searched it normally doesn’t help but rather increase the number of false positives.
Execute step 6 to 9 in the example Checking policy compliance to enable local security checks, to create a new task with the target systems and to start it.
As soon as the status changes to Done the complete report is available. At any time you can review the intermediate results.
To only show the results of the CPE-based policy checks, you can apply a suitable filter (search text “cpe”).
With the Greenbone Security Manager it is possible to automatically check the German “IT-Grundschutz-Kataloge” as published and maintained by the Bundesamt für Sicherheit in der Informationstechnik (German Federal Office for IT Security, BSI).
Supported is always the current “Ergänzungslieferung” with tests for over 80 measures. That is the maximum number of measures which is possible to support with automatic tests.
Some measures are quite comprehensive so that and actually consist of several single tests. A couple of measures address a specific operating system ans hence will only be applied to those. The number and type of tested systems remains irrelevant for the Greenbone Security Manager.
This makes the Greenbone Security Manager the fastest co-worker for executing a IT-Grundschutz audit. And it opens the opportunity to install a check for breaches as a permanent background process.
This example executes a simple check according to the German “IT-Grundschutz-Kataloge”.
This covers the settings to execute all of the checks. The actual checks are not explicitly selected so that rather a summary result is generated.
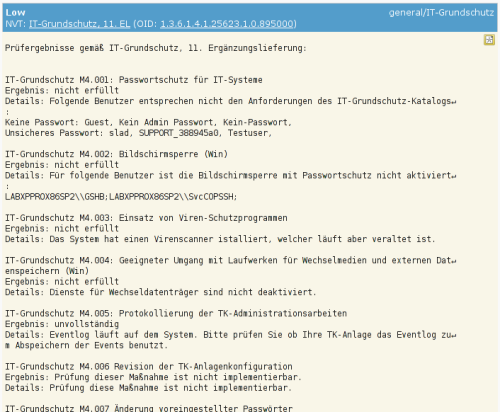
As soon as the status changes to “Done” the complete report is available. At any time you can review the intermediate results. Please note, that for the textual form of the reports you need to enable category “Low” in the filter.
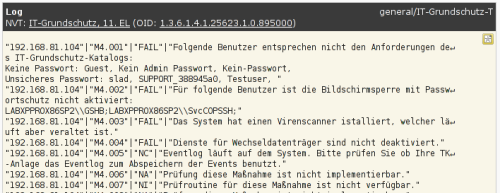
With the imported scan configuration 2 versions of the results will be created: an overview in textual form (under “general/IT-Grundschutz”) and a table for further processing (under “general/IT-Grundschutz-T”). For the latter, you need to enable category “Log” in the report filter
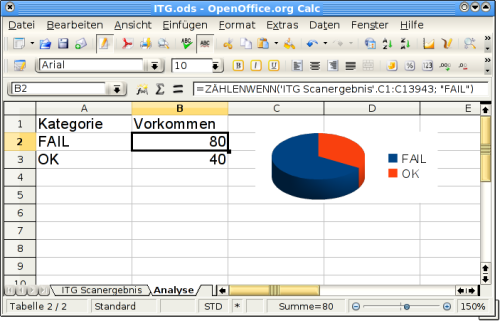
For this download format suitable tabular results for all target systems are automatically collected and joined.
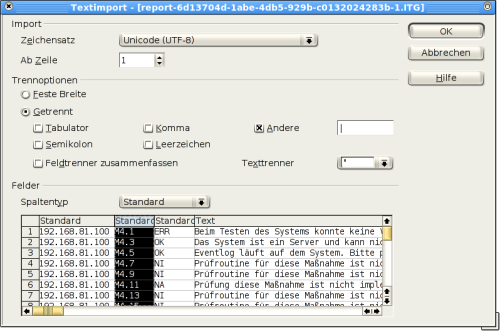
The example above shows an import for OpenOffice 3.2. Please take care that the following settings are adjusted for the import (if not already default):
A number of tools is available to help IT-Grundschutz processes with structured approach, data entries and management.
The German federal agency for IT security (Bundesamt für Sicherheit in der Informationstechnik, BSI) offers on its website an overview on IT-Grundschutz tools.
For an import of the results of a IT-Grundschutz scan into one of these tools please contact the vendor of the corresponding tool. For additional questions please don’t hesitate to contact the Greenbone Support.
The following result classes can occur for a check:
It was detected that the target system does not fulfill the measure.
It was detected that the target system does fulfill the measure.
It was not possible to execute the test routine properly. For example, some checks require credentials. If the credentials are missing, the check can not be executed for technical reasons. In case no credentials are provided many of the checks will have this status.
In general it is assumed this measure can be automatically checked for, but an implementation is not yet available. For newly released “Ergänzungslieferungen” this is initially true for a number of measures. However, the Greenbone Security Feed is updated continuously, and eventually all measures will be implemented.
A number of measures of the “IT-Grundschutzkataloge” are kept too general to create an explicit automatic check. Other measures describe checks that can only be done physically and thus also belong to this class of test that can’t be implemented at all.
Some measures refer exclusively to a special type of operating system. If the target system runs another operating system type, the measure does not apply and the result class is set to NS.
Some updates (“Ergänzungslieferungen”) removed some measures without a replacement. Old IDs of such deprecated measures are never re-used. So, the results marked as DEP can be safely ignored but the entries remain for completeness.
This overview refers to the current Ergänzungslieferung. The measure ID’s link to the corresponding detailed information available on the website of BSI.
The following test types are distinguished:
BSI reference | Title | Test type | Note |
---|---|---|---|
M4.2 | Screen lock | Credentials | Windows: Can only test for local accounts. Linux: Only default screen savers in Gnome and KDE. |
M4.3 | Use of anti virus protection software | Credentials | |
M4.4 | Compliant handling of drives for removable media and external data storage devices | Credentials | |
M4.5 | Logging of telecommunication equipment | Credentials | |
M4.7 | Changing of default passwords | Remote | Test only via SSH and Telnet. |
M4.9 | Use of the seccurity mechanisms of XWindows | Credentials | |
M4.14 | Mandatory password protection in Unix | Credentials | |
M4.15 | Secure login | Credentials | |
M4.16 | Access restrictions of user IDs and / or terminals | Credentials | |
M4.17 | Locking and deleting unneeded accounts and terminals | Credentials | |
M4.18 | Administrative and technical securing of access to monitoring and single-user mode | Credentials | |
M4.19 | Restrictive allocation of attributes for UNIX system files and directories | Credentials | |
M4.20 | Restrictive allocation of attributes for UNIX user files and directories | Credentials | |
M4.21 | Preventing of unauthorized escalation of administrator rights | Credentials | |
M4.22 | Preventing of loss of confidentiality of sensitive data in the UNIX system | Credentials | |
M4.23 | Safe access of executable files | Credentials | |
M4.33 | Use of a virus scanning program for storage media exchange and data transfer | Credentials | |
M4.36 | Disabling of certain fax receiving phone numbers | Credentials | Cisco devices can only be tested via telnet because they do not support blowfish-cbc encryption. |
M4.37 | Disabling of cetrain fax sending phone numbers | Credentials | Cisco devices can only be tested via telnet because they do not support blowfish-cbc encryption. |
M4.40 | Preventing the unauthorized use of the computer microphone | Credentials | Only implemented for Linux. Under Windows it is not possible to determine the status of the microphone via registry/WMI. |
M4.48 | Password protection if Windows systems | Credentials | |
M4.49 | Securing of the the boot process of Windows systems | Credentials | |
M4.52 | Equipment protection under Windows NT-based systems | Credentials | |
M4.57 | Deactivation of automatic CD-ROM recognition | Credentials | |
M4.80 | Sichere Zugriffsmechanismen bei Fernadministration | Remote | |
M4.94 | Protection of web server files | Remote | |
M4.96 | Disabling of DNS | Credentials | |
M4.97 | One service per server | Remote | |
M4.98 | Limit communication though a packet filter to a minimum | Credentials | Microsoft Windows Firewall is being tested. For Vista and newer any firewall that is installed comforming to the system. |
M4.106 | Activation of system wide logging | Credentials | |
M4.135 | Restrictive assigning of access rights to system files | Credentials | |
M4.147 | Secure use of EFS under Windows | Credentials | |
M4.200 | Use of USB storage media | Credentials | |
M4.227 | Use of a local NTP server for time synchronization | Credentials | |
M4.238 | Use of a local packet filter | Credentials | Microsoft Windows Firewall is being tested. For Vista and newer any firewall that is installed comforming to the system. |
M4.244 | Secure system configuration of Windows client operating systems | Credentials | |
M4.277 | Securing of the SMB, LDAP and RCP communication of Windows servers | Credentials | |
M4.284 | Handling of services of Windows Server 2003 | Credentials | |
M4.285 | Uninstallation of unneeded client services of Windows Server 2003 | Credentials | |
M4.287 | Secure administration of VoIP middleware | Remote | |
M4.300 | Information protection of printers, copies and multi-function equipment | Remote | |
M4.305 | Use of storage quotas | Credentials | |
M4.310 | Implementaion of LDAP access to file services | Remote | |
M4.313 | Providing of secure domain controllers | Credentials | |
M4.325 | Deletion of swap files | Credentials | |
M4.326 | Providing the NTFS properties on a Samba file server | Credentials | |
M4.328 | Secure base configuration of a Samba server | Credentials | |
M4.331 | Secure configuration of the operating system for a samba server | Credentials | |
M4.332 | Secure configuration of access controls of a samber server | Credentials | |
M4.333 | Secure configuration of Winbind under Samba | Credentials | |
M4.334 | SMB message signing and Samba | Credentials | |
M4.338 | Use of Windows Vista and new file and registry virtulization | Credentials | Only a general test if file and registry virtulization is enabled. |
M4.339 | Avoidance of unauthorized use of portable media under Windows Vista and later | Credentials | |
M4.340 | Use of the Windows user account control UAC starting with Windows Vista | Credentials | |
M4.341 | Integrity protection starting with Windows Vista | Credentials | Where possible technically implemented (active UAC and protected mode in different zones). |
M4.342 | Activation of last access certificate stamp starting with Windows Vista | Credentials | |
M4.344 | Monitoring of Windows Vista-, Windows 7 und Windows Server 2008-Systemen | Credentials | |
M4.368 | Regular audits of the terminal server environemnt | Credentials | |
M5.8 | Regular security check of the network | Remote | Only a message is being displayed that tests should be performed with up-to date plugins. |
M5.17 | Use of the security mechanisms of NFS | Credentials | |
M5.18 | Use of the security mechanisms of NIS | Credentials | |
M5.19 | Use of the security mechanisms of sendmail | Remote | |
M5.19 | Use of the security mechanisms of sendmail | Credentials | |
M5.20 | Use of the security mechanisms of rlogin, rsh and rcp | Credentials | |
M5.21 | Secure use of telnet, ftp, tftp and rexec | Credentials | |
M5.34 | Use of one time passwords | Credentials | |
M5.59 | Protection from DNS-spoofing with authentication mechanisms | Credentials | |
M5.63 | Use of GnuPG or PGP | Credentials | |
M5.64 | Secure shell | Remote | |
M5.66 | Use of TLS/SSL | Remote | |
M5.72 | Deactivation of not required net services | Credentials | Only displays the services in question. |
M5.90 | Use of IPSec under Windows | Credentials | |
M5.91 | Use of fersonal firewalls for clients | Credentials | Microsoft Windows Firewall is being tested. For Vista and newer any firewall that is installed comforming to the system. On Linux systems, displaying if the the iptables rules, if possible. |
M5.109 | Use of a e-mail scanners on the mailserver | Remote | |
M5.123 | Securing of the network commuication under Windows | Credentials | |
M5.131 | Securing of the IP protocols under Windows Server 2003 | Credentials | |
M5.145 | Secure use of CUPS | Credentials | |
M5.147 | Securing of the communication with directory services | Remote |
Introduction into vulnerability analysis and policy monitoring for the Payment Card Industry Data Security Standard (PCI DSS) with the Greenbone Security Manager.
The PCI DSS is a security standard for payment card transactions and is supported by the major payment systems MasterCard, Visa, AMEX, Discover and JCB.
All organizations that process card payments, store or transfer card data are required to perform compliance validation according to PCI DSS. Non-compliance or lack of validation means the risk of being fined or, ultimately, losing the ability to process payment cards.
The validation of compliance depends on the volume of card transactions. Here, service providers are usually classified as Level 1 Service Provider and they must, on a quarterly basis, validate their cardholder data environment by an independent scanning vendor approved by the PCI Security Standards Council (PCI SSC). In addition, an annual on-site PCI Security Audit has to be performed by an independent Qualified Security Assessor (QSA), also approved by the PCI SSC.
The “Approved Scanning Vendor” (ASV) is a service provider who performs a vulnerability scan of the cardholder data environment visible to the internet. As such the vulnerability scanners themselves can not be classified or certified as ASVs. However, they are tools for the ASV to perform the vulnerability scan using the approved process.
According to PCI DSS (Version 3.1, Requirement 11.2) two types of vulnerability scans are to be perfomred on a quarterly basis and after significant changes to the cardholder data environment. This includes the vulnerability scan conducted by the ASV explained above and an internal scan of the cardholder data environment. The latter scan may be performed by employees of the organization and requires no approval by the PCI SSC.
The Greenbone Security Manager (GSM) can perform both of these scans. The false positive management features help avoid significant work load of manual elimination of wrong alerts.
A merchant can use the GSM to check the security requirements prior to the ASV vulnerability scan in order to avoid costly re-scans.
This way, a merchant can use the GSM to check for PCI compliance on an ongoing basis even between the scans performed by the ASV.
Since security changes are stored immutable for audit compliance within the GSM, the correct security and compliance status can even be verified at all times in between the quarterly ASV scans.
Escalation methods can inform an external auditor as well as internal experts continuously about the security status. Summaries are sent to the responsible parties.
In the same way the GSM checks the technical aspects of other policies periodically it can also check the system parameters according to the PCI DSS policy.
With a permanent background policy scan it is ensured that antivirus tools are not outdated or firewalls don’t get deactivated without notice. Such parameters can be monitored and escalated in the same way as software vulnerabilities.
Advantages for merchant:
Advantages for the ASV:
Greenbone Networks GmbH as the vendor of the GSM does not act as an ASV. But among Greenbone’s business partners you will find security consultants that as an ASV at the same time and can introduce the GSM into your security process.
In September 2014 the Bavarian State Office for Data Protection performed an online test “Mailserver regarding STARTTLS, Perfect Forward Secrecy and Hartbleed”. The organizations that were found to be affected by this test were asked to remove the security risks.
Using Greenbone Security Manager or OpenVAS respectively an organziation can test themselves if their own mail servers comply with the security criteria. For this follow these steps:
Footnotes
[1] | http://windows.microsoft.com/en-ca/windows-vista/what-is-the-registry |
Conficker is a computer worm that occured in fall 2008. It threatens Windows operating systems and caused numerous network failures with significant financial damage. The worm takes advantage of a security hole in the operating system and is self-updating.
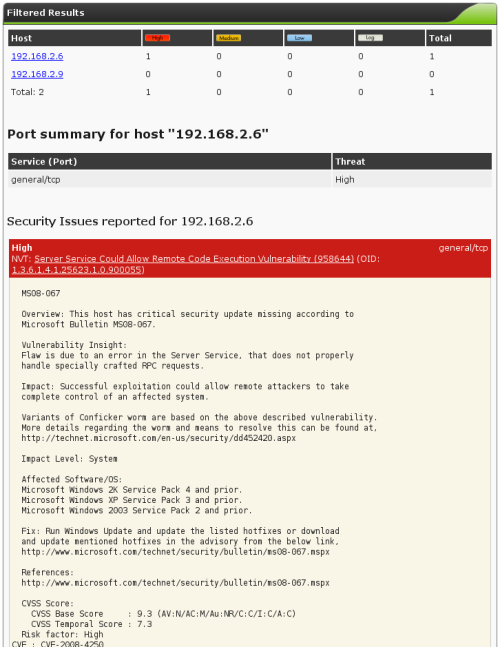
Microsoft Bulletin MS08-067 describes the most important security hole that is exploited by Conficker to attack the corresponding systems.
Using the Greenbone Security Manager two methods are recommended for the search:
The first method is able to detect the presence of the vulnerability. The second method goes as far as exploiting the vulnerability to be certain that it is indeed present. Admittedly, this may cause outages of the corresponding systems and thus should be executed with appropriate prudence.
The Open Vulnerability and Assessment Language (OVAL) is an approach for a standardized description of the (security) state of an IT system. OVAL files describe a vulnerability and define tests to identify the state in which a system is vulnerable. They usually refer to specific version of software products for which a known vulnerability exists.
This means that in order to check for vulnerabilities described in an OVAL definition, information about the current state of the system is needed. This information is collected in a standardized format as well — the OVAL System Characteristics (SC).
There are a number of solutions which perform checks based on OVAL definitions and SC files. OVAL definitions are provided by various vendors. MITRE provides the OVAL Repository with more than 13,000 entries.
Greenbone is an official OVAL Adopter and Greenbone Security Manager is registered as a “Systems Characteristics Producer”.
See also: OVAL Adoption Program.
Supported are OVAL versions 5.3 to 5.10. Should any wrong, missing or incomplete OVAL element be found, users are encouraged to provide feedback to the Greenbone support team. The OVAL-SC implementation of the Greenbone solution allows to activate updates within a single day and therefore provides timely improvements for the users.
During a scan the Greenbone Security Manager collects large amounts of data about the target system. This information is managed in an optimized data pool. Parts of this information are usable as a component of an OVAL System Characteristics.
The creation of OVAL SC files is not enabled by default but has to be explicitly enabled. The following scan configuration can be used to achieve this: collect-oval-sc-v2.xml.
Import the scan configuration in the GSM:
The new scan configuration is now shown in the list:
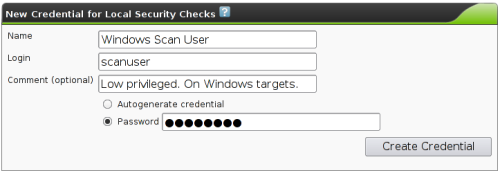
The most comprehensive results of a target system can be collected using authenticated scans. For this you need to create an account on the target system. Ensure that the account has the necessary privileges. For unixoid systems an account with low privileges is usually sufficient, for Windows system administrative privileges are required.
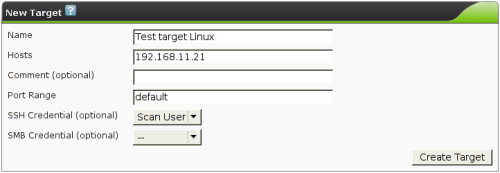
The following example shows the creation of a Linux target. For a Windows target the credential must be set in the SMB field instead of SSH.
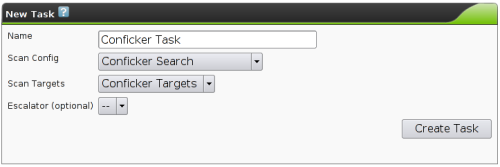
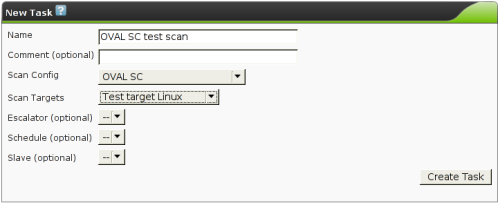
Now create the task, which you can start immediately.
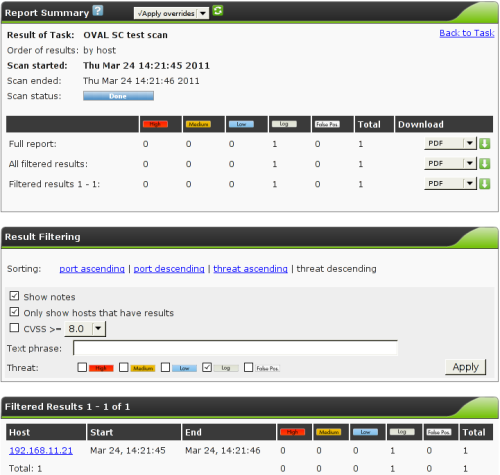
The scan itself is quite fast because the scan configuration is optimized to collect only the specific data needed for generating the System Characteristics file.
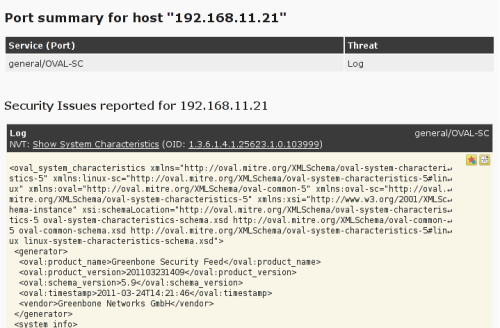
The results are returned a log information. If you adjust your filter you can see the OVAL System Characteristics in XML formatted for easy readability:
Please note: If you have collected data from a large number of target systems this view may become hard to read.
OVAL SC files are defined in a way that one file can contain only information about one system. Using the Greenbone Security Manager you can collect a large number of System Characteristics from many different systems in one single step.
Because of this we provide two Report Format Plugins:
Both plugins are available for download on the Report Formats page.
Import the report format plugins, verify the signature and activate them. For detailed information about this process, please refer to: Report Plugins.
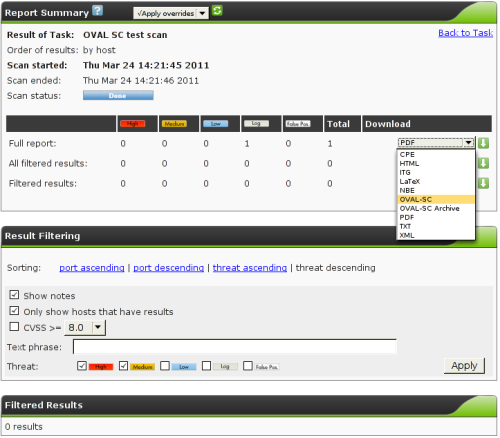
You can now download the results in the format you require for further processing. Select the format “OVAL-SC” or “OVAL-SC archive” in the “Full report” line:
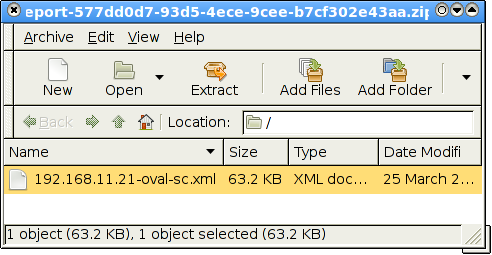
The ZIP archives look as follows:
The MITRE organization not only provides the OVAL standard but also provides a reference implementation for local OVAL checks. The OVAL Interpreter ovaldi is available under an Open Source license.
By using the Greenbone Security Manager to provide OVAL System Characteristics it is easy to use ovaldi on Linux to check a Windows system — or the other way round.
For example, if the target system you tested above was a Debian Linux system, you can now download the official Debian OVAL definitions 2010 and execute the test (“false” means that a condition was not met, i.e. a vulnerability does not exist on the target).
Ovaldi automatically creates a HTML and XML version of the plain text output as shown below: oval-sc-debian-squeeze-sample-ovaldi-results.html (102 KByte) and oval-sc-debian-squeeze-sample-ovaldi-results.xml (4.2 MByte). To run the tests additionally download the files oval-definitions-2010.xml and oval-sc-debian-squeeze-sample.xml.
$ cd /tmp
$ ovaldi -m -o /tmp/oval-definitions-2010.xml \
-i /tmp/oval-sc-debian-squeeze-sample.xml \
-a /usr/share/ovaldi/xml/
----------------------------------------------------
OVAL Definition Interpreter
Version: 5.10.1 Build: 2
Build date: Sep 11 2012 07:49:59
Copyright (c) 2002-2012 - The MITRE Corporation
----------------------------------------------------
Start Time: Tue Sep 11 12:12:52 2012
** parsing /tmp/oval-definitions-2010.xml file.
- validating xml schema.
** checking schema version
- Schema version - 5.3
** skipping Schematron validation
** parsing /tmp/oval-sc-debian-lenny-sample.xml for analysis.
- validating xml schema.
** running the OVAL Definition analysis.
Analyzing definition: FINISHED
** applying directives to OVAL results.
** OVAL definition results.
OVAL Id Result
-------------------------------------------------------
oval:org.debian:def:1965 false
oval:org.debian:def:1966 false
oval:org.debian:def:1967 false
oval:org.debian:def:1968 false
oval:org.debian:def:1969 false
oval:org.debian:def:1970 false
oval:org.debian:def:1971 false
oval:org.debian:def:1972 false
oval:org.debian:def:1973 false
oval:org.debian:def:1974 false
...
oval:org.debian:def:2124 false
oval:org.debian:def:2125 false
oval:org.debian:def:2126 false
oval:org.debian:def:2127 false
oval:org.debian:def:2128 false
oval:org.debian:def:2129 false
oval:org.debian:def:2130 false
oval:org.debian:def:2131 false
oval:org.debian:def:2132 false
oval:org.debian:def:2133 false
-------------------------------------------------------
** finished evaluating OVAL definitions.
** saving OVAL results to results.xml.
** running OVAL Results xsl: /usr/share/ovaldi/xml//results_to_html.xsl.
----------------------------------------------------
If the target system was a Microsoft Windows system, you can use the definitions provided by MITRE and execute the test (“false” means that a condition was not met, i.e. a vulnerability does not exist on the target).
Ovaldi automatically creates a HTML and XML version of the plain text output as shown below: oval-sc-windows-xp-sample-ovaldi-results.html (23 KByte) and oval-sc-windows-xp-sample-ovaldi-results.xml (159 KByte).
To run the tests additionally download the files windows.xml and oval-sc-windows-xp-sample.xml.
$ cd /tmp
$ ovaldi -m -o /tmp/windows.xml \
-i /tmp/oval-sc-windows-xp-sample.xml \
-a /usr/share/ovaldi/xml/
----------------------------------------------------
OVAL Definition Interpreter
Version: 5.10.1 Build: 2
Build date: Sep 11 2012 07:49:59
Copyright (c) 2002-2012 - The MITRE Corporation
----------------------------------------------------
Start Time: Tue Sep 11 15:57:55 2012
** parsing /tmp/windows.xml file.
- validating xml schema.
** checking schema version
- Schema version - 5.10
** skipping Schematron validation
** parsing /tmp/oval-sc-windows-xp-sample.xml for analysis.
- validating xml schema.
** running the OVAL Definition analysis.
Analyzing definition: FINISHED
** applying directives to OVAL results.
** OVAL definition results.
OVAL Id Result
-------------------------------------------------------
oval:org.mitre.oval:def:754 true
oval:org.mitre.oval:def:15339 false
oval:org.mitre.oval:def:15465 false
oval:org.mitre.oval:def:15452 false
oval:org.mitre.oval:def:15377 false
oval:org.mitre.oval:def:15346 false
oval:org.mitre.oval:def:15173 false
oval:org.mitre.oval:def:15057 false
oval:org.mitre.oval:def:15546 false
oval:org.mitre.oval:def:14566 false
oval:org.mitre.oval:def:720 false
oval:org.mitre.oval:def:627 false
oval:org.mitre.oval:def:286 false
oval:org.mitre.oval:def:748 false
oval:org.mitre.oval:def:684 false
oval:org.mitre.oval:def:396 false
oval:org.mitre.oval:def:1205 false
oval:org.mitre.oval:def:679 false
oval:org.mitre.oval:def:165 false
oval:org.mitre.oval:def:565 false
oval:org.mitre.oval:def:289 false
oval:org.mitre.oval:def:730 false
oval:org.mitre.oval:def:1162 false
oval:org.mitre.oval:def:2041 false
oval:org.mitre.oval:def:1946 false
oval:org.mitre.oval:def:1815 false
oval:org.mitre.oval:def:1282 false
oval:org.mitre.oval:def:1804 false
oval:org.mitre.oval:def:1469 false
oval:org.mitre.oval:def:718 false
oval:org.mitre.oval:def:347 false
oval:org.mitre.oval:def:283 false
oval:org.mitre.oval:def:282 false
-------------------------------------------------------
** finished evaluating OVAL definitions.
** saving OVAL results to results.xml.
** running OVAL Results xsl: /usr/share/ovaldi/xml/results_to_html.xsl.
----------------------------------------------------