12. Scan Configuration
The GSM appliance comes with various pre-defined scan configurations.
However, they can be customized and expanded by your on configurations.
The following configurations are already available from Greenbone:
- Empty
- This is an empty template.
- Discovery
- Only NVTs are used that provide information of the target system.
No vulnerabilities are being detected.
- Host Discovery
- Only NVTs are used that discover target systems.
This scan only reports the list of systems discovered.
- System Discovery
- Only NVTs are used that discover target systems including installed operating systems and hardware in use.
- Full and Fast
- For many environments this is the best option to start with.
This configuration is based on the information gathered in the prior port scan and uses almost all plugins.
Only plugins are used that will not damage the target system.
Plugins are optimized in the best possible way to keep the potential false negative rate especially low.
The other configurations only provide more value only in rare cases but with much more required effort.
- Full and fast ultimate
- This configuration expands the Full and Fast configuration with plugins that could disrupt services or systems or even cause shut downs.
- Full and very deep
- This configuration differs from the Full and Fast configuration in the results of the port scan not having an impact on the selection of the plugins.
Therefore plugins will be used that will have to wait for a timeout.
This scan is very slow.
- Full and very deep ultimate
- This configuration adds the dangerous plugins that could cause possible service or system disruptions to the Full and very deep configuration.
This scan is also very slow.
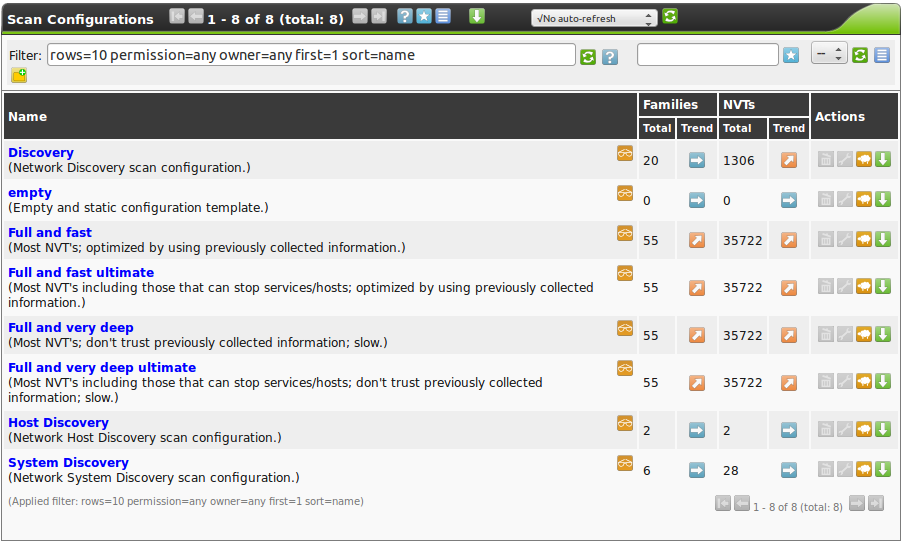
The available scan configurations can be viewed under Configuration/Scan Configs.
Remember that by default only the first 10 configurations are always displayed.
In figure The GSM comes with various scan configurations. one can identify how many NVT families and how many NVYs are activated in in a configuration.
Additionally it shows the trend if a scan configuration was configured dynamically  or statically
  .
.
Greenbone publishes new plugins regularly (NVTs).
Also new NVT families can be introduced through the Greenbone Security Feed.
 dynamic
Scan configurations that are configured dynamically will include and activate new NVT families and new NVTs of the respective activated families automatically after a NVT Feed update.
This ensures that new NVTs are available immediately and without any interaction by the administrator.
 static
Scan configurations that are configured statically will not change after an NVT Feed update.
The  icon indicates if the scan configuration is available to and can be used by other users.
To make a configuration available the respective user, role or group must be assigned the get_configs permission.
Then this configuration will be visible to the respective users as well.
12.1. Creating a New Scan Configuration
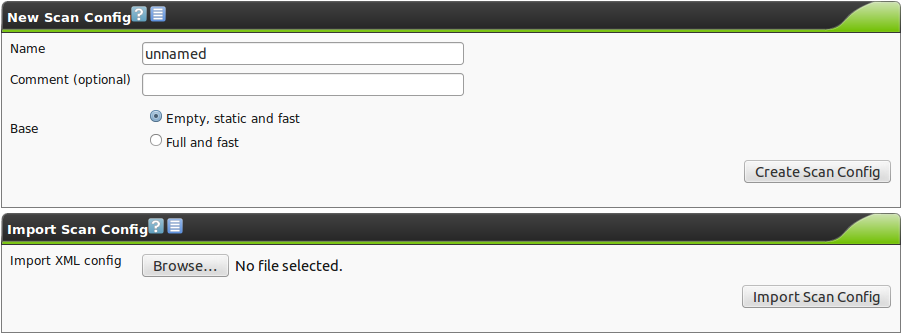
To create a new scan configuration first select Configuration/Scan Configs.
Then by clicking on  a new scan configuration can be created.
On the following screen there is the option to import a scan configuration or to created manually.
Greenbone themselves offer different scan configurations on their web site.
In addition scan configurations can be exported on other GSM appliances and then imported.
When manually creating a scan configuration enter the name and an optional comment and decide which scan configuration to use a template.
You can chose between:
- Empty, static and fast
- Full and fast
If another scan configuration should be used as a template it can be cloned on the overview page  .
Then the configuration can be edited and given its own name and comment and further customized.
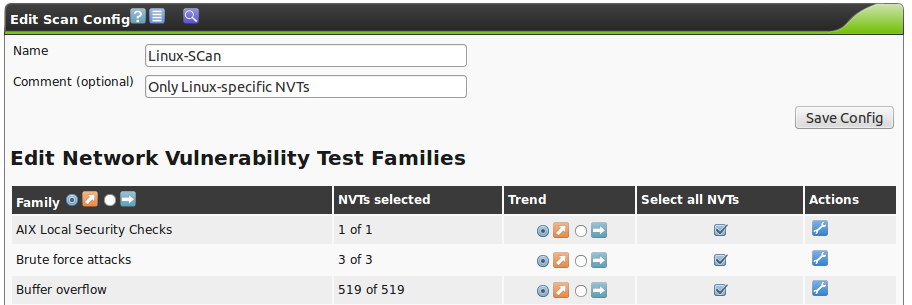
On the next page you will be presented with the configuration initially.
To edit the configuration use the respective icon  with the wrench.
Now the configuration can be customized.
Of importance are the following settings:
- Family Trend
Here it can be decided if a new family should be activated in this scan configuration.

- NVT Trend
In every family it can be decided if all NVTs in this family should be activated automatically.

- Select All
- In this column it can be configured if all NVTs of a family should be selected.
- Action

- With this icon you can jump directly into a family to select the individual NVTs if you do not want to use all of them.
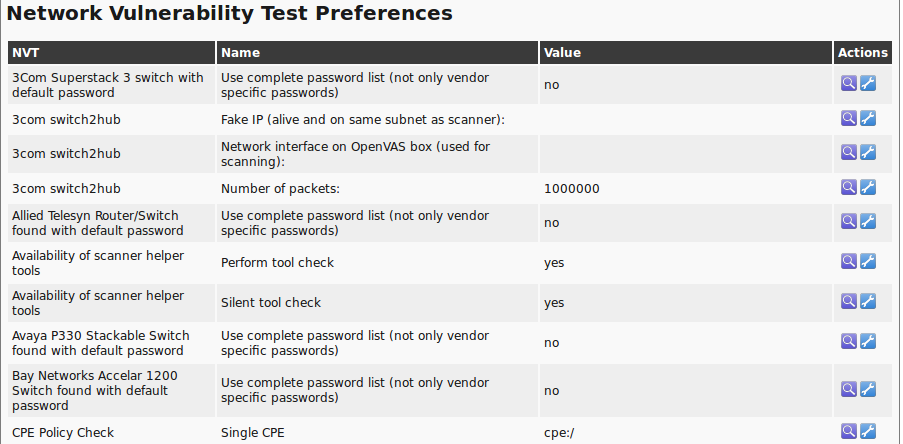
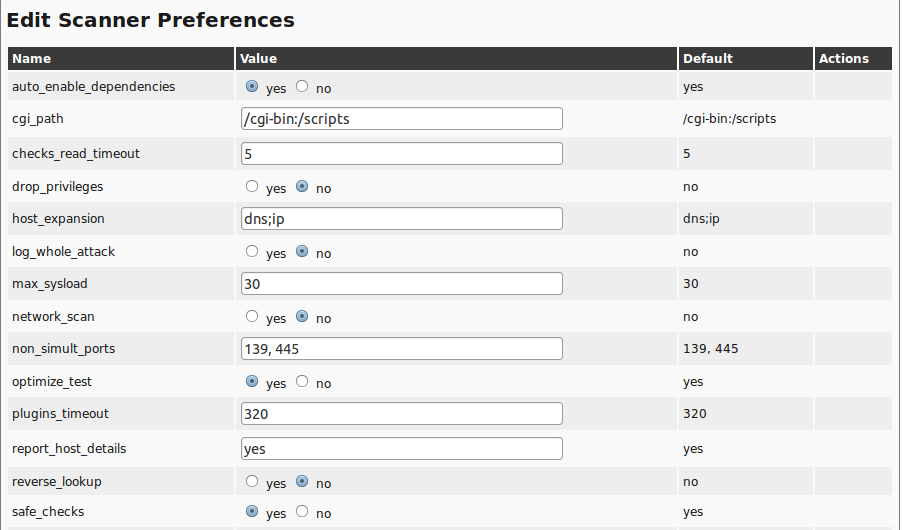
When scrolling further down the Scanner Preferences will appear (see section Scanner Preferences).
Here additional settings for the scan can be performed.
Also, there are the NVT preferences that are being used by the NVTs.
They can be customized here.
Furthermore there is the possibility to define the settings directly within the respective NVTs.
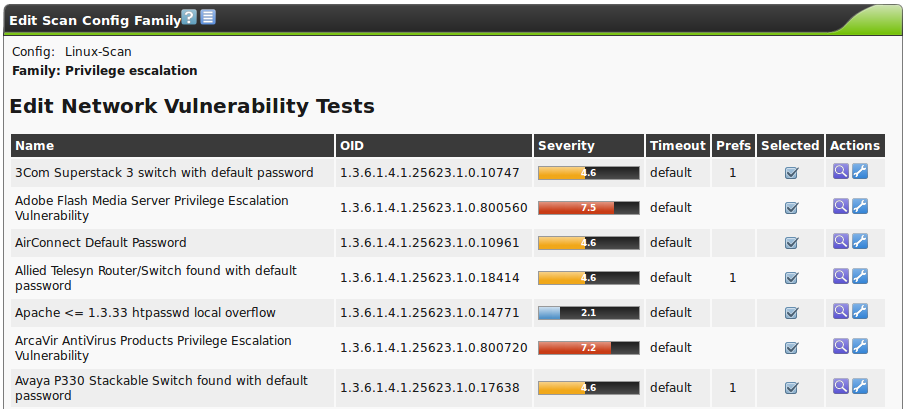
To make changes to the NVTs you must switch into the respective family.
After selecting a family the individual NVTs can be accessed.
The NVTs that are part of a family and their severity can be viewed.
Also the status (enabled/disabled) and the timeout of the NVT plugin can be viewed and verified as well if the NVT can be configured further via a configuration (column Prefs).
If this is the case the configuration can be accessed via the respective wrench icon  .
The settings can be found all the way at the bottom of the page the opens next.
The customized settings of the NVTs are then visible on the overview page of the scan configuration (see figure The configuration offers many customization options. and The configuration allows for specific customization of the NVTs as well.).
For practical use especially the settings of the Port Scanner in use are of interest.
The GSM appliance utilizes Nmap and Ping as port scanner.
Nmap is being used via the NASL wrapper.
This allows for the greatest flexibility.
12.2. Scanner Preferences
To document all scanner and NVT preferences is out of scope of this document.
Therefore only the most important general settings and specific settings of the Ping and Nmap-scanners will be covered.
12.2.1. General Preferences
auto_enable_dependencies:
NVTs that are required by other NVTs will be activated automatically.
cgi_path:
This is the path that will be used by the NVTs to access CGI scripts.
checks_read_timeout:
This is the timeout for the network sockets during a scan.
drop_privileges:
With this parameter the OpenVAS scanner gives up root privileges before the start of the NVTs.
This increases the security but results in fewer findings with some NVTs.
host_expansion:
Three different values are allowed:
dns: Performs an AXFR zone transfer on the target system and tests the systems that were found.nfs: Tests the systems that are allowed access to NFS shares on the target system.ip: Scans the specified subnet.
log_whole_attack:
If this option is enabled the system logs the run time of each individual NVT.
Otherwise only that start and completion of a scan is being logged.
This reduces required storage space on the hard disk.
network_scan:
Experimental option, which scans the entire network all at once instead of starting Nmap for each individual host.
This can save time in specific environments.
non_simult_ports:
These ports are not being tested simultaneously by NVTs.
optimize_test:
NVTs will only be started if specific pre-requisites are met (i.e. open port).
plugins_timeout:
Maximum run time of a NVT.
report_host_details:
Detailed information of the host are being saved to the report.
safe_checks:
Some NVTs can cause damage on the host system.
This setting disables those respective NVTs.
unscanned_closed:
This parameter defines if TCP ports that were not scanned should be treated like closed ports.
unscanned_closed_udp:
This parameter defines if UDP ports that weren’t scanned should be treated as closed ports.
use_mac_addr:
Systems will be identified by MAC address and not by IP address.
This could be beneficial in a DHCP environment.
vhosts:
If the GSM is to scan a web server with name based virtual hosts then the settings vhosts and vhosts_ip can be used.
In the setting vhosts the names of the virtual hosts a entered comma separated.
vhosts_ip:
If the GSM is to scan a web server with name based virtual hosts then the settings vhosts and vhosts_ip can be used.
In the setting vhosts_ip the IP address of the web server is being entered.
In the report it can not be referenced in which virtual instance a NVT discovered a vulnerability.
12.2.2. Ping Preferences
The Ping-Scanner-NVT contains the following configurations parameters.
Remember that the Alive Test settings of a target object can overwrite some settings of the Ping-Scanner.
- Do a TCP ping:
Here it can be selected if the reachability of a host should be tested using TCP.
In this case the following ports will be tested: 21,22,23,25,53,80,135,137,139,143,443,445.
Default: No.
- Do an ICMP ping:
Here it can be selected if the reachability of host should be tested using ICMP.
Default: Yes.
- Mark unreachable Hosts as dead:
Here it can be selected if a system that are not discovered by this NVT should be tested by other NVTs later.
Default: No.
- Report about reachable Hosts:
Here it can be selected if the systems discovered by this NVT should be listed.
Default: No.
- Report about unreachable Hosts:
Here it can be selected if the systems that are not discovered by this system should be listed.
Default: No.
- TCP ping tries also TCP-SYN ping:
The TCP ping uses by default a TCP-ACK packet.
Here a TCP-SYN packet can be used additionally.
Default: No.
- Use ARP:
Here it can be selected if hosts should be searched for in the local network using the ARP protocol.
Default: No.
- Use Nmap:
Here it can be selected if the Ping-NVT should use Nmap.
Default: Yes.
- nmap: try also with only –sP:
If Nmap is used the Ping-Scan will be performed using the –sP option.
- nmap additional ports for –PA:
Here additional ports for the TCP-Ping-Test can be specified.
This is only the case if Do a TCP ping is selected.
Default: 8080,3128.
12.2.3. Nmap NASL Preferences
The following options will be directly translated into options for the execution of the nmap command.
Therefore additional information can be found in the documentation for nmap.
- Do not randomize the order in which ports are scanned:
Nmap will scan the ports in ascending order.
- Do not scan targets not in the file:
Only meaningful in conjunction with File containing grepable results.
- Fragment IP packets:
Nmap fragments the packets for the attack.
This allows to bypass simple packet filters.
- Get Identd info:
Nmap queries the UNIX-Ident-Daemon.
It is currently no longer being used.
- Identify the remote OS:
Nmap tried to identify the operating system.
- RPC port scan:
Nmap tests the system for Sun RPC ports.
- Run dangerous ports even if safe checks are set:
UDP and RPC scans can cause problems and usually are disabled with the setting safe_checks.
- Service scan:
Nmap will try to identify services.
- Use hidden option to identify the remote OS:
Nmap will try to identify more aggressively.
- Host Timeout:
Defines the host timeout.
- Initial RTT timeout:
This is the initial round trip timeout.
Nmap can adjust this timeout dependent on the results.
- Max RTT timeout:
This is the maximum RTT.
- Min RTT timeout:
This is the minimum RTT.
- Minimum wait between probes:
This regulates the speed of the scan.
- Ports scanned in parallel (max):
Defines how many ports should be scanned simultaneously.
- Ports scanned in parallel (min):
see above
- Source port:
Defines the source port. This is of interest when scanning through a firewall if connections are in general allowed from a specific port.
- File containing grepable results:
Allows for the specification of a file in which line entries in the form of
Host: IP address can be found.
If the option Do not scan targets not in the file is set at the same time only systems contained in the file will be scanned.
- TCP scanning technique:
Define the actual scan technique.
- Timing policy:
Instead of changing the timing values individually the timing policy can be modified.
The timing policy uses the following values:
|
initial_rtt_timeout |
min_rtt_timeout |
max_rtt_timeout |
max_parallelism |
scan_delay |
max_scan_delay |
|---|
| Paranoid |
5 min |
100 ms |
10 sec |
Serial |
5 min |
1 sec |
| Sneaky |
15 sec |
100 ms |
10 sec |
Serial |
15 sec |
1 sec |
| Polite |
1 sec |
100 ms |
10 sec |
Serial |
400 ms |
1 sec |
| Normal |
1 sec |
100 ms |
10 sec |
Parallel |
0 sec |
1 sec |
| Aggressive |
500 ms |
100 ms |
1250 ms |
Parallel |
0 sec |
10 ms |
| Insane |
250 ms |
50 ms |
300 ms |
Parallel |
0 sec |
5 ms |

