7. Scanning
This chapter covers the set up and execution of the actual scans of your systems for vulnerability management.
The chapter describes basic first steps.
Later sections show the more detailed use and configuration of scan configurations and the analysis of the results.
7.1. Simple Scan
This first section describes the first steps of the configuration of the first scan.
Basically two options are available.
The web interface of the GSM appliance, the Greenbone Security Assistant, provides a wizard that creates all required configurations for a first scan with only very little input.
Alternatively these configurations can be created manually step by step.
The following two sections cover both options.
Ideally the individual steps should be followed directly on a GSM appliance.
 These steps are also explained in a video at http://docs.greenbone.net/Videos/gos-3.1/en/GSM-FirstScan-GOS-3.1-en-20150716.mp4.
7.1.1. Wizard
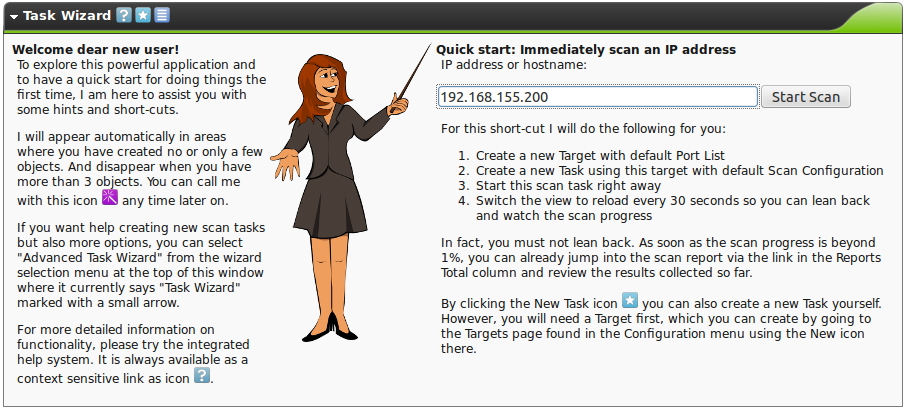
When logging into the web interface of the GSM appliance for the first time after initial set up a wizard will be displayed immediately.
By default, this will happen as long as less than four scan tasks were created.
Afterwards the wizard can be started at any time by clicking the  icon.
icon.
To scan a system using the wizard directly it is enough to enter the IP address or system name.
However, it is a requirement that the GSM appliance is able to resolve the system name.
The task wizard then automatically performs the following steps:
- Creates a new scan target (Target) in the GSM.
- Creates a new scan task (Task) in the GSM.
- Starts the scan task immediately.
- Changes the view and reloads it every 30 seconds in order to monitor the progress of the task.
After the task is started the progress can be monitored.
The Greenbone Security Assistant displays the overview page.
The new task can be seen there as well.
The colours and the fill level of the status bar notifies about the status of the scan (see also section Starting a Task).
As soon as the scan is completed the column Severity notifies about the criticality of the vulnerabilities found.
The prior column Solution Type  shows the type of solution available.
The most common type here is the VendorFix
  .
.
The task can be managed via the actions in the right column:
 Starting of a currently not running task.
 Stopping of a currently running task. All discovered results will be written to the database.
 Resuming of a stopped task.
 Moving of a task to the trashcan.
 Editing of a task.
 Cloning of a task.
 Exporting of a task as xml object. The object can be imported again on another GSM.
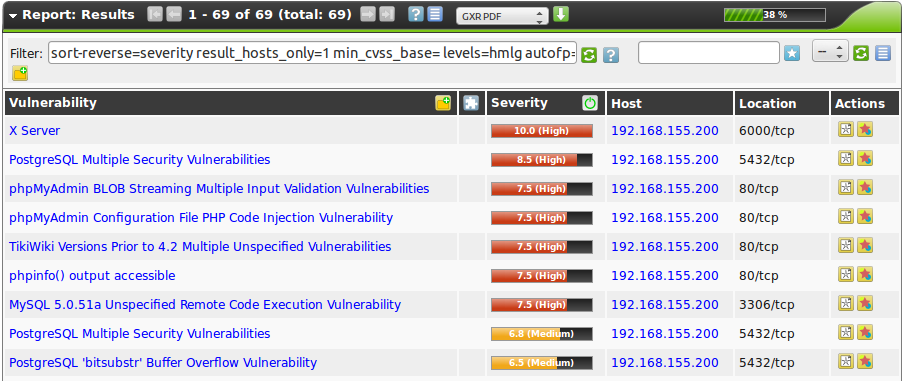
Even before the scan is completed the results can be viewed (see figure The results are already available before the scan is completed.).
With the mouse simply click on the progress bar.
The now displayed results are not complete yet of course.
The progress can be continued to be monitored at the top right via the progress bar.
This page, however, is not reloaded automatically.
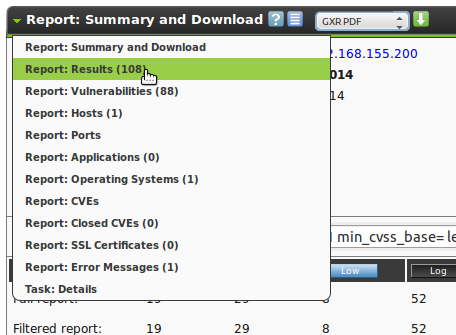
In order to obtain different representations of the results, you can move the mouse over the title bar.
It opens a pull-down menu where you can choose different representation formats.
Furthermore the report can be exported in various different formats as well.
The export formats are selected in the title bar as well.
Afterwards the report can be downloaded by clicking the  button.
Reports and report formats are discussed in more detail in section Reports.
7.1.2. Advanced Wizard
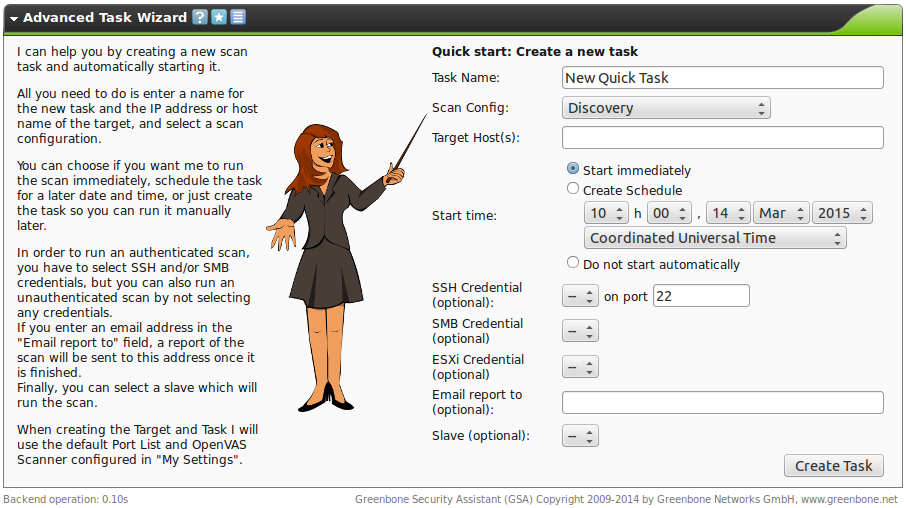
Next to the simple wizard the GSM also provides an advanced wizard that allows for more configuration options.
This wizard allows for shortcutting the manual configuration of the individual parameters and still allows for a more granular configuration.
This wizard can be started by clicking on the wizard icon  in the context menu.
Here a wizard can be executed that allows for the modification of a task (Modify Task Wizard).
7.1.3. Manual Configuration
The upcoming section covers the creation of a simple scan with its individual steps that the wizard performs as well.
You can chose your own names that make sense for the scan targets (Targets) and the scan task (Task).
 These steps are also explained in a video at http://docs.greenbone.net/Videos/gos-3.1/en/GSM-FirstScan-GOS-3.1-en-20150716.mp4.
7.1.3.1. Creating a Target
The first step is to define a scan target.
This is called Target by the Greenbone Security Assistant.
First chose one or more systems in your network you want to scan.
The IP address or DNS name is required.
In both cases it is necessary that the GSM can reach the system.
When using the DNS name the GSM appliance must be able to resolve the name.
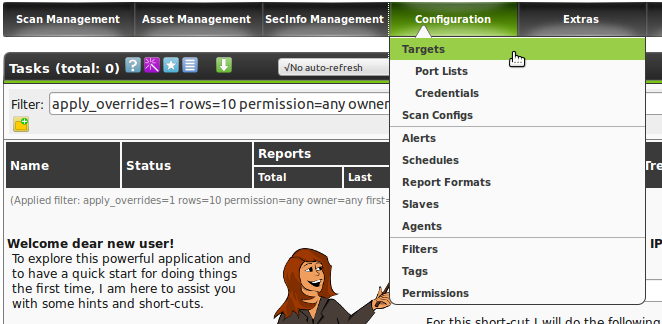
Choose Targets from the menu Configuration.
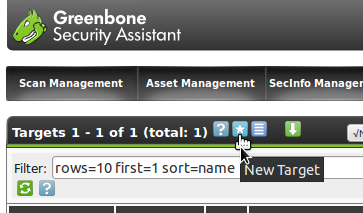
Select the New Target icon (the white star on blue background:  ).
This icon can be found in many places.
It always stands for the creation of a new object within its respective context.
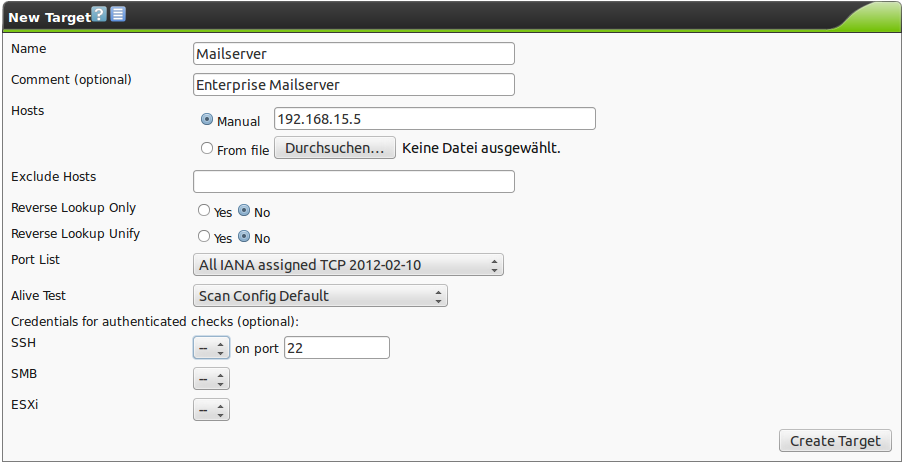
A new window, in which the target can be configured in more detail, will open.
Enter the following information:
Name
The name can be freely chosen.
A very descriptive name should be chosen if possible.
Possibilities are Mailserver, ClientNetwork, Webserverfarm, DMZ or the like, describing the entered systems in more detail.
- Comment
The optional comment allows to specify background information.
It simplifies understanding the configured targets later.
- Hosts
Manual entry of the system or importing of a list of systems.
When entering manually the following options are available:
- Single IP address, i.e. 192.168.15.5
- System name, i.e. mail.example.com
- IPv4 address range, i.e. 192.168.15.5-192.168.15.27 or 192.168.55.5-27
- IPv4 network in CIDR notation, i.e. 192.168.15.0/24
- Single IPv6 address
- IPv6 address range in long format, i.e. ::12:fe5:fb50-::12:fe6:100
- IPv6 address range in short format, i.e. ::13:fe5:fb50-fb80
- IPv6 address range in CIDR notation, i.e. fe80::222:64ff:fe76:4cea/120
- multiple entries can be entered separated with commas
When importing from a file the same syntax can be used.
The entries can be stored in the file on multiple lines.
When using long lists of systems to be scanned this way is usually the simpler one.
- Exclude Hosts
Systems that should be excluded from the lists mentioned above.
- Reverse Lookup Only
Only scan IP addresses that can be resolved into a DNS name.
- Reverse Lookup Unify
Should the reverse lookups get unified.
If multiple IP addresses resolve to the same DNS name the DNS name will only get scanned once.
- Port list
The TCP and UDP protocols support 65535 ports respectively.
Scanning all ports in many cases takes too long.
Many ports are normally not being used.
A manufacturer developing a new application often reserves the respective port with the IANA.
For most scans it is often enough to scan the ports registered with the IANA.
The registered ports differentiate from the privileged ports.
Privileged ports are ports smaller than 1024 .
At the IANA, for example, ports 1433/tcp (MS-SQL) and 3306/tcp (MySQL) are also included in the list.
Nmap uses a different list also and doesn’t check all ports either.
OpenVAS uses a different default as well.
The scan of TCP ports can be performed simply and fast.
Operating system always reply to a TCP request and as such advertise a port as being open (TCP-ACK) or closed (TCP-RST).
With UDP this is not the case.
The operating system only responds reliably when the port is closed (ICMP-Port-Unreachable).
An open port is deducted by the scanner by a missing response.
This is why the scanner has to wait for an internal timeout.
This behaviour is only true for systems not protected by a firewall.
When a firewall exists the discovery of open or closed ports is much more difficult.
If applications run on unusual ports and they should be monitored and tested with the GSM, the default port lists should be verified under Configuration submenu Port Lists.
If necessary create your own list that includes your port.
The default port lists can not be modified.
- Alive Test
Should the scan check if a target (Targets) is reachable.
Options are:
- ICMP Ping
- TCP Service Ping
- ARP Ping
- ICMP & TCP Service Ping
- ICMP & ARP Ping
- TCP Service & ARP Ping
- ICMP, TCP Service & ARP Ping
In the real world there are problems with this test from time to time.
In some environments routers and firewall systems respond to a TCP Service Ping with a TCP-RST even though the host is actually not alive.
Network components also exist that support a Proxy-ARP and respond to an ARP-Ping.
This is why this test requires local customization to your environment.
- SSH Credential
Selection of a user that can log into the target system of a scan if it is a Linux or UNIX system.
This allows for an Authorized Scan (see section Authenticated Scan).
- SMB Credential
Selection of a user that can log into the target system of a scan if it is a Microsoft Windows system.
This allows for an Authorized Scan (see section Authenticated Scan).
- ESXi Credential
Selection of a user that can log into the target system of a scan if it is a VMWare ESXi system.
This allows for an Authorized Scan (see section Authenticated Scan).
7.1.3.2. Creating a Task
The GSM controls the execution of a scan as Tasks.
These tasks can be repeated regularly or run at specific times.
The control is discussed in more detail in section Scheduled Scan.
For now the basic creation of a task is covered in this section.
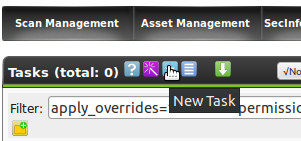
To access the tasks select menu option Scan Management from the menu bar.
From there select the Tasks.
On the following page select the white star  on blue background to create a new task.
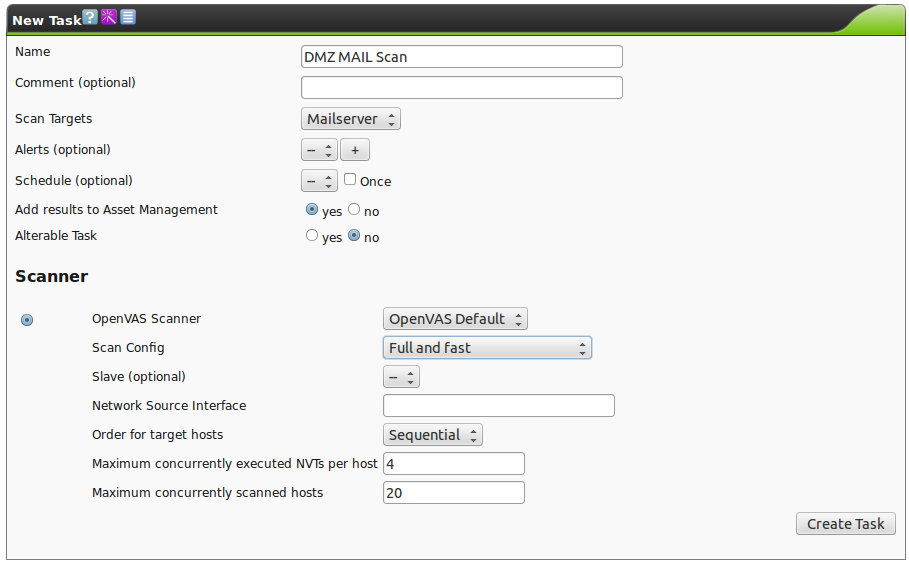
A web page opens on which you can configure the additional options of the task.
The following information can be entered:
- Name
The name can be chosen freely.
A descriptive name should be used if possible.
Possibilities to describe the entered task are Scan Mailserver, Test ClientNetwork, Check DMZ for new ports and systems or the like.
- Comment
The optional comment allows for the entry of background information.
It simplifies understanding the configured task later.
- Scan Targets
Select a previously configured Target from the drop down menu.
- Alerts
Select a previously configured Alert.
Status changes of a task can be communicated to the world via email, Syslog, HTTP or a connector.
- Schedule
Select a previously configured Schedule.
The task can be run once or repeatedly at a predetermined time.
It is possible to scan the network every Monday morning at 6:00 am for example.
- Add results to Asset Management
Selecting this option will make the systems available to the Asset Management of the GSM automatically (see chapter Asset Management).
This selection can be changed at a later point as well.
- Alterable Task
Allow for modification of the task even though reports were already created.
The consistency between reports can no longer be guaranteed if tasks are altered.
Scanner
- OpenVAS Scanner
By default only the OpenVAS scanning engine is supported. Additional scanning engines are the Palo Alto and W3AF scanning engines.
- Scan Config
The GSM comes by default with seven pre-configured scan configurations.
- Discovery
Only NVTs are used that provide the most possible information of the target system.
No vulnerabilities are being detected.
- Host Discovery
Only NVTs are used that discover target systems.
This scan only reports the list of systems discovered.
- System Discovery
Only NVTs are used that discover target systems including installed operating systems and hardware in use.
- Full and Fast
This is the default and for many environments the best option to start with.
This configuration is based on the information gathered in the prior port scan and uses almost all NVTs.
Only NVTs are used that will not damage the target system.
Plugins are optimized in the best possible way to keep the potential false negative rate especially low.
The other configurations only provide more value only in rare cases but with much more required effort.
- Full and fast ultimate
This configuration expands the first configuration with NVTs that could disrupt services or systems or even cause shut downs.
- Full and very deep
This configuration differs from the Full and Fast configuration in the results of the port scan not having an impact on the selection of the NVTs.
Therefore NVTs will be used that will have to wait for a timeout.
This scan is very slow.
- Full and very deep ultimate
This configuration adds the dangerous NVTs that could cause possible service or system disruptions to the Full and very deep configuration.
- Slave
Selection of a previously created slave that will be used by the performing scan.
The scan can be delegated to another system which has better access to the target system.
- Network Source Interface
Here you can choose the source interface for the scan.
- Order for target hosts
Select how the specified network area should be searched.
Options available are:
- Sequential
- Random
- Reverse
This is interesting if for example a network, i.e. 192.168.0.0/24, is being scanned that has lots of systems at the beginning or end of the IP address range.
With the selection of the Random mode the progress view is more meaningful.
- Scan Intensity
Select the speed of the scan.
The default values are chosen sensibly.
If more NVTs run simultaneously on a system or more systems are scanned at the same time, there is the danger that a scan has a negative impact on the performance of the systems or network.
7.1.3.3. Permissions
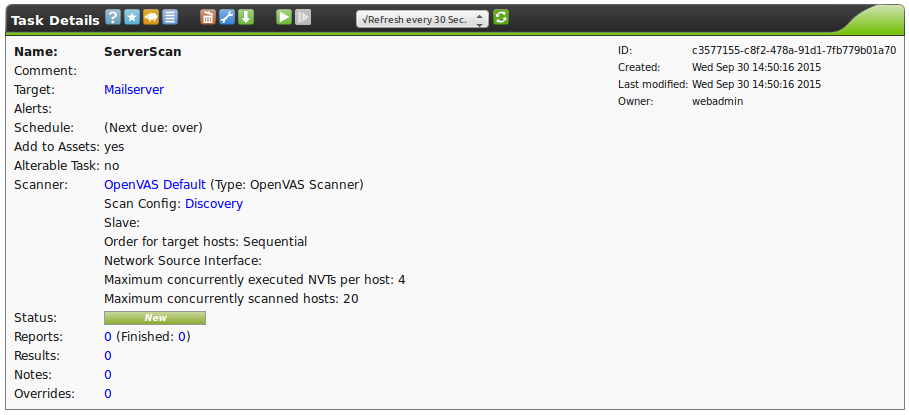
Once the task is saved it will be displayed next (see figure A newly created task.).
When scrolling the window further down the permissions for the task can be managed.
Note
By default normal users can not create permissions for other users as they do not have read permission to the user database.
To do this a user must specifically have the get_users permission.
It makes most sense to create an additional role (see section GetUsers Role for Observers).
Select User, Group or Role respectively and enter the respective name.
After clicking on  the permissions are entered.
This is now displayed in the task overview.
After logging in the user can see those tasks and can access the respective reports.
This is now displayed in the task overview.
7.1.3.5. Container Task
A Container Task can be used to import and provide reports created on other GSMs.
When creating the Container Task the first report needs to be imported right away.
Afterwards additional reports can be imported and, like in this example, be compared with a delta report as well.
The reports need to be in the GSM xml report format.
7.2. Reports
The results of a scan are summarized in a report.
Reports can be viewed with a browser and downloaded from the GSM in different formats.
Once a scan has been started the report of the results found so far, can be viewed.
Once a scan is complete its status changed to Done.
From now on no additional results will get added.
For more information on reports please refer to the Reports chapter as well.
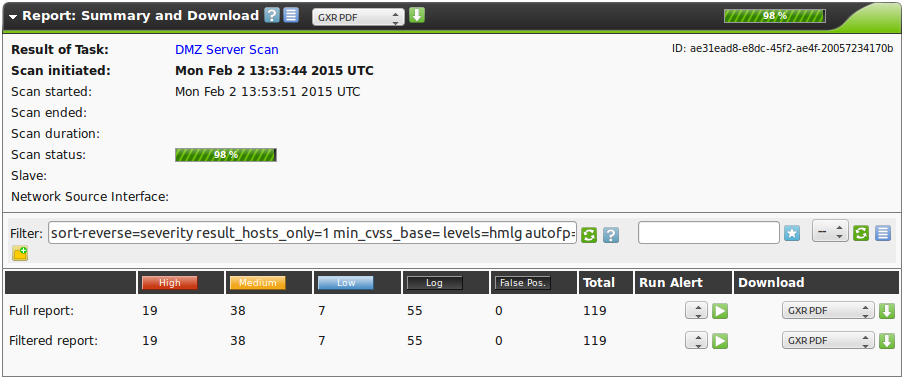
The report summary gives a quick overview over the current state.
It shows if a scan is complete and how many vulnerabilities have already been found.
From the summery a report can be downloaded directly in many different formats.
The following formats are supported (see also section Report Plugins)
- ARF: Asset Reporting Format v1.0.0
- This format creates a report that represents the NIST Asset Reporting Format.
- CPE - Common Enumeration CSV Table
- This report selects all CPE tables and creates a single comma separated file.
- CSV hosts
- This report creates a comma separated file containing the systems discovered.
- CSV Results
- This report creates a comma separated file with the results of a scan.
- GSR PDF - Greenbone Security Report (recommended)
- This is the complete Greenbone Security report with all vulnerabilities.
- GXR PDF - Greenbone Executive Report (recommended)
- This is a shortened report for management.
- HTML
- This report is in HTML format.
- ITG - IT-Grundschutz catalogue
- This report is guided by the BSI IT-Grundschutz catalogue.
- LaTeX
- This report is offered as LaTeX source text.
- NBE
- This is the old OpenVAS/Nessus report format.
Details of a report can be viewed in the web UI as well.
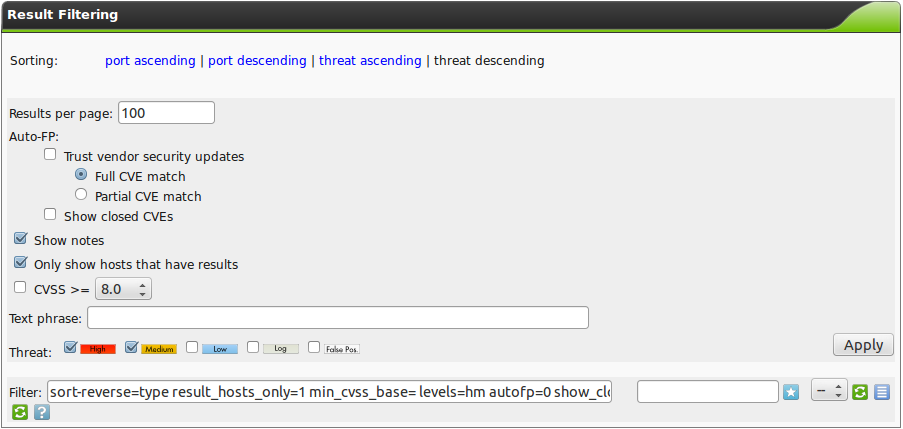
Since a report often contains a lot of findings, the complete report as well as only filtered results can be viewed and downloaded.
In the default setting only the High and Medium risks are being displayed.
This can be changed very easily.
In the Filtered Results section shows the filtered results.
As long as the scan is still running can cause rearrangements here.
To interpret the results please note the following information:
False Positives 
A false positive is a finding that describes a problem that does not exists in reality.
Vulnerability scanners often find evidence that point at a vulnerability.
However, a final judgment cannot be made.
There are two options available:
- Reporting of a potentially nonexistent vulnerability (False Positive).
- Ignoring reporting of a potentially existing vulnerability (False Negative).
Since a user can identify, manage and as such deal with false positives compared to false negatives, the GSM Vulnerability Scanner reports all potentially existing vulnerabilities.
The GSM assists with several automatic and semi-automatic to categorize them.
This problem is very common with Enterprise Linux distributions.
If, for example, a SSH service in version 4.4 is installed and the software reports this version during a connection attempt, a vulnerability scanner, that knows of a vulnerability in this version, will report this as such.
The vendor potentially already addressed the vulnerability and released version 4.4-p1 that is already installed.
This version still reports to the outside version 4.4 so that the vulnerability scanner cannot differentiate.
If the user knows of this circumstance an Override can be configured (see section Overrides and False Positives).
The AutoFP function (see section Automatic False Positives) can assist here as well.
- Multiple findings can have the same cause.
Is an especially old software package installed often multiple vulnerabilities exist.
Each of these vulnerabilities is tested by an individual NVT and causes an alert.
The installation of a current package will then remove a lot of vulnerabilities at once.
- Important are findings of the levels High
 and Medium
  .
Address these findings in order of priority.
Before addressing medium level findings, high level findings should get addressed.
Only in exceptional cases, when it is known that the high alerts need to be less considered (because the service cannot be reached through the firewall) should this approach be deviated from.
- Low
 and Log
  are mostly interesting for detail understanding.
This is why these findings are filtered out by default.
These findings can hold very interesting information however and considering them will increase the security of your network and systems.
For their understanding often a deeper knowledge of the applications is required.
Typical for an alert at the log level is that a service uses a banner with its name and version number.
This could be useful for an attacker during an attack if this version has a known vulnerability.
- To simplify the remediation of vulnerabilities every alert offers a solution for problems directly.
In most cases it will be referred to the latest vendor software package.
In some cases a configuration change will be mentioned.
- References explain the vulnerabilities further.
Even though the alerts contain a lot of information external references are always listed.
These refer to web sites on which the vulnerability was already discussed.
Additional background information is available such as who discovered the vulnerability, what effects it could have and how the vulnerability can be remediated.
7.2.1. Reading of the Reports
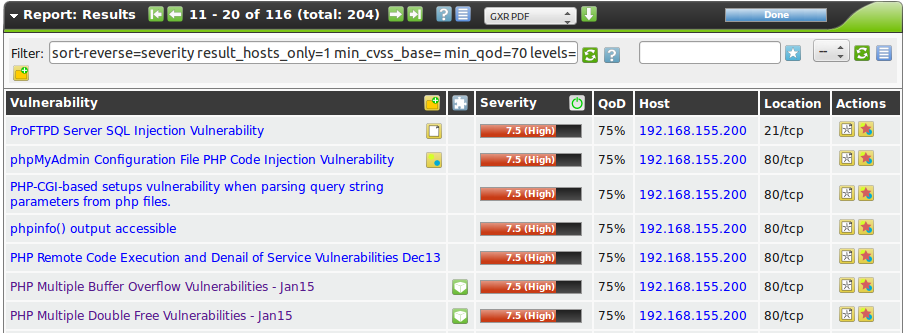
The report contains a list of all of the vulnerabilities detected by the GSM (see figure List of discovered vulnerabilities)
To support the administrator with the analysis of the results the severity of a vulnerability (CVSS, see also section CVSS)is displayed directly as a bar.
To point the administrator to a simple solution the column Solution-Type  displays the existence of a solution.
The column will display if a vendor patch
  exists or a workaround
  is available.
It will also be displayed if no solution for a vulnerability exists
  .
If the column of the respective vulnerability still appears empty then the respective NVT has not been updated yet.
The column Quality of Detection (QoD) provides information in regards to the reliability of the successful detection of a vulnerability.
This assessment is implemented into all existing NVTs step by step (see section Network Vulnerability Tests).
This column allows to be filtered as well. You can use the min_qod in the Powerfilter.
By default only NVTs with a QoD of 70% are displayed.
Vulnerabilities with a lower reliability of detection are not displayed in the report.
The possibility of false positives is thereby lower.
In the respective vulnerability view, additional, more detailed information is available.
7.3. Results
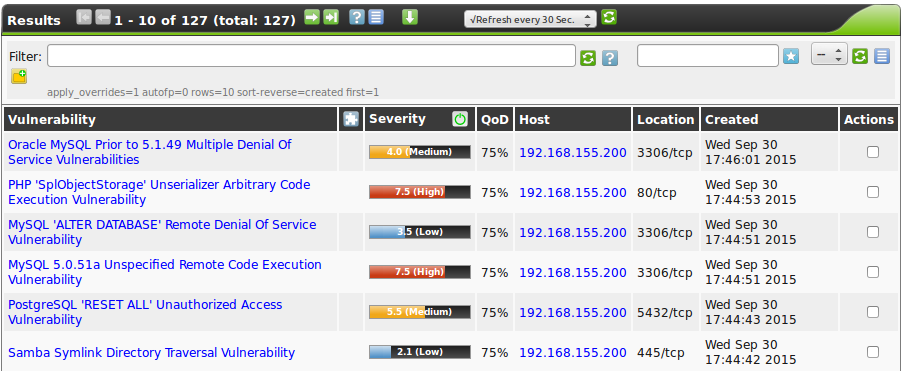
While the reports only contain the results of one single run of a task all results are saved in the internal database and can be viewed using Scan Managment/Results.
By default the view is sorted by the creation time of the results. But the results may be sorted by severity, QoD, solution type or host as well. Additionally powerfilters (see section Powerfilter) may be used to view just the interesting results.
7.4. Authenticated Scan
An authenticated scan logs into a target system in order to test it.
The scan uses credentials the scan user has saved on the GSM previously.
These credentials are used to authenticate with different services on the target system.
In some circumstances the results could be limited by the permissions of the users used.
A scan is minimally invasive.
It means that the GSM only determines the risk level but does not make any changes on the target system.
However the log in by the GSM is being logged in the protocols of the target system.
The GSM can use the credentials for different services.
However, the most important ones are:
- SMB
On Windows systems the GSM can check the patch level and locally installed software such as Adobe Acrobat Reader or the Java suite.
- SSH
This access is used to check the patch level on UNIX and Linux systems.
- ESXi
This access is used for testing of VMWare ESXi servers locally.
The extent and success of the testing routines for authenticated scans depends on the heavily on the permissions of the account used for access.
Especially on Windows systems unprivileged users are very restricted.
To create credentials access the submenu Credentials from the Configuration menu.
The following information can be entered:
- Name
An arbitrary name for the credentials.
- Login
The log in name with which the GSM authenticates on the system that is to be scanned.
- Comment
A freely selectable comment.
- Autogenerate Credentials
The GSM itself is creating a random password.
- Password
The password can be entered.
- Key Pair
If authentication is performed via SSH the private keys can be uploaded.
Additionally an optional passphrase of the private key can be entered.
7.4.1. Requirements on Target Systems with Windows
7.4.1.1. General notes on configuration
The remote registry service must be started in order to access the registry
You can achieve this by configuring the service to automatically start up.
If you do not prefer the automatic start, you could configure manual start up.
In that case the service will be started while the system is scanned by GSM and afterwards it will be disabled again.
To ensure this behaviour the following item about LocalAccountTokenFilterPolicy must be considered.
It is necessary that for all scanned systems the file and printer sharing is activated.
When using Windows XP, take care to disable the setting “Use Simple File Sharing”.
For individual systems not attached to a domain the following registry key must be set:
HKLM\SOFTWARE\Microsoft\Windows\CurrentVersion\Policies\system\DWORD:
LocalAccountTokenFilterPolicy = 1
On systems with domain controller the user account in use must be a member of the group Domain Administrators to achieve the best possible results.
Due to the permission concept it is not possible to discover all vulnerabilities using the Local Administrator or the administrators assigned by the domain.
Alternatively follow the instructions below under Configuring a domain account for authenticated scans.
Should a Local Administrator be selected – which we explicitly do not recommend – it is mandatory to set the following registry key as well:
HKLM\SOFTWARE\Microsoft\Windows\CurrentVersion\Policies\system\DWORD:
LocalAccountTokenFilterPolicy = 1
Generated install package for credentials:
The installer sets the Remote Registry service to auto start.
If the installer is executed on a Domain Controller the user account will be assigned to the Group Domain Administrators (SID S-1-5-32-544).
An exception rule for the GSM on the Windows firewall must be created.
Additionally on XP systems the File and Printer Sharing must be set to enabled.
Generated install package for credentials:
During the installation the installer offers a dialog to enter the IP address of the GSM.
If the entry is confirmed the firewall rule is configured.
The File and Printer Sharing service will be enabled in the firewall rules.
7.4.1.2. Configuring a domain account for authenticated scans
In order to use a domain account for host based remote audits on a windows target this must be performed under Windows XP Professional, Windows Vista, Windows 2003, Windows 2008, Windows 2012 Windows 7, Windows 8 or Windows 8.1 and also be part of a domain.
Taking security into consideration the following eight steps should be implemented to create these scans.
7.4.1.2.1. Step 1: Create a security group
First create a security group called Greenbone Local Scan:
- Log into a domain controller and open
Active Directory Users and Computers.
- Now create the security group in the menu. Select .
- Call the group
Greenbone Local Scan. It is important that the Global is selected for the Group Scope and Security as the Group Type.
- Add the account, that is being used for the local authenticated scans under Windows by the Greenbone Appliance, to the group
Greenbone Local Scan.
7.4.1.2.2. Step 2: Create a Group Policy
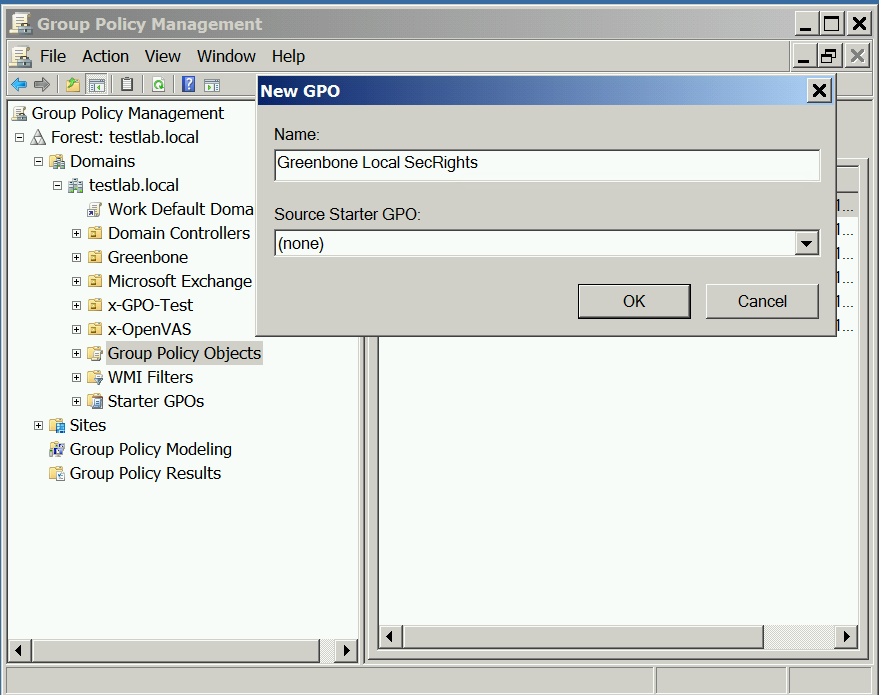
Now create a group policy with called Greenbone Local SecRights.
Open the Group Policy Management console.
Right click on Group Policy Objects and select New.
Enter Greenbone Local SecRights as the name of the policy.
7.4.1.2.3. Step 3: Configuration of the Policy
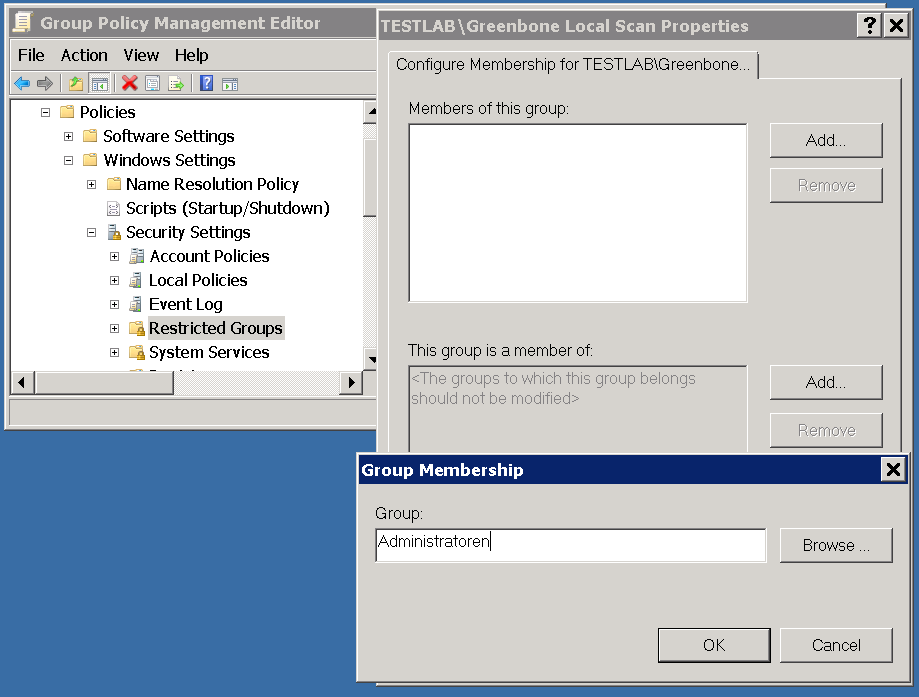
Add the group Greenbone Local Scan to the Greenbone Local SecRIghts policy and insert local administrators to the groups.
Please note that this setting still exists after the GPO has been removed (Tattooing GPO).
Click on the policy Greenbone Local SecRights and select Edit.
Open:
Computer Configuration\Policies\Windows Settings\
Security Settings\Restricted Groups
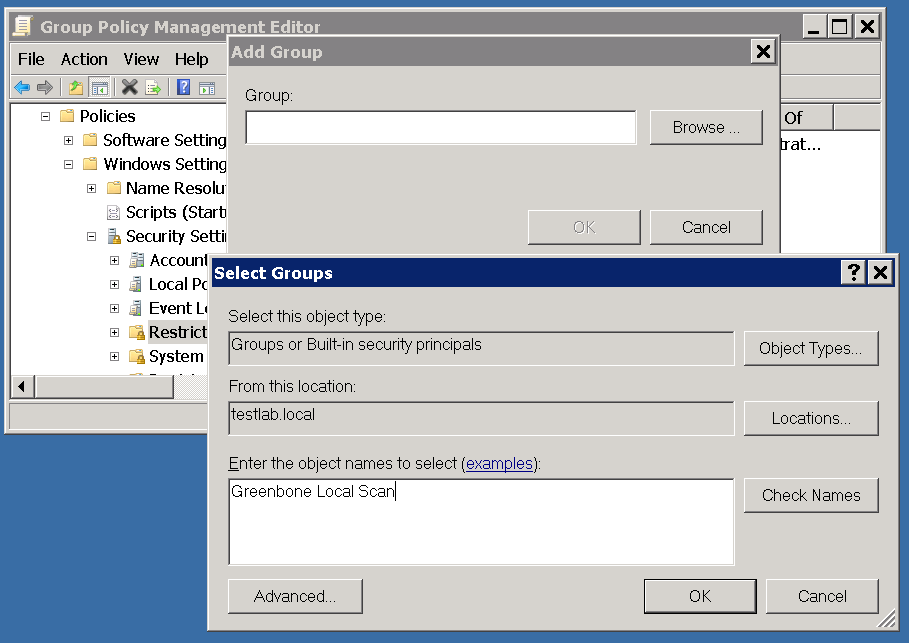
In the left pane right click on Restricted Groups and select Add Group
Now select Browse in the Add Group dialog, enter Greenbone Local Scan, afterwards click Check Names.
Click OK twice to close the opened dialog.
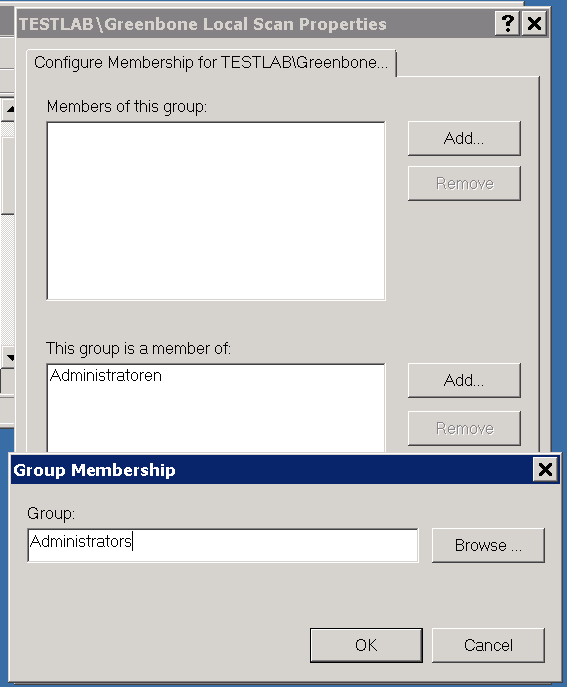
Under This group is member of: click on Add.
Add the group Administrators. Additionally on non-English systems enter the respective name of the local administrator group.
Click OK twice.
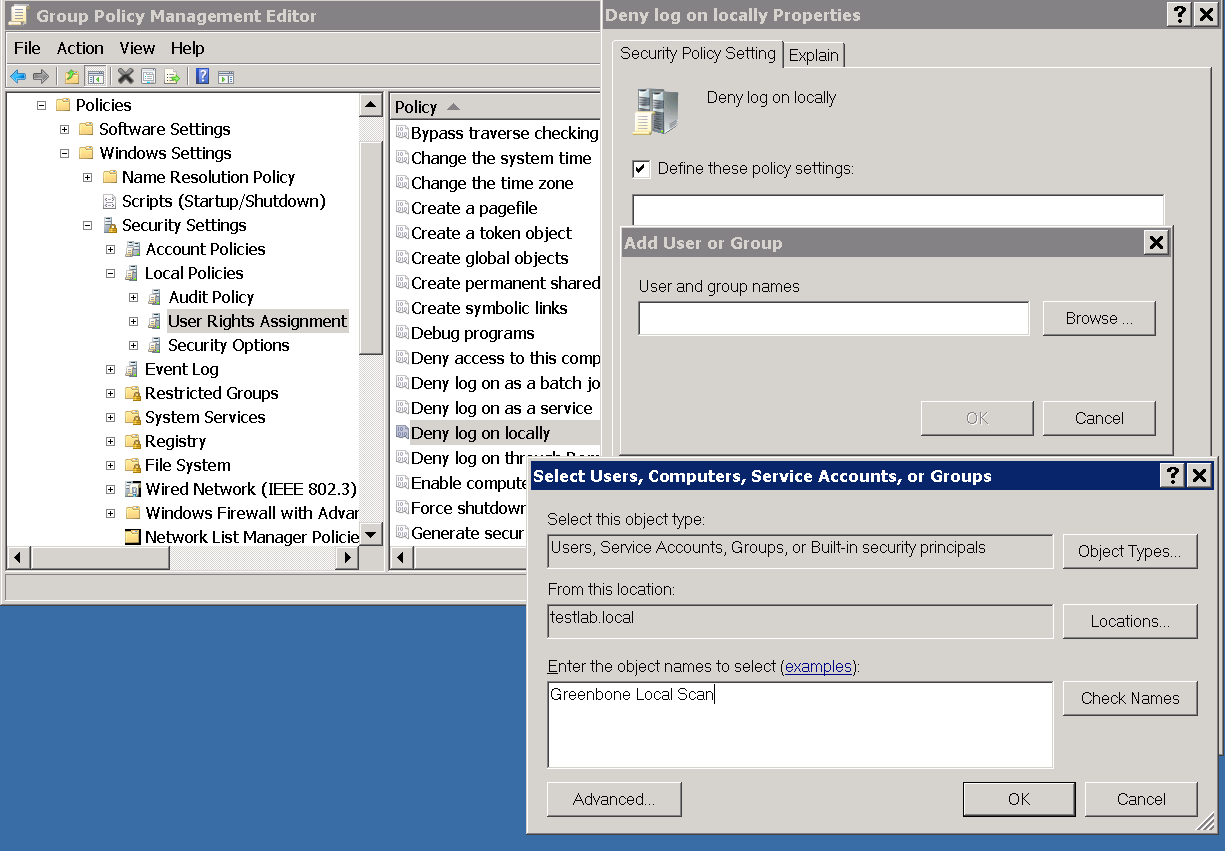
Step 4: Configuration of the policy, to deny local log on systems of the Greenbone Local Scan group
Add the Greenbone Local Scan to the Greenbone Local SecRights group and deny the local log in of group members.
Click on the Greenbone Local SecRights and then select Edit.
Open:
Computer Configuration\Policies\Windows Settings\Security Settigns\
Local Policies\User Rights Assignment
In the right pane double click on Deny log on locally
Set the checkmark in Define these policy settings:
Click on Add User or Group
Now select Browse, enter Greenbone Local Scan and then click on Check Names.
Now click twice on OK to close the opened dialog.
Click OK.
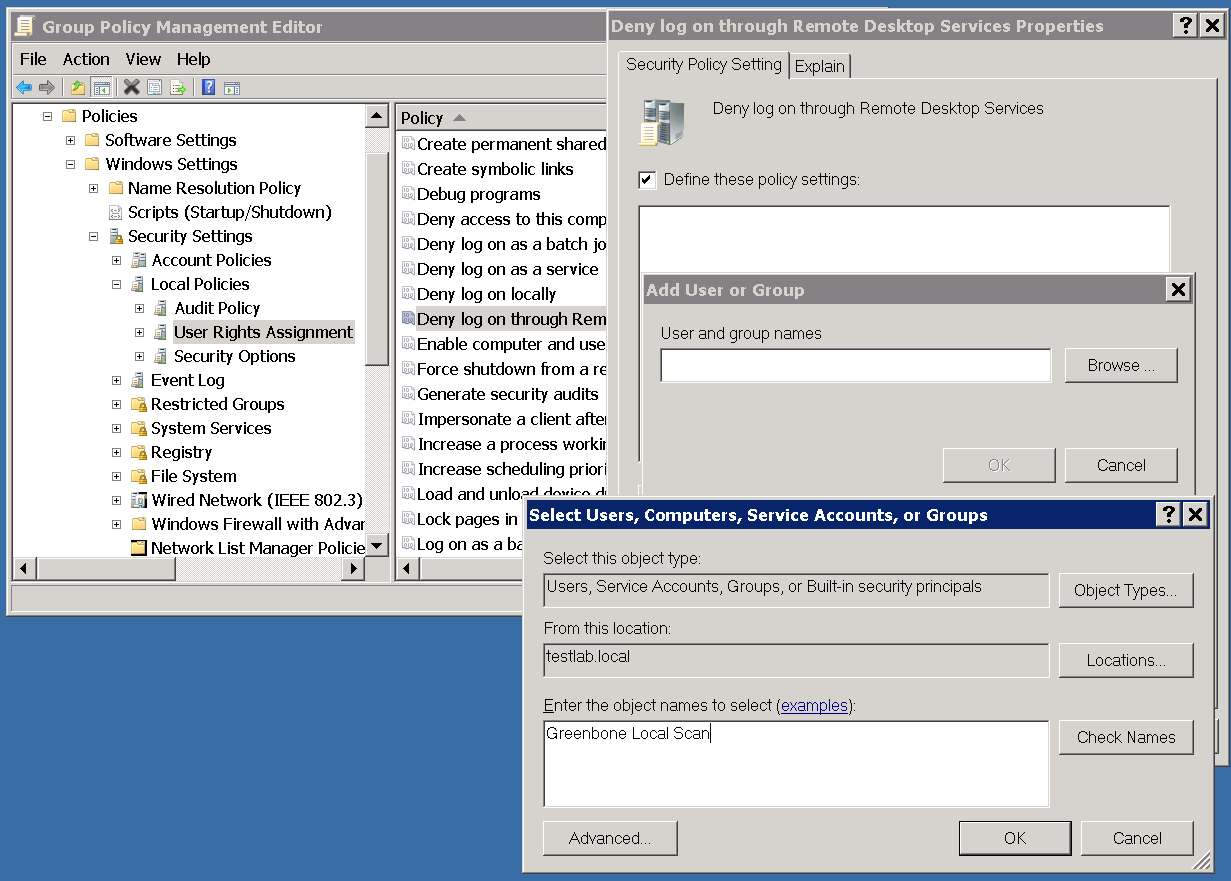
Step 5: Configure the policy to deny the group Greenbone Local Scan logging into systems remotely
Add the Greenbone Local Scan to the Greenbone Local SecRights group and deny group members logging in via RDP.
Click the policy Greenbone Local SecRights and then select Edit.
Open:
Computer Configuration\Polices\Windows Settings\Security Settings\
Local Policies\User Rights Assignment
In the right pane double click on Deny log on through Remote Desktop Services.
Set the checkmark in Define these policy settings:
Click on Add User or Group
Now select Browse in the dialog, enter Greenbone Local Scan, then click on Check Names.
Now click twice on OK to close the opened dialog.
Click OK.
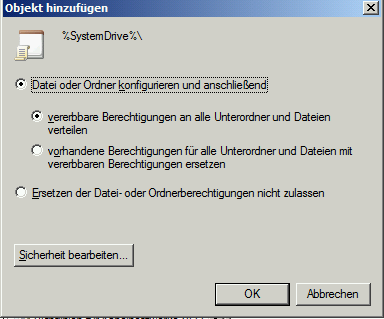
Step 6 (Optional): Configure the policy to give only read permissions to the local drive for the Greenbone Local Scan group.
Restrict the permissions to the system drive in the Greenbone Local SecRights policy for the Greenbone Local Scan group.
Please note that this setting still exists after the GPO has been removed (Tattooing GPO).
Click on the Greenbone Local Sec Rights policy and then select Edit.
Open:
Computer Configuration\Polices\Windows Settings\Security Settings\File Systems
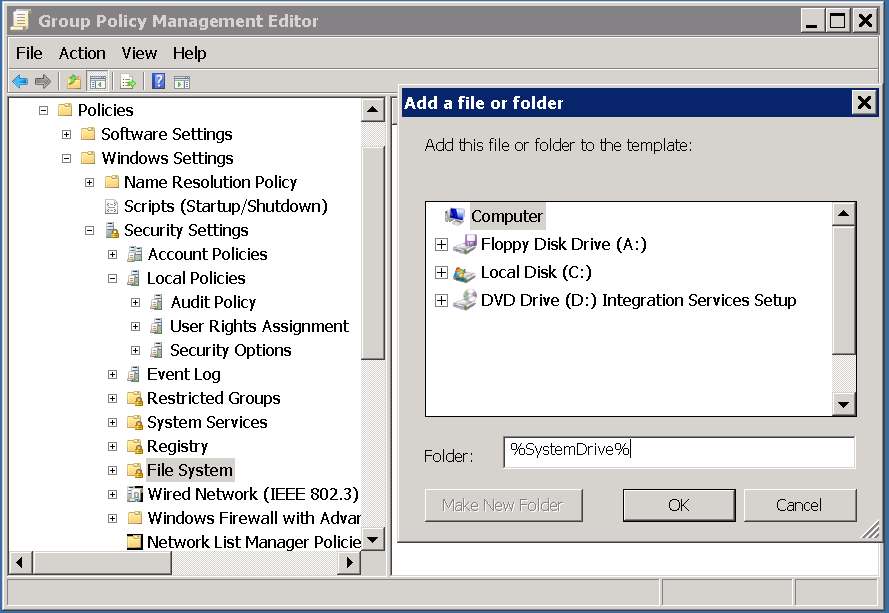
In the left pane right click on File System and select Add File….
In the Folder field enter: %SystemDrive% and click OK.
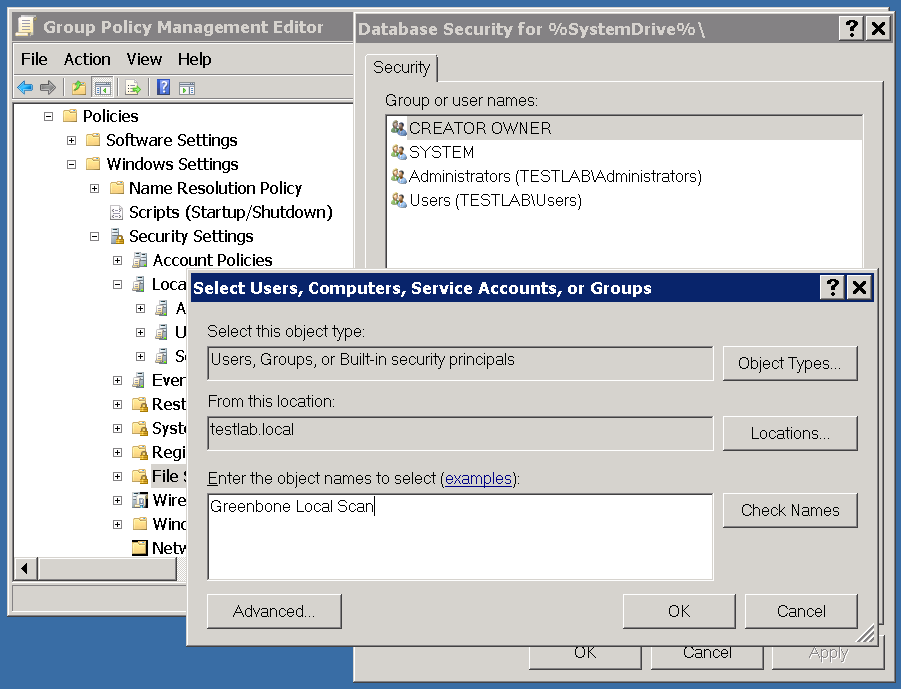
Click on Add under Group or user names:
In the dialog that opens enter Greenbone Local Scan and click OK.
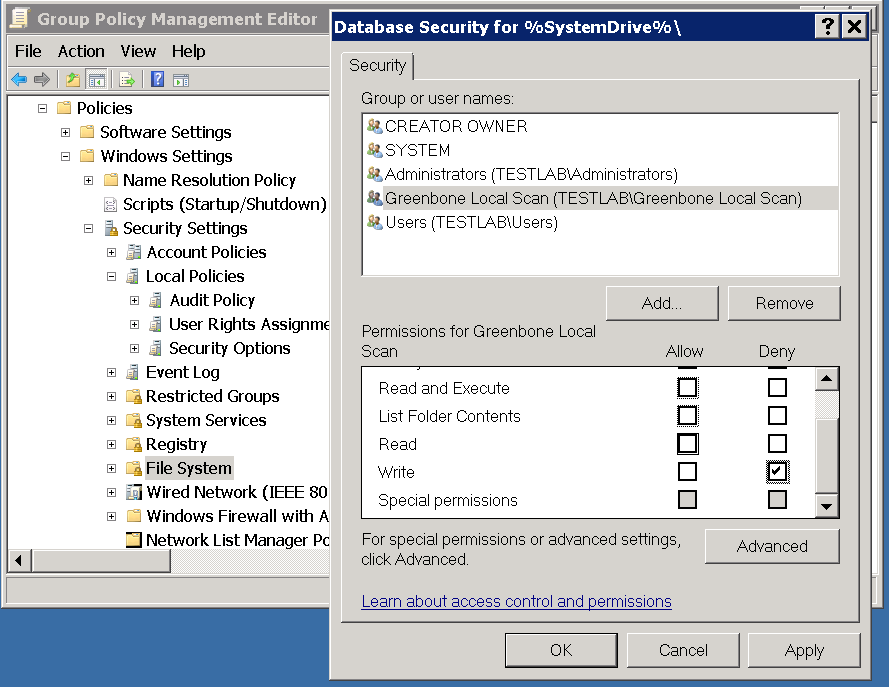
Now select the user Greenbone Local Scan.
Deactivate all checkmarks under Allow and activate the checkmarks under .
Afterwards click on OK and confirm the warning message with Yes.
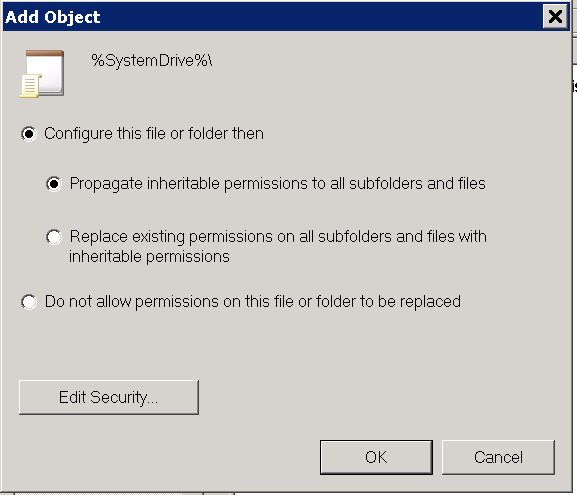
Now select Configure this file or folder then and Propagate inheritable permissions to all subfolders and files and then click on OK.
Step 7 (Optional): Configure the policy to give only read permissions to the registry for the Greenbone Local Scan group.
To achieve complete restriction is very difficult and possible with a lot of effort.
If necessary critical branches can be secured additionally by adding the branches manually.
Please note that this setting still exists after the GPO has been removed (Tattooing GPO).
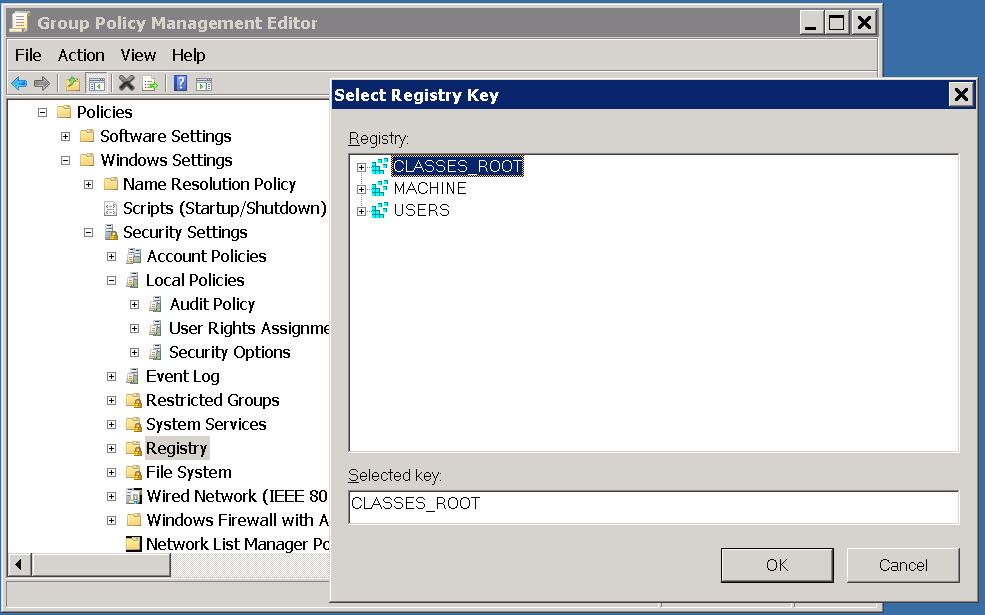
In the left pane right click Registry and select Add Key.
Select Users and click OK
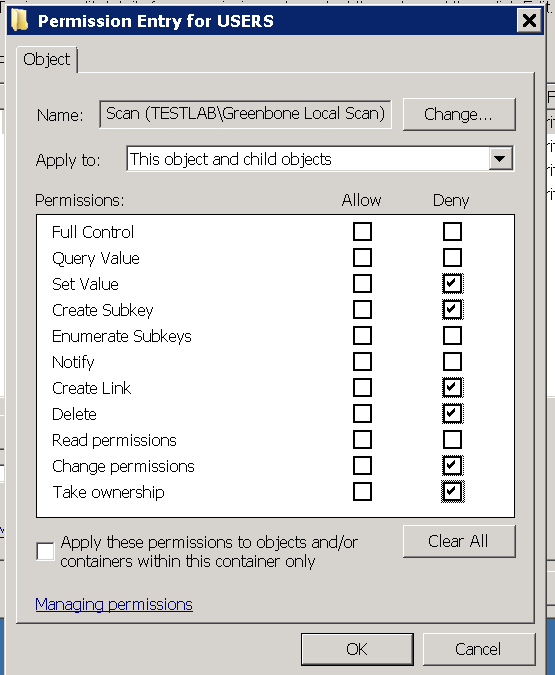
Click on Advanced and then Add.
Enter Greenbone Local Scan in the dialog that opens and click on OK.
In the following dialog select for Apply to: This object and child objects
Under Permissions select Deny for Set Value, Create Subkey, Create Link, Delete, Change Permissions and Take Ownership.
Do not select anything under Allow!
Afterwards click OK twice and confirm the warning message with Yes.
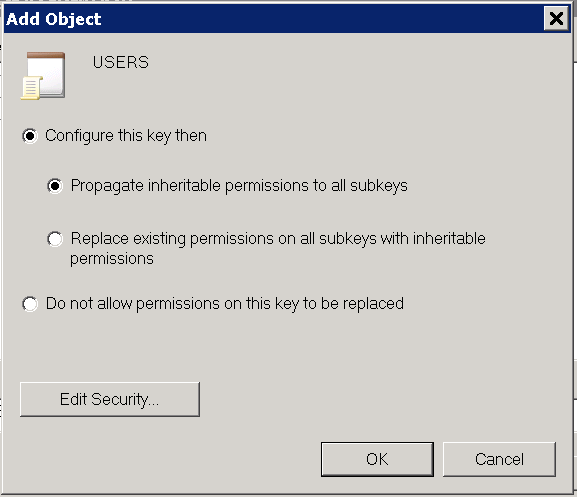
Click OK again.
Now select Configure this key then and Propagate inheritable permissions to all subkeys and then click OK.
Repeat the above mentioned steps also for MACHINE and CLASSES_ROOT by clicking on Registry in the right pane and then select Add key....
7.4.1.2.4. Step 8 (Optional): Linking of the Group Policy Object
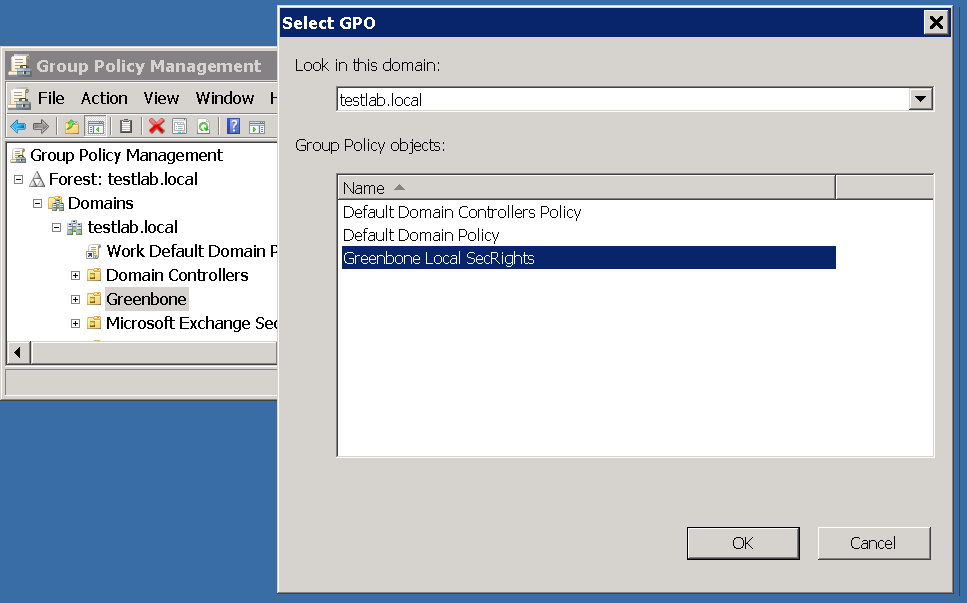
On the right pane in the Group Policy Management console right click on the domain or Organizational Unit Link an Existing GPO and select Link an Existing GPO….
Now select the group policy object Greenbone Local SecRights.
7.4.1.2.5. Restrictions
Based on the fact that write permissions to the registry and system drive have been removed, the following two tests will no longer work:
Leave information on scanned Windows hosts OID 1.3.6.1.4.1.25623.1.0.96171This test, if desired, creates information about the start and end of a scan under HKLMSoftwareVulScanInfo.
Due to denying write access to HKLM this is no longer possible.
If you continue to desire this the GPO must be adjusted here respectively.
Windows file Checksums OID 1.3.6.1.4.1.25623.1.0.96180This test, if desired, when executed saves the tool ReHash under C:\Windows\system32 (for 32-bit systems) or c:\Windows\SysWOW64 (for 64-bit systems).
Due to denying write access this is no longer possible.
The tool must be saved separately or the GPO must be adjusted respectively.
More information can be found in section File Checksums.
7.4.1.3. Scanning without domain admin and local admin permissions
Theoretically it is possible to build a GPO in which the user also does not have any local admin permissions.
But the effort to add respective read permissions to each registry branch and folder as well, is enormous.
Unfortunately inheriting of permissions is deactivated for many folders and branches.
Additionally these changes can be set by GPO but cannot be removed again (Tattooing GPO).
Also specific permissions could possibly be overwritten so that additional problems could occur.
To go this route does not make a lot of sense from a technical and administrative perspective.
7.4.2. Requirements on Target Systems with Linux/UNIX
- For authenticated scans on Linux or UNIX systems regular user access is usually enough.
The log in is performed via SSH.
The authentication is done wither with passwords or an SSH key stored on the GSM.
- Generated install package for credentials:
The install package for Linux Debian or Linux RedHat is a
.deb or a .rpm respectively, creating a new user without any specific permissions.
A SSH Key that is created on the GSM is stored in the users home folder.
For users of other Linux distributions or UNIX derivatives the key is offered for download.
The creation of a user and saving the key with the proper file permissions is the responsibility of the user.
- In both cases it needs to be made sure that Public Key authentication is not prohibited by the SSH daemon.
The line
PubkeyAuthentication no can not be present.
- Already existing SSH keys protected by an optional passphrase can be used as well.
It is recommended to use the RSA and DSA formats as created by the command ssh-keygen.
- For scans that include policy testing root permission or the membership in specific groups (often
wheel) might be necessary.
For security reasons many configuration files are only readable by super user or members of specific groups.
7.4.3. Requirements on Target Systems with ESXi
By default, local ESXi users are limited to read-only roles.
Either an administrative account or a read-only role with permission to global settings must be used.
To avoid using a administrative account, clone the Read-Only role and then select Global > Settings.
Finally the scan user account must be assigned with this new role.
7.5. Scheduled Scan
Once tasks are created executing them manually can be annoying.
The GSM offers the possibility to automate different tasks.
This is done via Schedules.
It can be found in the Configuration menu.
Directly after start up no schedule is pre-configured.
The first schedule needs to be created by you.
To do so select the  button.
The Greenbone Security Manager refers to Schedules as automatic scans at a specific time.
They can be run once or repeatedly.
The intervals can be configured in much detail:
- hourly
- daily
- weekly
- monthly
The time zone is very important in a schedule.
It can be selected from a drop down menu.
For Eastern Standard Time (EST) you will likely choose America/New York.
Finally the maximum duration of the scan can be limited.
If the scan takes longer it will aborted.
This way it can be ensured that the scan will always run with a specific time window.
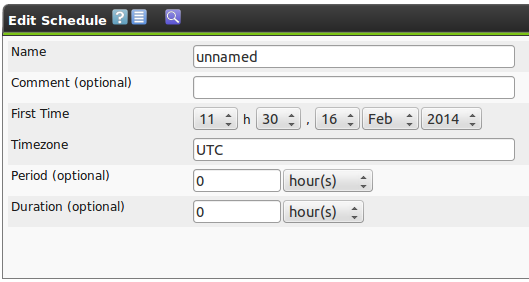
Now the schedule can be defined and the following data can be entered:
- Name
- This is a descriptive name.
Meaningful are entries such as
Daily 5:15pm or Every 2nd monthly 4:15am.
- Comment
- Enter a comment again.
- First Time
- Enter the time of the first run.
- Period
- This is the interval between two runs.
It can be selected between hourly, daily, weekly and monthly.
If left blank the interval is a single instance.
- Timezone
- Select the time zone.
UTC is standard.
- Duration
- This is the maximum duration a task can take for its execution.
After expiration of the of the time allotted the task is aborted.
7.6. Notes
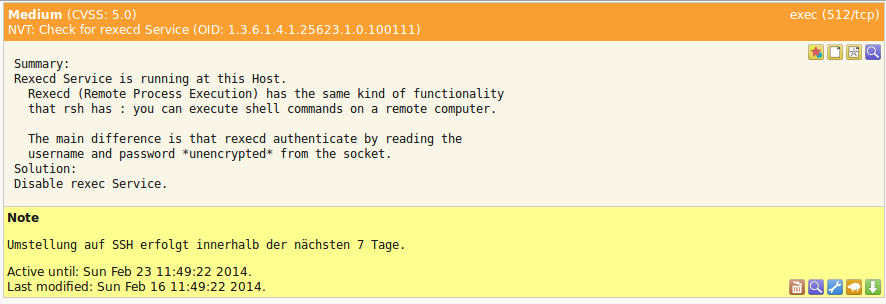
Notes allow adding comments to a Network Vulnerability Test (NVT).
They will also be displayed in the reports.
A Note can be added to a specific result, a specific task, a risk level, port or host and as such will only appear in specific reports.
A Note can be generalized just as well so that it will be displayed in all reports.
7.6.1. Creating notes
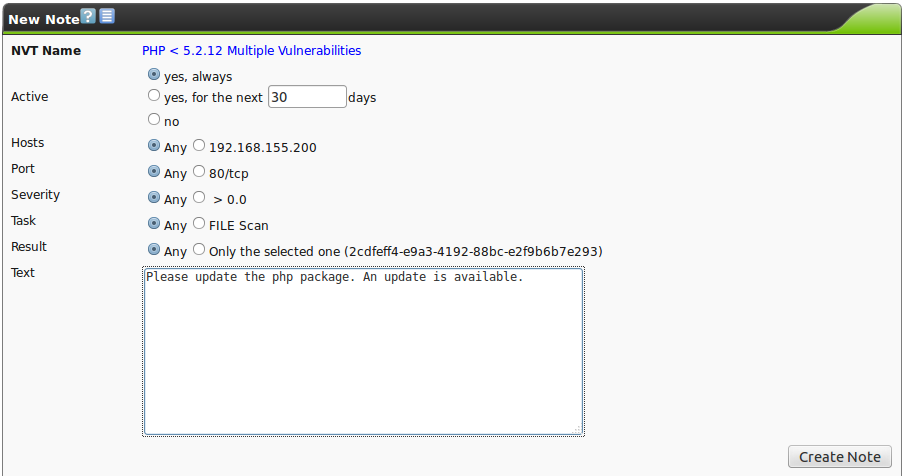
To create a new note select the finding in the report you want to add a note to and click New Note  .
Alternatively you can create a note without relation to a finding.
However, the GSM can not suggest any meaningful values for the different fields in the following dialogue.
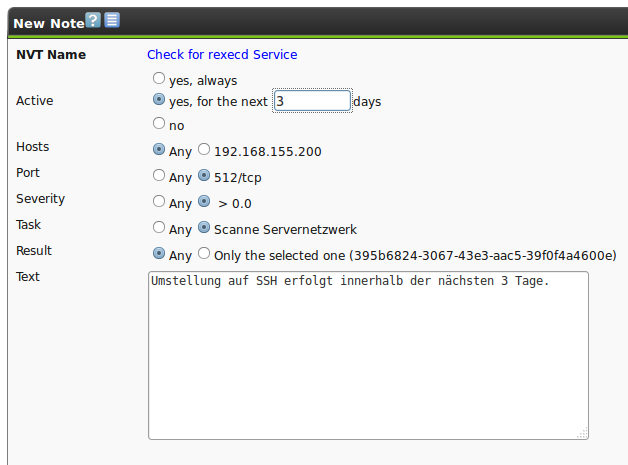
A new window opens in which exactly those criteria of the selected vulnerability are pre-set.
Individual values can be selected and unselected to generalize or the note even further or make it more specific.
Additionally the note can be activated for a specific period of time.
This allows adding of information to a note that a security update is uploaded in the next seven days.
For the next seven days the note will be displayed in the report that the vulnerability is being worked on.
7.6.2. Generalizing Notes
Any note can be generalized. In this example a quite extensive generalization is configured, matching any target host, port and task.
From this moment on the note is always shown in the results view if this NVT matches.
This applies for all previously created scan reports and for all future scan reports until the note is deleted.
7.6.3. Managing Notes
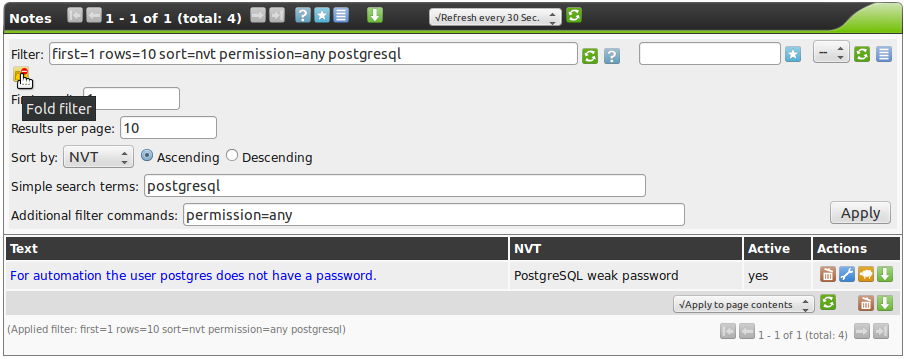
The created notes can be displayed under Scan Management and Notes.
Here completely new notes can be added as well.
Among others it is being displayed if created notes are currently active.
Additionally notes can be edited  .
To search for a specific note a search filter can be used respectively.
This will make it easier to find a specific note when especially a great deal of notes is available.
The search filter can be opened respectively end text entered appropriately or it can be entered directly into the filter window at the top.
These filters can, of course, be saved for later use as well.
7.7. Overrides and False Positives
The results of a report can not only be supplemented through meaningful or helpful data but the severity of the results can be modified.
This is called Override by the GSM.
These overrides are especially useful to manage results that are discovered as a false positive and that have been given a critical severity but should be given a different severity (i.e. False Positive) in the future.
The same is true for results that only have been given the severity Log but should be assigned a higher severity locally.
These can be managed with an override as well.
The use of overrides makes also sense to manage acceptable risks.
The risk of a vulnerability can be ranked new and as such the risks that, in your opinion, are not critical can be re-evaluated in the results.
7.7.1. What is a false positive?
A false positive is a result that describes a problem that does not exist in reality.
Often vulnerability scanners find proof that point to a security issue.
A final prediction is not possible, however.
Two options are now available:
- Reporting of a potentially non-existent vulnerability (False Positive).
- Omission of the reporting of the potentially existing vulnerability (False Negative).
Since a user is able to recognize, manage and handle these as it is not the case with false negatives, the GSM vulnerability scanner reports all potentially existing vulnerabilities.
The GSM assists with several automatic and semi-automatic to categorize them.
This problem is especially typical with Enterprise Linux distributions.
If, for example, a SSH service in version 4.4 is installed and the software reports this version during a connection attempt, a vulnerability scanner, that knows of a vulnerability in this version, will report this as such.
The vendor potentially already addressed the vulnerability and released version 4.4-p1 that is already installed.
This version still reports to the outside version 4.4 so that the vulnerability scanner cannot differentiate.
If the scan administrator knows of this circumstance an override can ensure that these results are no longer being displayed.
7.7.2. Creating an Override
Overrides like notes can be created in different ways.
The simplest way to get to this option is through the respective scan result in a report.
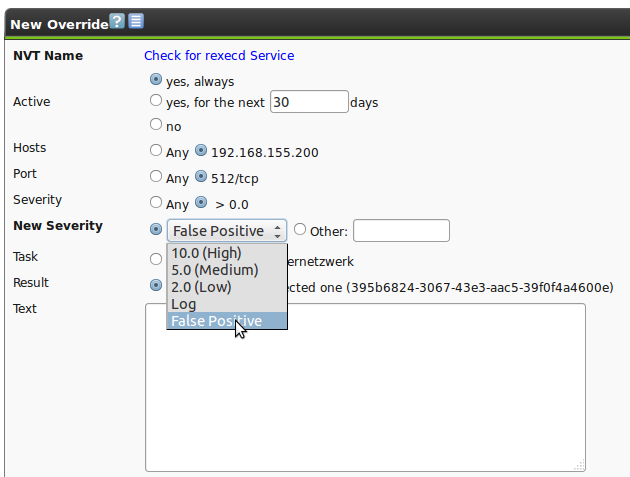
At the top right of each finding the Add Override icon  can be found.
Overrides have the same function as notes, however, they add the possibility to adjust the severity:
- High
- Medium
- Low
- Log
- False Positive
Vulnerabilities with the level False Positive are not being displayed in the reports.
But special reports for findings of this level can be created.
As with overrides they can have a time limitation.
7.7.3. Disabling and Enabling Overrides
Whereever overrides may change the display of the results, the overrides may be enabled or disabled. This may be done using the icon  in the title bar.
7.7.4. Automatic False Positives
The GSM is able to detect false positives automatically and can assign an override automatically.
However the target system must be analyzed internally and externally with an authenticated scan.
An authenticated scan can identify vulnerabilities in locally installed software.
As such vulnerabilities can be identified that can be exploited by local users or are available to an attacker if he already gained local access as an unprivileged user for example.
In many cases an attack occurs in different phases and an attacker exploits multiple vulnerabilities to increase his privileges.
An authenticated scan offers a second more powerful function justifying its execution.
In many cases by scanning the system externally, it can not be properly identified if a vulnerability really exists.
In doubt, the Greenbone Security Manager reports all potential vulnerabilities.
With the authenticated scan many of these potential vulnerabilities can be recognized and filtered as false positives.
This problem is especially typical with Enterprise Linux distributions.
If, for example, a SSH service in version 4.4 is installed and the software reports this version during a connection attempt, a vulnerability scanner, that knows of a vulnerability in this version, will report this as such.
The vendor potentially already addressed the vulnerability and released version 4.4-p1 that is already installed.
This version still reports to the outside version 4.4 so that the vulnerability scanner cannot differentiate.
If an authenticated scan was performed the GSM can recognize that the version 4.4-p1 is installed and no longer contains this vulnerability.
Automatic false positives are enabled with the Report-Filter function (see section Powerfilter).
This functionality gives the best results when using the Partial CVE match.
7.8. Scanning Web Applications
The Greenbone Security Manager supports scanning of web applications in two ways:
- With our own Network Vulnerability Tests (NVTs, over 1500 are of some relevance for web applications).
- With connected web applications scanners like the built-in scanner w3af
Using the NVTs, basically all that are relevant for web applications are already selected with the default scan configurations.
Alternatively you can narrow down the scope of the scan configuration to focus on web applications only.
An example is available for download which just needs to be imported as a new scan configuration: http://greenbone.net/download/web-app-scan.xml
Note
If you are only interested in the actual web service, you can change the target’s port list to cover only port 80 and/or 443.
There are various fine-tuning preferences available for the scan configuration.
Footnotes


