This chapter covers the user, group, role and permission management in detail.
15.1. User Management
The Greenbone Security Manager allows for the definition and the management of different users with different roles and permissions.
When initializing the GSM the first user, the web/scan administrator respectively, is being created via the GOS-Admin-Menu already.
This user allows the login and management of additional users.
The GSM user management supports a role based permission concept when accessing the web interface.
Various roles are already set up by default.
Additional roles can be created and used by an administrator.
The role defines which options of the web interface can be viewed and modified by the user.
Thereby the roles are not realized in the web interface rather than the underlying OMP protocol hence affecting all OMP clients.
Read and write access can be assigned to roles separately.
In addition to the roles the GSM user management supports groups as well.
Groups allow the combining of users.
This serves mainly for logical grouping.
Aside from the management of permissions for the roles groups can be assigned specific permissions.
Additionally, via the user management users can be assigned an IP address range which scanning is allowed or denied.
The GSM appliance will then refuse to scan any other IP addresses than the ones specified for the respective user.
Also the access to specific interfaces of the GSM appliance can be allowed and denied.
The Greenbone Security Manager offers its own User Management for the management of roles and the specific permissions of users.
However, in order not to store multiple passwords and to allow password synchronization the Greenbone Security Manager offers connecting the system to a central LDAP server.
It will only be used to verify the password during the log in process of the user.
All other settings are being performed in the User Management of the GSM appliance.
These functions are being covered in more detail below.
15.1.1. Creating and Managing Users
The dialog for the creation and management of users can be accessed via the Administration menu.
This menu is only visible to the administrators as only they are allowed to create and manage additional users.
The dialog to create a new user can be accessed via the white asterisk on blue background  or by selecting the wrench an existing user can be modified.
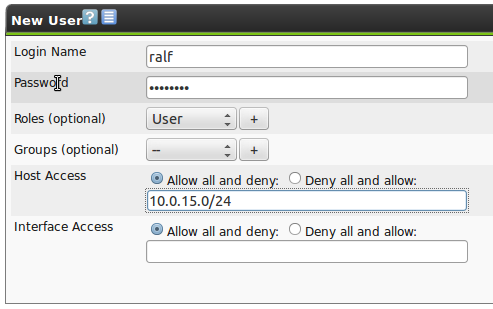
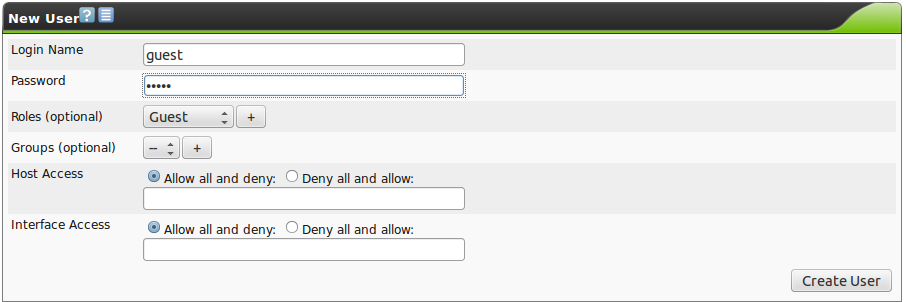
When creating a new user the following options are available:
Login Name:
This is the name the user logs in with.
If an LDAP server is used for central password management, the user needs to be created with the identical name (rDN) as in the LDAP server.
The name can be a maximum of 80 characters and can contain letters and numbers.
Password:
This is the password for the user.
The password can be a maximum of 40 characters and can contain any type of character.
Please note when using special characters that they are available on all keyboards and operating systems in use.
Roles (optional):
Each user can have multiple roles.
The roles define the permissions of a user when using the OMP protocol.
Since the Greenbone Security Assistance utilized the OMP protocol the roles define directly the features in the web interface.
While it is possible to add and configure additional roles, at the beginning, the roles Administrator, User, Info, Observer, and some others are available.
These roles are discussed in more detail in section User Roles.
Groups (optional):
Each user can be a member of multiple groups.
Permissions management can be performed via groups as well (see section Permissions).
Host Access:
Here it can be defined which systems a specific user can analyze in a scan and which systems should not be considered in a scan.
These restrictions can also be set up for administrators.
They can, however, remove these restrictions again themselves.
This is why this function is simply a self-protection for administrators.
Normal users (User) and roles without access to the user management respectively cannot circumvent this restriction.
Basically is can be chosen between a whitelist (deny all and allow) and a blacklist (allow all and deny).
In the first case the scanning of all systems is denied in general and only explicitly listed systems are allowed to be scanned.
In the latter case the scanning of all systems is allowed except the listed systems.
System names as well as IPv4 and IPv6 addresses can be entered.
Furthermore individual IP addresses as well as address ranges and network segments can be specified.
The following listing shows some examples:
- 192.168.15.5 (IPv4 address)
- 192.168.15.5-192.168.15.27 (IPv4 range long form)
- 192.168.15.5-27 (IPv4 range short form)
- 192.168.15.128/25 (CIDR notation)
- 2001:db8::1 (IPv6 address)
- 2001:db8::1-2001:db8::15 (IPv6 range long form)
- 2001:db8::1-15 (IPv6 range short form)
- 2001:db8::/120 (CIDR notation)
All options can be mixed and matched and entered as a comma separated list.
The netmask in the CIDR notation is restricted however to a maximum of 20 for IPv4 and 116 for IPv6.
In both cases the result is a maximum of 4096 IP addresses.
Interface Access:
Here it can be specified which network adapter a user can run a scan.
A comma separated list of network adapters can be entered and similar to the Host Access it can be chosen between a whitelist and blacklist methodology.
Tip
In general the whitelist methodology should be used and scans of systems denied except for the chosen systems.
This is to ensure that users do not scan systems by accident or unknowingly that are outside of there are of responsibility, are located somewhere on the Internet or react to a malfunctioning scan.
After creating the user the user’s properties are displayed.
The display should be verified to ensure that the user does not have too many permissions assigned to him.
15.1.2. Simultaneous Log in
It is possible, of course, that two users are logged into a GSM at the same time.
If the same user wants to log in multiple times the log in must be performed from a different PC or at least a different browser.
Another log in in the same browser invalidates the first login.
15.1.3. User Roles
Starting with Greenbone OS 3.1 the Greenbone Security Assistant allows for the creation and configuration of your own user roles.
Like in all other instances the modification of the included default roles is not possible.
However they can be copied (cloned).
This clone then can be modified.
This ensures consistent behaviour when updating the software.
The User Management can be accessed via the web interface in the menu Administration in the submenu Roles.
The following three roles are available by default:
- Admin:
This role by default has all permissions.
It is especially allowed to create and manage other users.
- Guest:
This role corresponds with the Info role.
It merely is not allowed to change its settings.
- Info:
This role (Information Browser) only has read access to the NVTs and SCAP information.
All other information is not available.
- Monitor:
This role has access to performance data of the GSM (see section Monitoring and Debugging).
- Observer:
This role has read access to the system.
It is not allowed to start or create new scans.
It has only read access to the scans for which the respective users have been set up as observers.
- Super Admin:
This role has access to all objects of all users.
It has no relation to the SuperUser in the command line.
This role can not be configured in the web interface.
The configuration is only possible in the GOS-Admin-Menu (see section Super Admin),
- User:
This role by default has all permissions with the exception of user, role and group management.
Besides this role is not allowed to synchronize and manage the feeds.
In the web interface there is no access to the menu option Administration.
All other option, however, are available to this role.
Additional roles can easily be created.
The simplest way is to copy one of the existing roles that reflects your needs the closest and modify it.
In rare cases you might want to create a role that only supports limited functionality.
Then it makes more sense to start with an empty role.
User can have more than one role.
Therefore permissions can be grouped with the help of the roles.
If more than more than one role is being assigned to a user the permissions will be added.
Hence a role Maintenance can be created for example.
This role is being assigned the following permissions:
- authenticate
- get_settings
- write_settings
- help
- describe_cert
- describe_feed
- describe_scap
- sync_cert
- sync_feed
- sync_scap
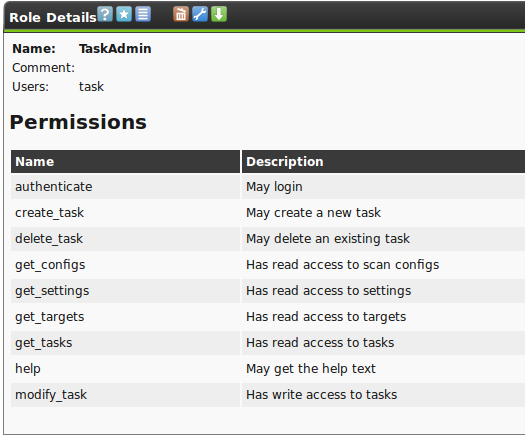
Additional roles then can have the name TargetAdmin, ScanConfigAdmin, TaskAdmin and Scanner and assigned permissions respectively.
Important is the fact that roles have to have at minimum the permissions authenticate and get_settings.
These are an imperative requirement to log into the web interface.
The permission write_settings makes sense as well.
Then a user can change their own password, time zone and other personal settings.
Users can be assigned different permutations of these roles.
This allows specific users to configure target systems, scan configurations or configure and start the actual scan.
In the selection of the permissions only the permissions that are not assigned are being displayed.
This simplifies adding and the overview of the still available permissions.
If a user logs in with the role TaskAdmin later the menu options are restricted respectively.
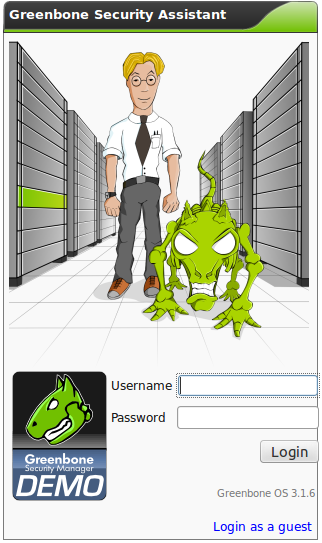
15.1.4. Guest Log in
The GSM can be configured for guest log in.
As guest the user is only allowed to access the SecInfo-Management (see chapter SecInfo Management).
This offers easy access to current information without password.
To allow this guest access a user can be created and assigned the Guest role.
Having knowledge of the password this user now can log in and is presented with the dashboard.
To allow a guest log in without password it must be activated on the command line first.
To do so start the GOS-Admin-Menu and select the option User.
Afterwards activate the Guest login in the respective option.
Possible values are disabled and enabled.
Then you to enter the name of the guest user and their password.
This is done in the same menu under the Guest User option.
This menu option appears as soon as the guest access is enabled.
Activate the changes by selecting Commit in the menu.
Alternatively access can be enabled via guest_login:
gsm: get guest_login
s guest_login disabled
gsm: set guest_login enabled
gsm: set guest_user guest
gsm: set guest_password guest
gsm *: commit
gsm: get guest_login
s guest_login enabled
Afterwards a reboot is required.
Now on the log in screen the guest log in is available (see figure Log in as guest user without password.)
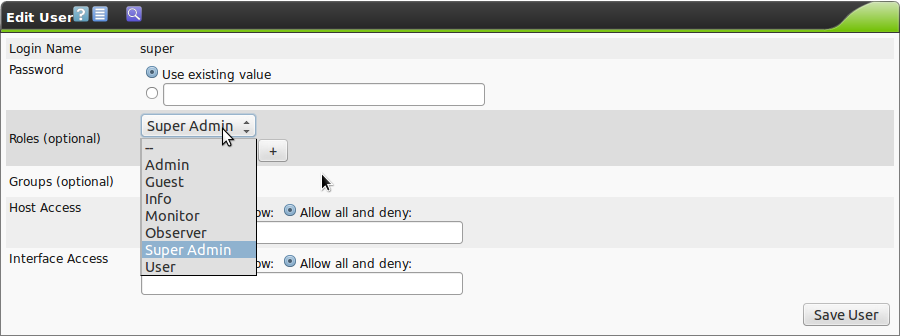
15.1.5. Super Admin
The Super Admin is the highest level of access.
It was introduced with the new permission concept.
Initially the regular admin role is equal to a simple user.
However the admin user is allowed to create new users, modify and delete users.
Additionally the admin can view, modify and delete any permissions on the system.
However the admin is subject to those permissions.
If a user creates a private scan configuration but does not share it, the Admin can not view the scan configuration.
Of course the Admin could create respective permissions itself to the user created resource.
The Super Admin is excluded from this.
The Super User is allowed to view and edit any configuration settings of any user.
The Super Admin can not be created in the web interface.
To create the Super Admin access to the command line is required.
This user and password can be created in Gos-Admin-Menu under the menu User submenu Add Super Admin.
Afterwards the user can be edited in the web interface.
The Super Admin can not be modified by the regular admin.
Only the Super Admin itself can modify the settings of this user!
15.1.5.1. Super Permissions
A role can be assigned with Super-Permissions.
Then the role can access all objects in a group.
Any resource created on the GSM (scan, configuration, target, and so on) is either global or is owned by a specific user.
Global resources are identified by the icon  .
Any resource that is not global can can be viewed and used by its user initially.
Individual permissions are necessary to make the resource available to other users.
This is very cumbersome.
Therefore the Greenbone OS 3.1 offers the option to assign Super Permissions.
A user can get these Super Permissions for:
.
Any resource that is not global can can be viewed and used by its user initially.
Individual permissions are necessary to make the resource available to other users.
This is very cumbersome.
Therefore the Greenbone OS 3.1 offers the option to assign Super Permissions.
A user can get these Super Permissions for:
These Super Permissions then allow complete access to any resources of the respective user, role, group or effectively all resources.
The any access can not be set explicitly.
It is a privilege of the Super Admin (see section Super Admin).
This is why the last Super Permission can only be set by creating a Super Admin.
A user can only set Super Permissions for objects created he created himself.
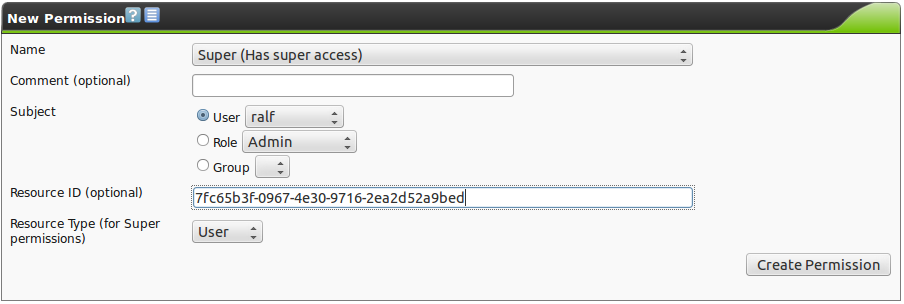
First the user must determine the Resource ID of the user, the role or the group for which to set the Super Permissions.
Afterwards the values can be entered in the dialog.
In the success message instead of the Resource ID the name is being displayed in clear text.
The Super Permissions simplify the permission management on the GSM.
Super Permissions for entire groups can be assigned very easily.
This allows all users of a group access to all resources that are being created by other members of the group.
15.1.5.2. GetUsers Role for Observers
The GSM allows for management of observers (see section Permissions).
These are users that have read access to specific tasks and their respective reports.
These observers by default can only get permission to tasks and reports by administrators.
Regular users can not give access to their own tasks to observers.
Therefore they can not share their tasks with other users.
For them the respective dialog to manage permissions in not functional.
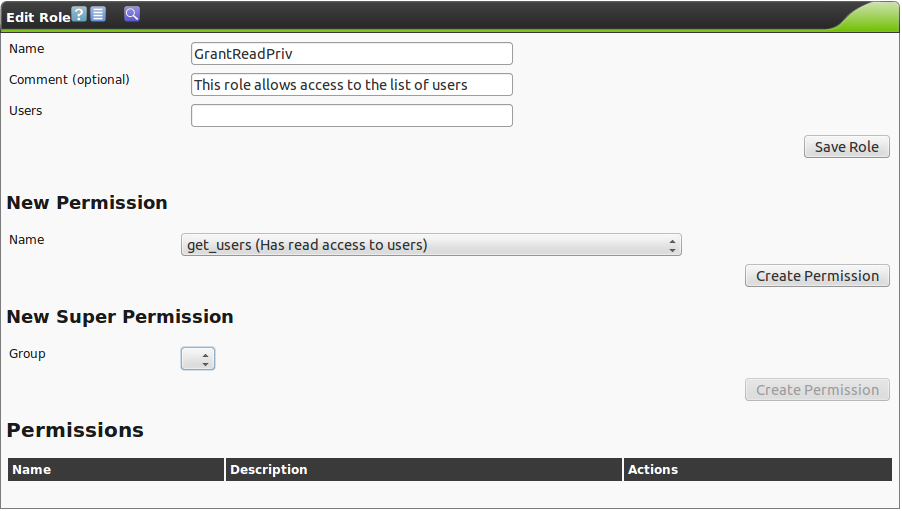
For regular users to assign read permission to their tasks to other users as well they require the permission get_users to access the user database.
This permission is being managed simply by its own role.
For this create a role GrantReadPriv (see figure The role GrantReadPriv allows to manage read access.).
In a second step assign it the permission gos:perm:get_users.
In doing this every user with this additional role is assigned the permission to share read access to their own tasks.
Then, in addition, this role must only be assigned to the respective users.
Note
In case the user is also allowed to share read access to groups or roles the get_groups and get_roles permissions must be assigned respectively.
15.1.6. Groups
Aside of the roles group management is also part of the Greenbone Security Assistant.
These groups are used to logically group users.
Additionally through the groups permissions can be assigned as well (see section Permissions).
By default no groups are set up.
Indefinite groups can be created.
The following information must be included:
- Name:
The name of the Group can be a maximum of 80 characters and can contain letters and numbers.
- Comment:
An optional comment that describes the group in more detail.
- Users:
The members of the group can be selected directly.
The members can be separated by a space or comma.
The length of the entry can be a maximum of 1000 characters.
Alternatively, group memberships can be managed in the user profile directly.
15.1.7. Permissions
Under the menu option Configuration/Permissions every single permission assigned on the system can be viewed.
This can easily reach hundreds of permissions if multiple roles are created.
Each individual permission displayed always relates to exactly one subject.
A subject can be either
- a user
- a role
- or a group.
Normally permissions are being managed using the web interface vie the roles (see section User Roles).
Thereby the permissions of the role can be managed in the role management as well as here.
Alternatively permissions can be assigned directly to users and groups.
This option gives you the most possible flexibility when managing permissions.
However adding and managing permissions using this dialog is only recommended for experienced users who are looking for a specific permission or who want to delete a specific user, for example.
Note
It is also possible to modify the permissions of the default roles with this dialog.
This could have unwanted effects when updating and the permissions are reset again.
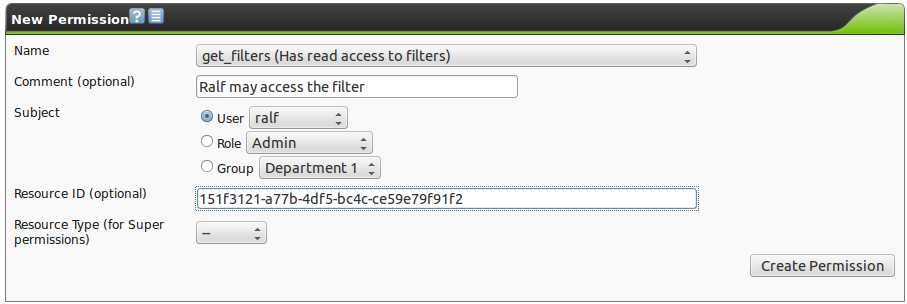
15.1.7.1. Sharing Individual Objects for Other Users
Every user can share indefinite objects created by the user.
However, the user must be assigned the permission get_users.
Otherwise the user will not have permission to determine the name of other users (see section GetUsers Role for Observers).
To share an object, first determine the Object-ID.
Sharing by name is not possible.
To do so display the object that is to be shared in the browser (i.e. a filter).
At the top right of the display you can find and copy the ID.
Afterwards switch into the menu Configuration/Permissions.
Create a new permission .
Then select the proper permission for the object to be shared:
- Filter: get_filters
- Scan configuration: get_configs
- Alert: get_alerts
- Notes: get_notes
- Overrides: get_overrides
- Tags: get_tags
- Targets: get_targets
- Task with report: get_tasks
- Schedules: get_schedules
Select the appropriate subject (user, role or group) and paste the copied Resource ID into the respective field.
15.1.8. Central User Management
Especially in larger environments with multiple users it is often difficult to achieve synchronization for passwords.
The effort to create new or reset passwords is often very high.
To avoid this, the GSM appliance supports the usage of a central password store
via LDAP. The GSM will use the directory service only for authentication on a per user basis. This means that users who should be able to authenticate through the directory service have to exist on the GSM as well and have to be configured for authentication through the directory service as well.
Prerequisite for using central authentication is the naming of the users with the same name as the object in the LDAP tree.
Below the connection to a LDAP tree is covered.
Thereby the GSM appliance uses a very simple interface.
While other most systems supporting LDAP first search for the matching object in the LDAP tree and subsequently log in as this object afterwards (Search&Bind), the GSM appliance uses a simple bind with a hard coded object path.
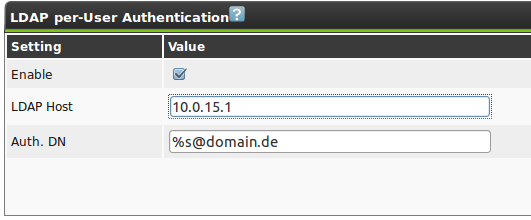
Then the distinguishedName of the objects can be defined distinctively.
Thereby the wildcard %s replaces the username.
Examples for the Auth. DN are:
uid=%s,ou=people,dc=domain,dc=de%s@domain.dedomain.de\%s
While the first example should work for any LDAP server with the correct attributes, the second and third example are typical formats used by Active Directory.
Hereby the exact location of the user object is irrelevant.
The first example does not support users in different sub trees or different recursive depths of an LDAP tree.
All users that need to log into the GSM must be in the same branch and in the same level of the LDAP tree!
The only other information required is the LDAP Host.
Only one system with its IP address or name can be entered here.
Once you have enabled LDAP authentication, you will notice a new option Allow LDAP-Authentication only in the New User section which will be checked by default. Leave it checked if the new user should be able to login with the credentials configured in the directory service. For existing users you may enable this option through the Edit User dialog.
Please note that the user has to exist with this name in your directory service prior to use with the GSM. The GSM will not add, modify or remove users in your directory service. It will also not grant any user from your directory service automatically access to the GSM. You have to authorize every user separately by adding a user with the same name to the GSM with Allow LDAP-Authentication only checked as described above.
Also note that a locally configured user (i.e. a user which is not enabled for LDAP authentication) “Smith” on the GSM takes precedence over a user “Smith” in the connected directory service.
The LDAP authentication will only be functioning after a reboot.
This reboot is uniquely mandatory after the LDAP authentication is being activated.
Note
The communication must be protected via SSL/TLS.
If the LDAP server does not support this the GSM appliance will refuse working together.
Details are covered in the following section.
15.1.8.1. LDAP with SSL/TLS
The GSM appliance uses either the command StartTLS via the LDAP protocol on port 389 or SSL via LDAPS on port 636.
Therefore the LDAP server must make its services available via SSL.
The exact configuration of all available LDAP servers is out of scope for this manual.
Therefore the following are just a couple of references:
In order for the GSM appliance to verify the identity of the LDAP server it must trust its certificate.
For this the certificate of the issuing certificate authority must be stored on the GSM.
To do so the certificate of the certificate authority must be exported as a BASE64 encoded file.
A BASE64 encoded certificate is often using the file extension .pem. The file itself starts with ------BEGIN CERTIFICATE-------.
The actual place where you may find this certificate may vary based on your environment.
Univention Corporate Server (UCS)
Here you may retrieve the CA certificate from the file /etc/univention/ssl/ucsCA/CAcert.pem. This file already contains the certificate in the correct format and may be used by the command ldapcertdownload.
Active Directory LDAP
If your Active Directory LDAP service does not yet use LDAPS, you may find the following article helpful: http://social.technet.microsoft.com/wiki/contents/articles/2980.ldap-over-ssl-ldaps-certificate.aspx
The Active Directory LDAP — CA certificates can then be exported using the following procedure which must be performed from a desktop or server that has access to the Certification Authority console.
- Open the Certification Authority console from any domain-joined computer or server.
- Right-click the name of the certification authority and then select Properties.
- In the CA certificates dialog box, choose the General tab, and then select the certificate for the certification authority you want to access.
- Choose View Certificate.
- In the Certificate dialog box, choose the Certification Authority tab. Select the name of the root certification authority and then choose View Certificate.
- In the Certificate dialog box, choose the Details tab and then choose Copy to File.
- The Certificate Export Wizard appears. Choose Next.
- On the Export File Format page, select the Base-64 encoded X.509 (.CER) option.
- Choose Next.
- In the File to Export box, choose the path and name for the certificate, and then choose Next.
- Choose Finish. The .cer file will be created in the location that you specified in the previous step.
- A dialog box appears to inform you that the export was successful. Choose OK to finish.
The contents of the file may be used for the command ldapcertdownload.
This the file now must be transferred to the GSM.
It is best to connect to the appliance via SSH (i.e. Putty).
Open the certificate in an editor and copy it to the clipboard.
Execute the command ldapcertdownload on the GSM command line and paste the certificate.
Complete the copy process with Enter and Ctrl-D thereafter.
If the LDAP authentication does not work please verify that the entry in LDAP Host matches the commonName of the certificate of the LDAP server.
If there are deviations the GSM appliance will refuse using the LDAP server.