This chapter covers the first steps of the setup of your appliance.
The steps in this chapter are shared among the various GSM appliance models.
You will find appliance specific setup and trouble shooting in the chapter Setup Guides:
4.1. Log in as admin
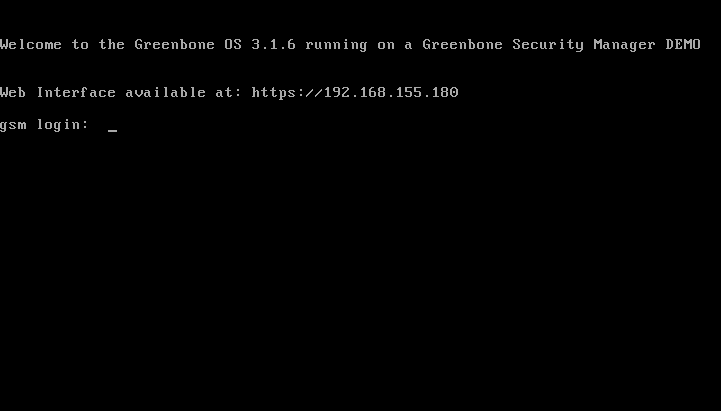
Once turned on the appliance will boot up.
The boot process can be monitored via serial console.
The boot process of the virtual appliance can be monitored in the hypervisor (VirtualBox or VMWare).
After the boot process is completed you can log into the system locally.
The default login is user: admin with password: admin.
At the login prompt (if not already configured) the GSM reminds you that no web user has been configured (see section Web admin user).
4.2. Base configuration
The following sections cover the base configuration of the appliance.
The base configuration should not be done via network connection rather than the serial console or the virtual console of the hypervisor.
4.2.1. Keyboard layout
First check the keyboard layout of the appliance and if necessary, set it appropriately to your required needs and locale.
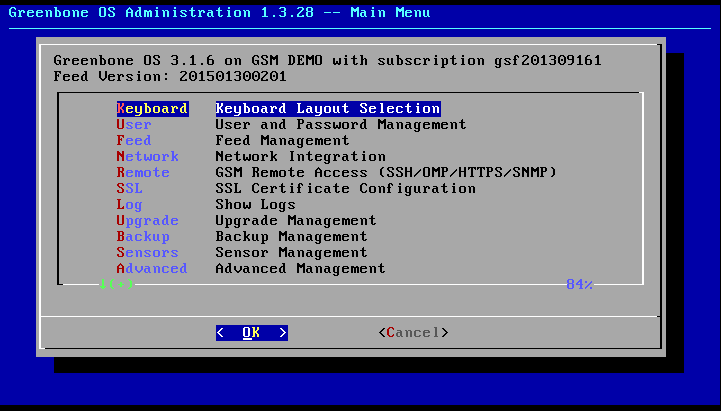
To configure the keyboard layout start the administrative menu from the command line after you logged into the appliance as admin (see section Log in as admin).
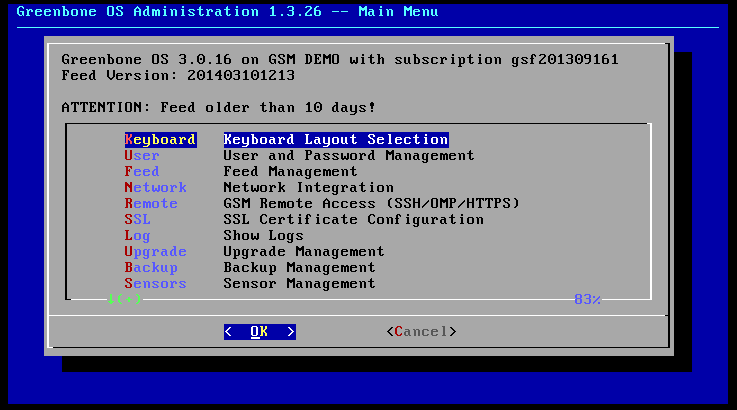
Entering the command gos-admin-menu will bring up the administrative menu (see figure Greenbone OS Admin Menu).
In this menu select the first option Keyboard using the arrow keys and confirm with Enter .
Select the desired layout in the new dialog.
After confirming the selection the option Commit must be selected and confirmed with Enter.
The change will be confirmed with the message The keyboard changes are submitted and become active within the next 5 minutes.
Alternative by selecting the Rollback option you can return to the original state.
Footnotes
4.2.2. Network
The configuration of the network adapter eth0 is required to perform the base configuration and to attach the appliance to the network.
To configure the adapter start the admin menu from the command line after logging in as admin (see section Log in as admin).
Enter the command gos-admin-menu at the command line.
A text based menu will be displayed which can be navigated by using the arrow keys and the Enter-key (see figure Greenbone OS Admin Menu).
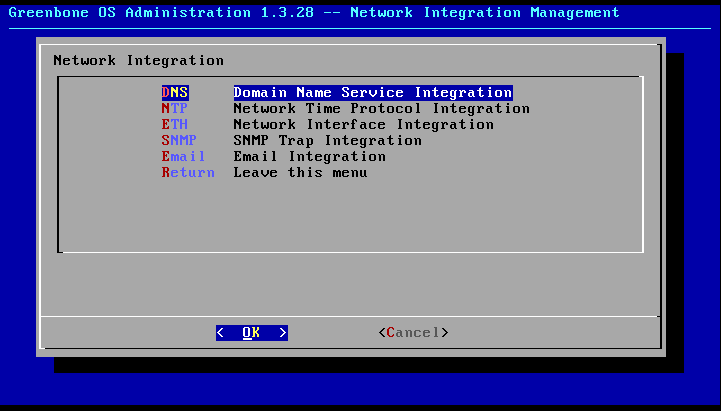
Under the menu option Network the network settings can be set.
A new menu (see figure Greenbone OS Admin: Network configuration) with the following options will be displayed:
- DNS:
Configuration of the DNS servers.
These are not set automatically even when DHCP is used.
The DHCP settings only have an effect on the IP-address and the default gateway!
- NTP:
Configuration on the NTP servers.
These are also not set automatically when DHCP is used.
The DHCP settings only have an effect on the IP-address and the default gateway!
- ETH:
Configuration of the Ethernet adapters.
- SNMP:
Configuration of the SNMP-Trap-Settings.
The community string for an external SNMP-Trap-Receiver for error messages can be configured.
- Email:
Configuration of an external mail server for sending GSM emails (such as scan reports).
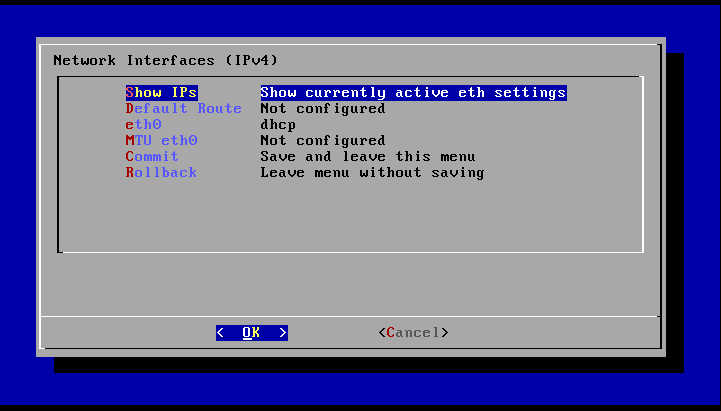
To configure the IP address of the management port use option ETH.
eth0 is of special importance.
This adapter is being used as the management port.
The other possible adapters can be disregarded during the base configuration.
The eth0 adapter relates to the physical appliance adapter LAN1.
By selecting option eth0 the network adapter can be configured.
There are three options:
dhcp:- The IP address of the network adapter is configured via DHCP.
This relates only to the IP address and the default gateway and not the DNS servers in use.
- IP address:
- Entering an IP address with CIDR-netmask sets the IP address.
The netmask must be entered as CIDR notation (/24, /25, and so on) and not as bitmask (255.255.255.0).
- Blank:
- The network adapter is deactivated.
When setting a static IP address you must also set the default gateway in order to receive the GSM feeds and updates through the network.
It can be set in the Network-ETH-Default Route.
Entering the IP address of the default gateway is enough.
All changes must be confirmed by Commit.
4.2.3. Management Adapter
If more than one network adapters are available you can chose through which network adapter the administrative interface of the GSM will be available.
This is set by the GSM variable ifadm.
4.2.4. DNS configuration
In order to receive GSM feeds and updates you require a reachable DNS server for name resolution.
In the factory default settings two Google name servers are configured:
- google-public-dns-a.google.com: 8.8.8.8
- google-public-dns-b.google.com: 8.8.4.4
The default DNS servers should be replace by your own DNS servers.
This is especially necessary when the GSM cannot reach the Google DNS servers due to firewall rules.
You can add up to three DNS servers.
All changes must be confirmed by Commit.
If the DNS-servers can be reached is shown in the Readiness-Check (see section Readiness)
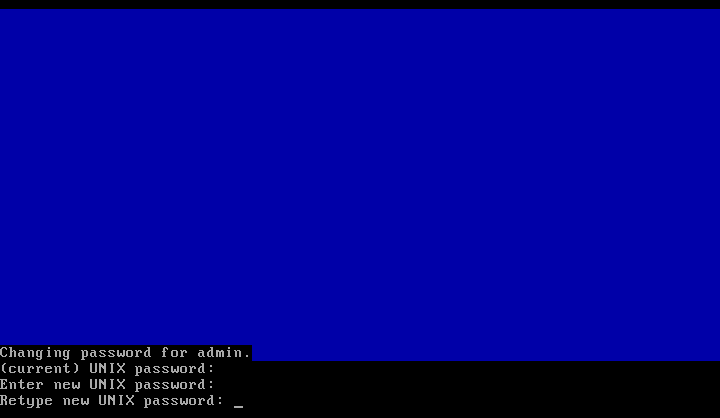
4.2.5. Password change
Also during the base configuration the password for the GSM administrator should be changed.
The factory setting admin/admin is not suitable for a production environment.
The respective function is available in the Greenbone OS administration tool (GOS-Admin-menu) under User.
The following user roles can be configured:
- GSM-Admin: This is the administrator which can log into via command line (ie. via serial port).
- Web-Admin: This is the administrator which can log into the web interface.
To change the administrator password select the option GSM Admin.
You will be asked to enter the current (UNIX) password of the administrator.
Afterwards you must enter the new password twice.
This change is effective immediately.
A commit of the change is not required.
A rollback is not possible either.
Note
Trivial passwords are being rejected.
This includes the default password admin.
4.2.6. Setting up the web interface
Access to the Greenbone Security Manager primarily occurs through the web interface.
To use it properly the following two steps are required:
Creation of a web administrator
This user is used to log into the web interface with administrative rights.
This user can use all of the features within the web interface.
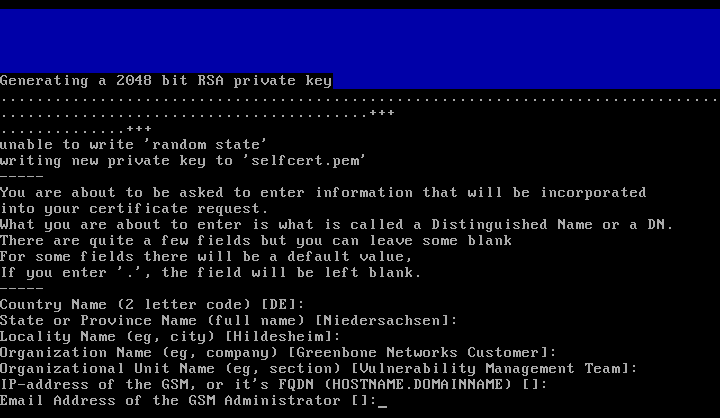
Creation of a SSL certificate
The SSL certificate is required to for the encrypted communication via HTTPS and OMP with the GSM.
A self-signed certificate can be created or issue a certificate from a certificate authority (see section Certificate by an external certificate authority)
4.2.6.1. Web admin user
To be able to use the GSM appliance a web administrator must be set up.
This user is being referred to as Scan Administrator in some documentation and by some applications.
The set-up of a web admin is only possible through the GOS-Admin-Menu or from command line.
Within the GOS-Admin-Menu switch to the User option and select Add Web Admin.
Now enter the name and password of the scan administrator.
More than one user with administrative rights can be set up.
Configuration of users from the GOS-Admin-Menu is not possible.
It is only possible to display existing users or delete them if applicable.
To edit the existing users, or add users with less permissions, use the web-interface.
4.2.6.2. Certificate
The GSM appliance basically can use two types of certificates:
- Self-signed certificates
- Certificates issued by an external certificate authority
The use of self-signed certificates is the easiest way.
It poses, however, the lowest security and more work for the user:
- The trust of a self-signed certificate can only be checked manually by the user through examination of the finger print of the certificate.
- Self-signed certificates cannot be revoked.
Once they are accepted by the user in the browser they are stored permanently in the browser.
Usually, a GSM already carries a individual self-signed certificate.
The installation of a certificate signed by an external certificate authority is described in section Certificate by an external certificate authority.
4.2.6.3. Self-signed certificate
To create a new self-signed certificate chose option SSL in the GOS-Admin-Menu and then select Self-Signed.
You will be prompted with a couple of questions.
The certificate is build based on the respective answers.
The declaration of commonName is not critical as it is not part of the certificate.
4.3. Activation key
Every Greenbone Security Manager appliance requires an activation key.
The GSM ONE already comes with a pre-installed activation key.
If you are evaluating a GSM DEMO an activation key is already pre-installed.
If an activation key is installed can be verified by starting up the GOS-Admin-Menu.
The title bar shows if an activation key exists.
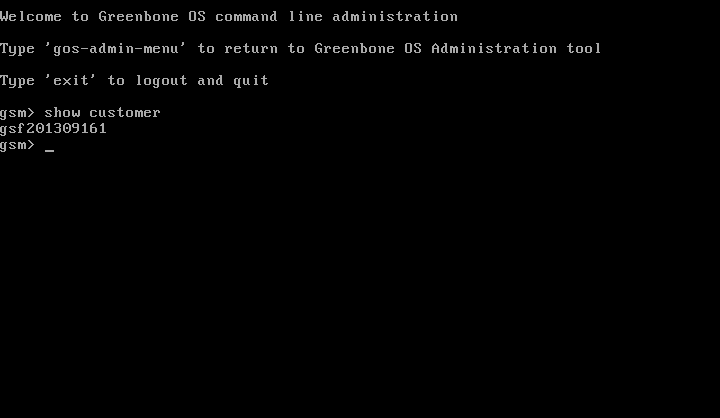
In the example in figure Verifying of the activation key the subscription gsf201309161 is stored.
Alternatively from the command line execute show customer.
If no activation key is stored you should have received it usually separately.
After running subscriptiondownload you must enter they key via copy/paste.
Ideally this is done via SSH connection with the appliance.
Possibly SSH access needs to be activated (see SSH Access).
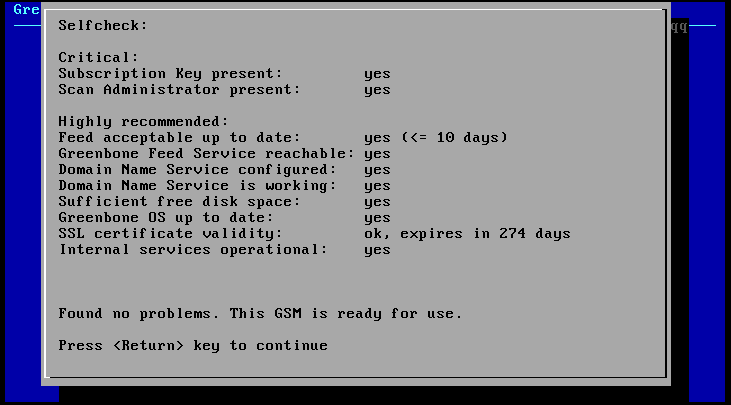
4.4. Readiness
To verify the availability and correct configuration of the appliance the GOS-Admin-menu offers the possibility of a self-check.
Start up the GOS-Admin-Menu and select the SelfCheck option.
The GSM now verifies if all pre-requisites exist to operate.
The individual pre-requisites are:
- Subscription key
- Web-administrator (scan administrator)
- Up-to date feeds
- Connectivity to the Greenbone feed server
- Configuration of the DNS server
- Connectivity and functionality of the DNS server
- Available disk space of the hard disk
- Version of the operating system
- Validity of the SSL certificate
- Availability of the configured sensors (only Midrange and Enterprise models)
- Operational state of the internal services
Please reboot the appliance if you have changed any fundamental settings or after the first configuration.