Configuring LDAP
LDAP is the light weight directory access protocol used by Microsoft Active Directory, OpenLDAP and Novell eDirectory, to name a few.
OPNsense can use a LDAP server for authentication purposes and for authorization to access (parts) of the graphical user interface (web configurator). When using LDAP for the GUI the privileges have to be defined with the local user manager, to do so an import of the users from the LDAP source is required.
In this how-to we will show you how to configure both using Microsoft Active Directory Server. If you only need LDAP for services like vpn, then you can skip step 3-5.
Prerequisites
A functional LDAP server (example is based on MS AD) is required. You OPNsense firewall need to be fully configured and able to access the LDAP server.
Step 1 - Add New LDAP server
To add a new LDAP server as authentication source, go to System->Access->Servers and click on Add server the top right corner, just above the form.
Enter the following information:
| Descriptive name | ws2012 | Enter a descriptive name |
| Type | LDAP | Select LDAP |
| Hostname or IP address | 10.10.10.1 | Enter the IP address of you LDAP Server |
| Port value | 389 | Enter the port number, 389 is default |
| Transport | TCP - Standard | Select Standard or Encrypted |
| Peer Certificate Authority | When using SSL Encryption, select the CA | |
| Protocol version | 3 | Select protocol version |
| Bind credentials | cn=testusr,CN=Users, | |
| User DN: | DC=opnsense,DC=local | Enter your credentials |
| Password: | secret | alway use a strong password |
| Search scope | ||
| Level: | Entire Subtree | Select Entire Subtree to retrieve all |
| Base DN: | DC=opnsense,DC=local | Enter the Base DN |
| Authentication containers | Select | Click & Select the containers from the list |
| Extended Query | &(objectClass=Person) | Extend query, p.e. limit results to Persons |
| Initial Template | MicrosoftAD | Select you LDAP Server Type |
| User naming attribute | samAccountName | Auto filled in based upon Initial Template |
Note
When clicking on the Select button right next to Authentication containers, something similar to will show up:

Tip
The Extended Query can be used to select users who are member of a specific group. One can use something like this: &(memberOf=CN=myGroup,CN=Users,DC=opnsense,DC=local) to select only members of the group “myGroup”. To add a user to a specific group under Windows just edit the groups properties and select Add... to add the user under the tab Members.

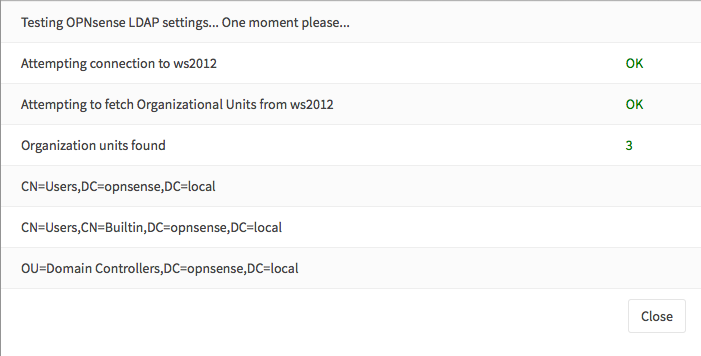
Step 2 - Test
To test if the server is configured correctly, go to System->Access->Tester and select your LDAP server and enter a valid username + password. Click on Test and if everything is setup correctly it will show:

Note
When limited to just one group, the group name will not be shown in the listing.
If not (or your entered invalid credentials) it shows:

Step 3 - Import Users
If you would like to give LDAP/Active Directory users access to the GUI, you need to import the users into the local user manager. Go to System->Access->Users you will see a cloud import icon at the lower right corner of the form.

Click on the cloud import icon to start importing users.
A new form will be show with the individual users, select the ones you like to import.
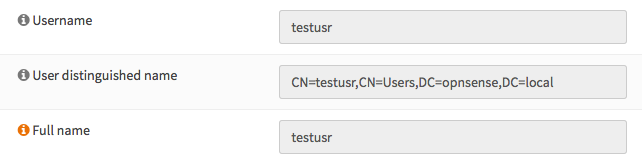
Step 4 - Update ldap user privileges
Now if you go to System->Access->Users you will see all users including the newly imported ldap users. You can create a specific group for these users to easily manage the privileges or use one of your earlier created groups.
When opening a ldap user (edit) via the pecil icon right next to the name, you will notice the difference as the User Distinguished name will be shown from the LDAP server, just like this:
Tip
See Creating Users & Groups for more information on User, Groups and privileges.
Step 5 - Update system access settings
Now we have configures, verified and imported the users from our LDAP server, we need to change the default settings to allow LDAP users to login.
Go to System->Access->Settings and change the Authentication Server from Local Database to your newly created LDAP server. Leave the fallback on Local Database and click on Save and Test.
The test result should look like this: