Set up vCloud Air or vCloud Virtual Data Center Resources
Page last updated: December 11, 2015
This topic describes getting started with open source Cloud Foundry on vCloud Air or on a supported vCloud Director (vCD) deployment (5.1+).
Note: These instructions emphasize simplicity, not security, scale, or any other production considerations.
The goal of these instructions is to help you deploy an environment that looks like the following diagram:
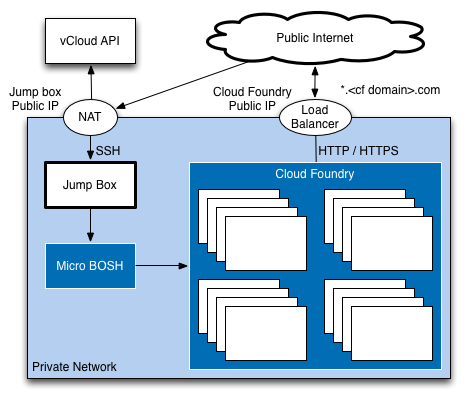
Specifically:
- We deploy to a private network.
- We deploy a jump box virtual machine (VM) in the private network. We carry out all other deployment from the jump box VM.
- We provide outbound connectivity for all VMs from the private network to a public network.
- We provide inbound access to the jump box VM and to the Cloud Foundry instance from the public network.
Prerequisites
vCloud Air
To get started with Cloud Foundry on vCloud Air Service you will need a vCloud Air account and a virtual datacenter (vDC) with at least 60GB memory, 120GB disk, and 28 vCPU cores. You will need at least two public IP addresses: one to connect to the jump box VM and one for Cloud Foundry.
Your user account will need Virtual Infrastructure Administrator and Network Administrator privileges for this virtual datacenter.
Many of the actions we take during this installation will be carried out in the vCloud Director UI. When using vCloud Air, you can open the vCloud Director UI for your virtual datacenter as follows:
Click on your virtual datacenter to open the virtual datacenter details.
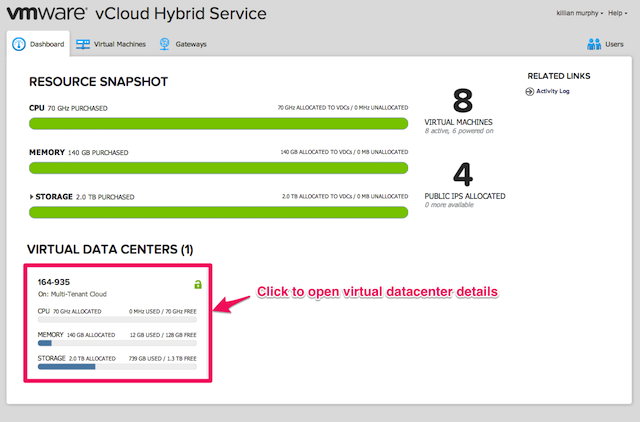
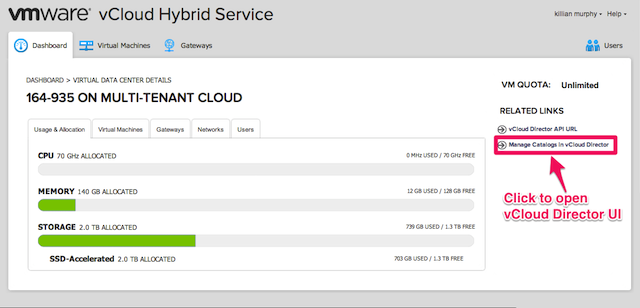
Next, click Manage Catalogs in vCloud Director to open the vCloud Director UI.
vCloud Director
To get started with Cloud Foundry on vCloud Director you will need an account in a vCloud organization and a vCloud virtual datacenter with an Internet routable network and a block of assigned IP addresses. The recommended resources for a full CF deployment introduced in this doc is to have 28 CPU cores, 39 GB Memory, 120 GB disk, and 23 IPs to assign.
Your user account will need organization administrator privileges for this virtual datacenter.
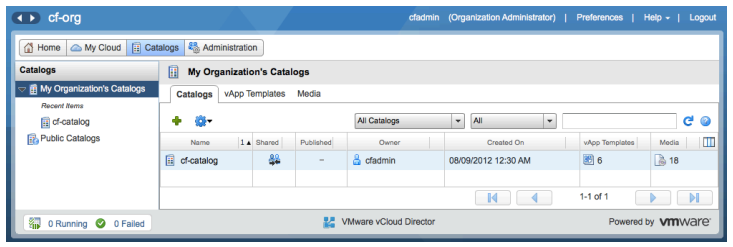
Add a catalog
In the vCloud Director UI, choose Catalogs on the top row of buttons, then My Organization’s Catalogs.
Add a catalog in vCloud Director where stemcells and media (ISOs) for BOSH will be stored. Next, click Manage Catalogs in vCloud Director to open the vCloud Director UI.
Set up networking
Please note that the following instructions are optimized for simplicity rather than security. When planning a production deployment of Cloud Foundry, you will need to modify these instructions to meet the needs of your service.
Create a network
If you are using vCloud Air you can reuse the networks provided out of the box. Typically you will use the routed network - for example, 164-935-default-routed. Note that the default network names are actually all lower case, despite what is shown in the UI.
If you want to add a network in vCloud Air, or if you need to in vCloud Director, here are the major steps to create a network from the vCloud Director UI:
- Click the Manage & Monitor tab and click Organization vDCs in the left pane.
- Double-click the organization vDC name to open the organization vDC.
- Click the Org vDC Networks tab and click Add Network.
- Then choose to add an external direct network or an external routed network. For security and better usage of IP resources, the external routed network is recommended. For adding routed network detailed steps, please refer this link: Create an External Routed Organization vDC Network.
Plan your IP address allocation
You will be using the private network created above for your deployment. The diagram at the top of this page illustrates this. You should plan the use of your private IP addresses as follows:
- Assign an IP address for the jump box VM
- Assign a second IP address for MicroBOSH
- Assign a range of at least 20 IP addresses for static IP assignments to VMs in the Cloud Foundry deployment
- Assign one of the IP addresses in this static range for HAProxy
- Allocate the same number of IP addresses as in bullet #3 to be used dynamically during deployment
The exact number of addresses needed for the static and dynamic ranges will depend on the size of your deployment. The basic deployment described in this documentation will use 1 jump box VM, 1 MicroBOSH VM, and ~16 Cloud Foundry VMs.
You will need two public IP addresses for this deployment. These are used as follows:
- One for connectivity to the jump box
- One for all user connectivity to the Cloud Foundry instance
Wildcard domains
In general, we use a wildcard domain to map all apps and services running on a Cloud Foundry instance to its public IP address (i.e. the public IP address of HAProxy in the deployment described in this documentation, or the IP address of a load balancer if that’s being used). For example, if a Cloud Foundry instance uses the wildcard domain *.mycf.com, and the application foo is deployed to it, the URL foo.mycf.com can be used to access the foo application.
The system services are made available in the same way - api.mycf.com, console.mycf.com, etc., may all be used. This can lead to some phishing opportunities, however. For example, someone could pretend to be a legitimate system service and create change_your_password.mycf.com or sign_up_with_credit_card.mycf.com. To avoid this, Cloud Foundry supports two domains, one for system applications and one for general applications. Only administrators of the system can deploy applications to the system domain.
These instructions explain a deployment using a single wildcard domain for both applications and system services. It is straightforward to use separate domains if you wish, when creating the Cloud Foundry deployment manifest.
Even when using a single wildcard domain, we recommend that you use different subdomain names for your system domain and your app domain. Doing so prevents apps from creating routes that overlap and conflict with system routes.
For example, name your system domain system.MYDOMAIN.COM and your apps domain apps.MYDOMAIN.COM.
Private network deployments and limitations of NAT
In vCloud and vCloud Air deployments the various components of Cloud Foundry are installed on a private network, where each component does not have a publicly routable IP address. Instead, when internal VMs need to access public IP addresses we use source NAT (SNAT) to map these multiple internal addresses to a public address (just like your home WiFi router).
Similarly, when an external machine tries to connect to Cloud Foundry, it will connect to a public IP address. This needs to then connect to the private IP address of the Cloud Foundry instance, specifically the HAProxy VM.
The obvious solution to this is to use destination NAT (DNAT) to connect the Cloud Foundry public IP address to the HAProxy private address. However, we have found some issues with that approach. When the internal components of Cloud Foundry talk to each other over https (e.g. login server to the UAA) they use the wildcard domain described above to resolve host names to IPs. For example, when login.mycf.com wants to connect to uaa.mycf.com and does a DNS lookup, it will receive the public IP address of the Cloud Foundry instance. When it connects to this it should be SNATed to an external address and then DNATed to the HAProxy private IP address. We have found that, because of the way iptables rules are processed, this repeated NAT conversion from an internal IP to a public IP and back to internal does not happen correctly.
We have found two ways to work around this:
- Use the vShield Edge Load Balancer to connect the Cloud Foundry public IP to the HAProxy private IP
- Use split-brain DNS, with an internal DNS server resolving the wildcard domain for internal VMs to the private IP of HAProxy
The vShield Edge Load Balancer is the simpler of the two to set up and so the following sections detail the steps used to set up the network environment using that approach.
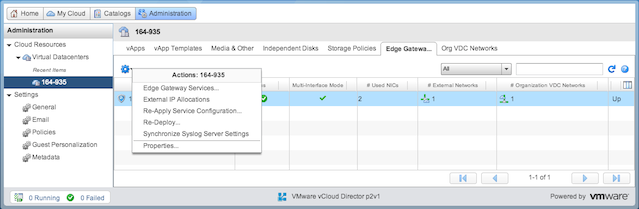
Configuring the vShield Edge Gateway
The following sections require you to configure the vShield Edge Gateway. To do so, in the vCloud Director UI go to the Administration button on the top row, then Cloud Resources, then Virtual Datacenters, then pick your virtual datacenter. Choose the Edge Gateways tab, select the gateway being used and click on the gear to select Edge gateway services.
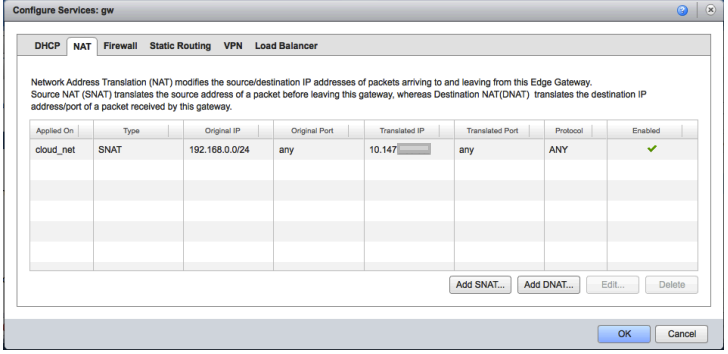
Allow all VMs to connect outbound to the internet
We allow all private network VMs access to the internet to allow installation of software, connection to the vCloud API, connectivity between VMs, etc.
- Configure an SNAT rule allowing outbound connections to a public IP. For simplicity you should do this for the entire network to allow all outbound connections. You can reuse the same IP as used for inbound SSH above. More information is available in the vCloud Director documentation
- Set up a firewall rule allowing outbound traffic from all private / internal addresses to all external addresses.
Set up SSH inbound to the jump box
In the same Edge Gateway configuration screen:
- Create a DNAT rule allowing inbound connections from your jump box public IP address to the jump box private IP address on port 22, to allow SSH from your laptop / desktop to the jump box.
- Create a firewall rule allowing inbound traffic from this public IP to the jump box private IP.
Set up connectivity inbound to the Cloud Foundry instance
As explained above, instead of using SNAT to map to the HAProxy private IP address we instead use the vShield Load Balancer.
In the Edge Gateway configuration screen, select the Load Balancer.

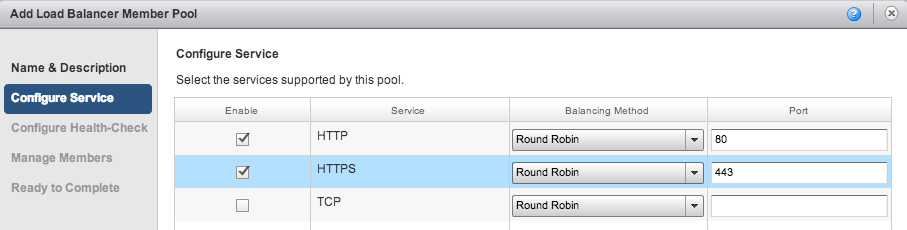
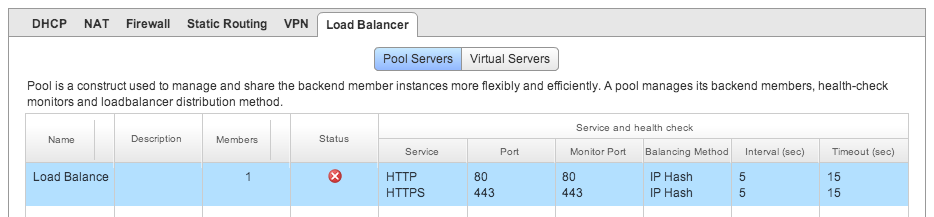
Create a pool server, by clicking Add on the Pool Servers tab and configuring HTTP (port 80) and HTTPS (port 443).
After giving your pool a name, say Load Balance to Cloud Foundry, configure the service:
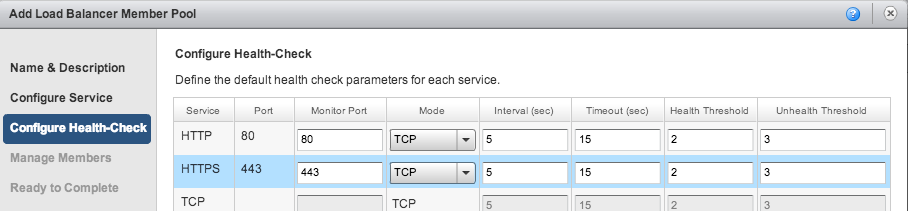
Next configure the health check. It is very important to select TCP in the pull-down menus as illustrated. The default values HTTP and SSL do not work correctly:
Finally configure the members of the pool. There is only one member - the internal IP for the HAProxy VM, assigned above:
On finishing this portion, the load balancer tab should look as follows:
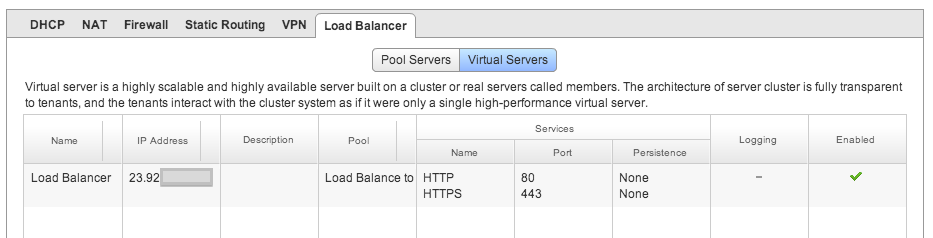
Next, click the virtual servers tab within the Load Balancer configuration screen and configure the Cloud Foundry instance public IP to use the load balancer rule just created.
This should look as follows when complete:
Set up a jump box
As illustrated at the top of this document, Cloud Foundry installation on vCloud Air / vCloud Director is simplest if you create a machine within the target vDC (a jump box VM) from which you drive the rest of the installation process. We typically use Ubuntu 12.04 for this machine, and configure it with 1GB memory, 1GHz vCPU and 16GB storage (You will need to have around 8 GB of free disk space for the bosh_cli if you plan to use it to deploy CF releases. You’ll need around 3 GB free disk space in /tmp)
The rest of this documentation assumes you have created this machine in the target vDC.
- Download the latest Ubuntu 12.04 LTS server ISO image from http://www.ubuntu.com/download/server
- Upload this ISO to the catalog you created above. Choose the “Media and Other” tab, and then use the upload button.
- In your virtual datacenter, create a VM connecting the ISO to the VM. Start up the VM and install Ubuntu.
- Once it starts, assign an IP address to the jump box by logging into the VM and assigning a static IP address using Ubuntu’s instructions.
Install a set of packages we will need for various purposes during this installation
sudo apt-get -y install libsqlite3-dev genisoimage libxslt-dev libxml2-dev whois openssl bind9 libpq-dev libmysqlclient-dev
Install BOSH CLI
Refer to the BOSH Command Line Interface topic for installation instructions.