Mesh Renderer
Switch to ScriptingThe Mesh Renderer takes the geometry from the Mesh Filter and renders it at the position defined by the object’s Transform component.
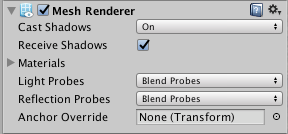
Properties
| Property: | Function: |
|---|---|
| Cast Shadows | If enabled, the mesh will create shadows when a shadow-casting Light shines on it. The options are On and Off to enable/disable shadows, Two Sided to allow shadows to be cast from either side of the mesh (ie, backface culling is not taken into account) and Shadows Only (ie, the shadows should be visible but not the mesh itself). |
| Receive Shadows | If enabled, the mesh will display any shadows being cast upon it. |
| Materials | A list of Materials to render the model with. |
| Light Probes | Probe-based lighting interpolation mode. |
| Reflection Probes | If enabled and reflection probes are present in the scene, a reflection texture will be picked for this object and set as a built-in shader uniform variable. |
| Anchor Override | A Transform used to determine the interpolation position when the light probe or reflection probe systems are used. |
Details
Meshes imported from 3D packages can use multiple Materials. All the materials used by a Mesh Renderer are held in the Materials list. Each submesh will use one material from the materials list. If there are more materials assigned to the Mesh Renderer than there are submeshes in the mesh, the first submesh will be rendered with each of the remaining materials, one on top of the next. At a cost of performance, this will let you set up multi-pass rendering on that submesh. Fully opaque materials, however, will simply overwrite the previous layers, costing performance for no advantage.
A mesh can receive light from the light probe system and reflections from the reflection probe system depending on the settings of the Use Light Probes and Use Reflection Probes options. For both types of probe, a single point is used as the mesh’s notional position probe interpolation. By default, this is the centre of the mesh’s bounding box, but you can change this by dragging a Transform to the Anchor Override property (the Anchor Override affects both types of probe).
It may be useful to set the anchor in cases where an object contains two adjoining meshes; since each mesh has a separate bounding box, the two will be lit discontinuously at the join by default. However, if you set both meshes to use the same anchor point then they will be consistently lit. By default, a probe-lit Renderer receives lighting from a single light probe that is interpolated from the surrounding light probes in the scene. Because of this, objects have constant ambient lighting across the surface. It will have a rotational gradient because it is using spherical harmonics, but it will lack a spatial gradient. This will be more noticeable on larger objects or particle systems. The lighting across the object will match the lighting at the anchor point, and if the object straddles, a lighting gradient parts of the object will look incorrect.
To alleviate this behavior, you can set the Light Probe property to UseProxyVolume with an additional Light Probe Proxy Volume component that will generate a 3D grid of interpolated light probes inside a bounding volume where the resolution of the grid can be user-specified. The spherical harmonics coefficients of the interpolated light probes are updated into 3D textures which are sampled at render time to compute the contribution to the diffuse ambient lighting. This will add a spatial gradient to probe-lit objects.