Before configuring the Role Based Access Control plugin, it is helpful to review the checklist in Table 8.1, “Pre-configuration checklist”
Table 8.1. Pre-configuration checklist
| Check | Done |
|---|---|
Have you got a list of roles do you want to define? It is usually best to start small, you can always add more later. If unsure a reasonable minimal set could be: Read-only; Developer; Manager; and Administrator. Additionally it is helpful to think about what you want those roles to be able to do. |
Yes / No |
Have you got a list of groups you want to define? You will typically require at least one local group for each role you define. If some roles are only being assigned to specific users or groups of users on specific objects, then each of those assignments will require a group local to that object. |
Yes / No |
Have you configured and tested your security realm? The first time you enable the Role Based Access Control plugin, it defaults to a configuration whereby logged-in users can do anything and users cannot access the system anonymously. If you have not tested that you can successfully log in to the system with the security realm you are using, enabling the Role Based Access Control plugin may result in everyone being completely locked out of the system. See the section called “Recovering from a lock-out” for details on how to restore access to the system in the event of a lock-out. |
Yes / No |
Does your security realm provide details of external groups? If the security realm does not provide details of external groups then you (or somebody you delegate the permissions to) may have to manually maintain synchronization between the external group membership and any corresponding shadow local groups that you may define within Jenkins. |
Yes / No |
Is this the first time the Role Based Access Control plugin will be enabled? The Role Based Access Control plugin remembers its configuration even when a different authorization strategy is configured, this allows easier experimentation with the plugin, but a side-effect is that you may have to remove the existing configuration if you want to start from a clean slate. See the section called “Completely resetting the configuration” for details on how to remove any existing configuration. |
Yes / No |
Are there specific objects which require different permissions? If most of your jobs will have a permissive set of permissions, but a few jobs will have permissions restricted to specific users, then the typical design is to grant the permissive permissions at the root level, filter those permissions out on the few jobs that have restricted permissions, and define groups for the users who require permissions on the restricted jobs. |
Yes / No |
Tip
If you are still prototyping how the Role Based Access Control plugin can help you, it can be useful to defer setting up a proper security realm while you are testing Jenkins configuration. The Mock Security Realm plugin lets you simulate having multiple users, as well as various external groups that can be bound to local groups. It provides no actual security (everyone has a dummy password), so replace it with another security realm before going into production.
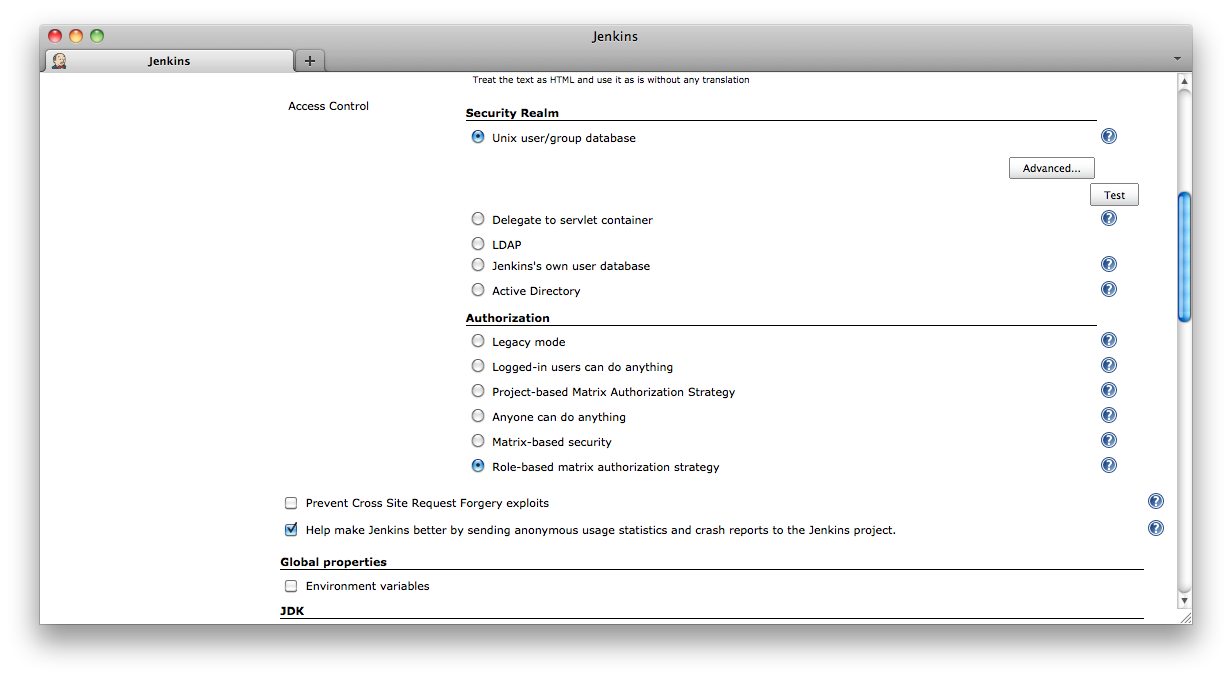
The Role Based Access Control authorization strategy is enabled from the main configure screen by selecting the Role-based matrix authorization strategy from the Authorization selections (that are displayed when the Enable Security checkbox is enabled) and then saving the configuration. See Figure 8.1, “Enabling the Role Based Access Control authorization strategy”
Note
The first time you enable the Role Based Access Control plugin, it defaults to a configuration whereby logged in users can do anything and users cannot access the system anonymously. If you have not tested that you can successfully log in to the system with the security realm you are using, enabling the Role Based Access Control plugin may result in everyone being completely locked out of the system. See the section called “Recovering from a lock-out” for details on how to restore access to the system in the event of a lock-out.
Alternately, you may select the option Typical initial setup when enabling this strategy. This option is only available when you are logged in, because it creates a group of “administrators” (with full permissions) of whom you are initially the sole member. For convenience, it also creates initially empty groups for “developers” and “browsers” with useful permission sets; later you might want to add some existing users to developers, or add the special labels anonymous or authenticated to browsers, etc.
When the Role Based Access Control authorization strategy, Jenkins Changes is enabled there will be a number of changes to the Jenkins interface.
- There will be additional icons for Groups and Roles at the root of Jenkins as well as on any objects which support the definition of local groups. See Figure 8.2, “The main Jenkins screen with the additional icons for Groups and Roles”
- There will be an additional Manage Roles icon on the Manage Jenkins screen. See Figure 8.3, “The Manage Roles action from the main Manage Jenkins screen”
Roles are configured and managed from the ![]() Manage Roles screen accessed via the Manage Jenkins screen (See Figure 8.3, “The Manage Roles action from the main Manage Jenkins screen”). The first time the Role Based Access Control authorization strategy Plugins RBAC Authorization Strategy is enabled the Manage Roles screen should look something like Figure 8.4, “The Manage Roles screen after the Role Based Access Control authorization strategy Plugins RBAC Authorization Strategy has been initially enabled”. The screen consists of a table of check boxes with each row of the table corresponds to a role, and each column corresponding to a permission. By checking the boxes you can assign permissions to roles.
Manage Roles screen accessed via the Manage Jenkins screen (See Figure 8.3, “The Manage Roles action from the main Manage Jenkins screen”). The first time the Role Based Access Control authorization strategy Plugins RBAC Authorization Strategy is enabled the Manage Roles screen should look something like Figure 8.4, “The Manage Roles screen after the Role Based Access Control authorization strategy Plugins RBAC Authorization Strategy has been initially enabled”. The screen consists of a table of check boxes with each row of the table corresponds to a role, and each column corresponding to a permission. By checking the boxes you can assign permissions to roles.
Figure 8.4. The Manage Roles screen after the Role Based Access Control authorization strategy Plugins RBAC Authorization Strategy has been initially enabled
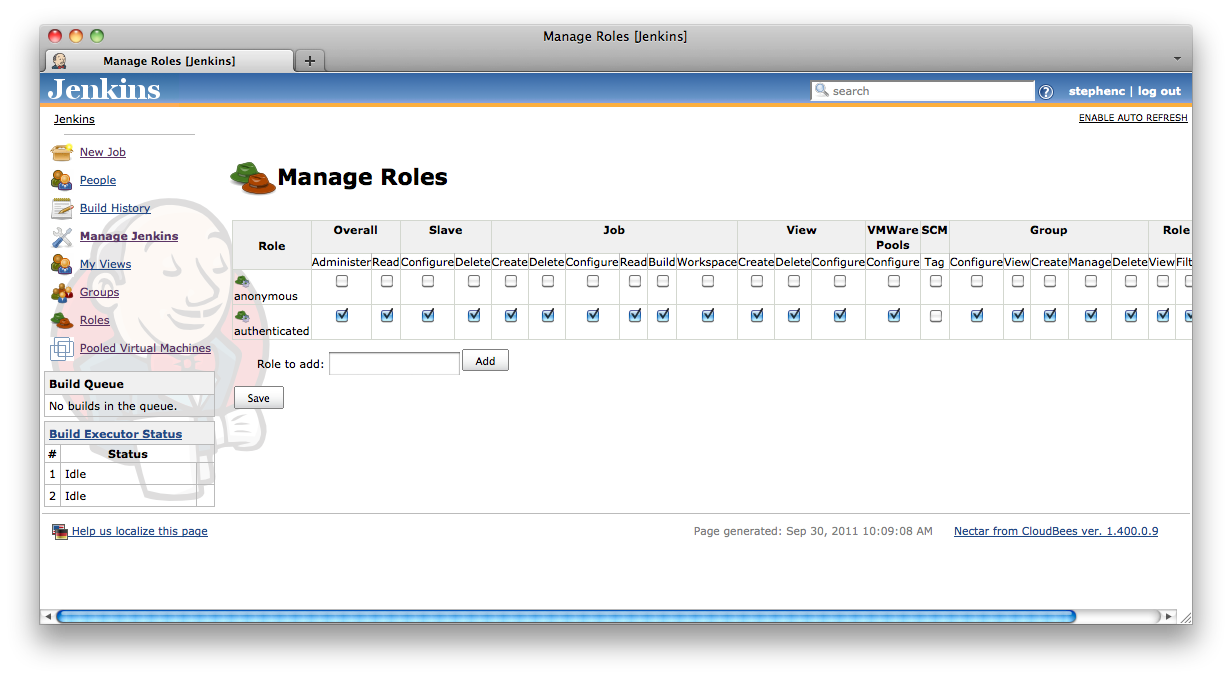 |
There are two types of roles:
 system role.
 user defined role.
System roles cannot be removed. There are two system roles:
- anonymous
This role is automatically assigned to any user that is not logged in. If you do not want anonymous users to be able to access the system then do not assign any permissions to the anonymous role.
- authenticated
This role is automatically assigned to any user that is logged in. If you want very fine grained control over user permissions you may end up removing all permissions from this role.
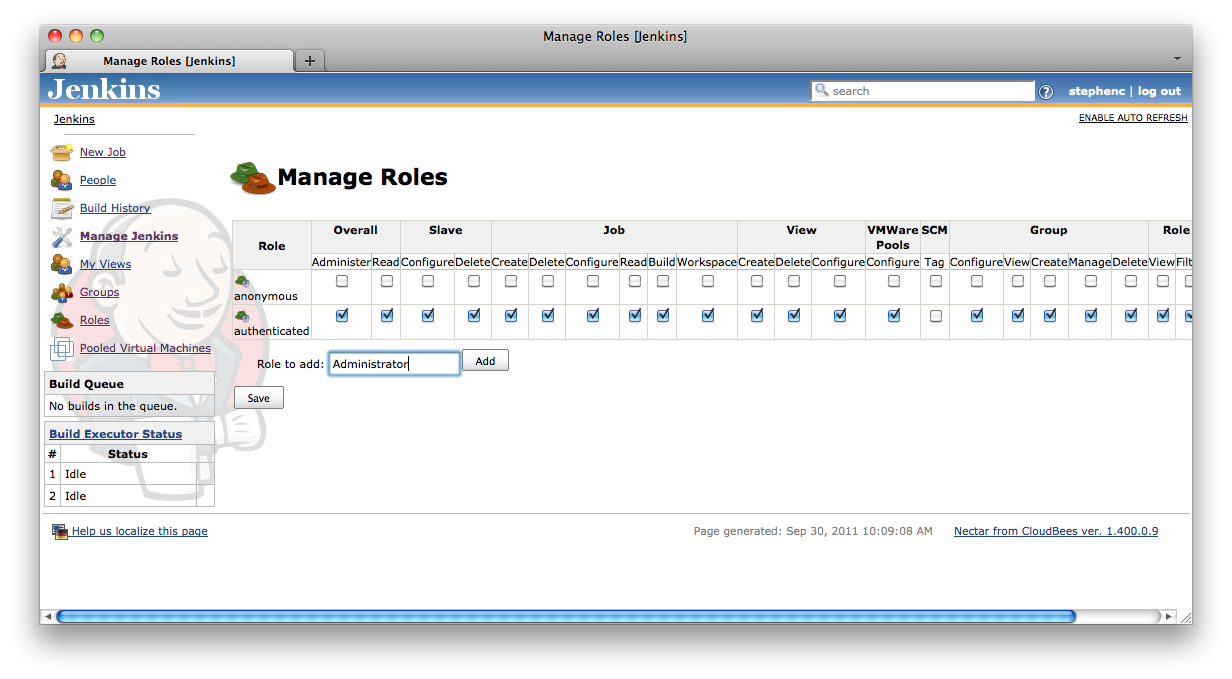
To define a new role you type the name of the role you want to define into the Role to add text box (Figure 8.5, “Adding a role called Administrator”).
Once you have typed the name in click the Add button. This will add a new row to the bottom of the table (Figure 8.6, “After clicking the Add button”).
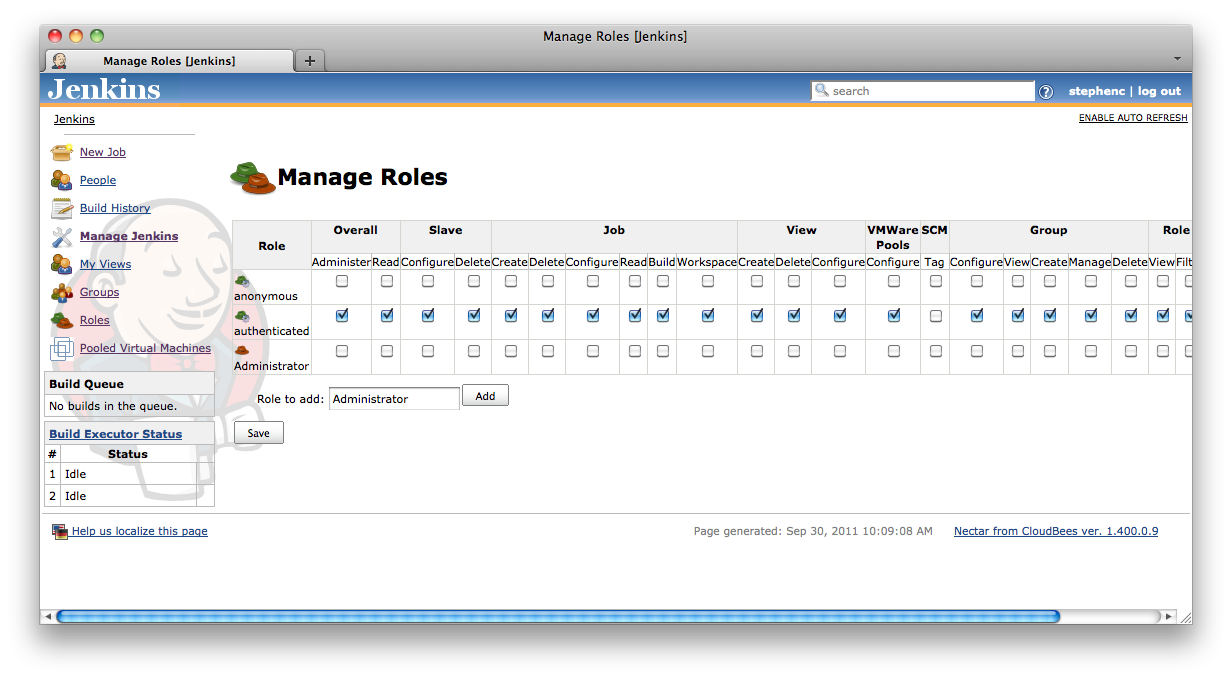
Once you have created the row for the new role, you can assign permissions for that role by clicking the appropriate check boxes.
Note
If you want to assign all permissions there is a ![]()
Check all button at the far right of the screen. There is also a ![]()
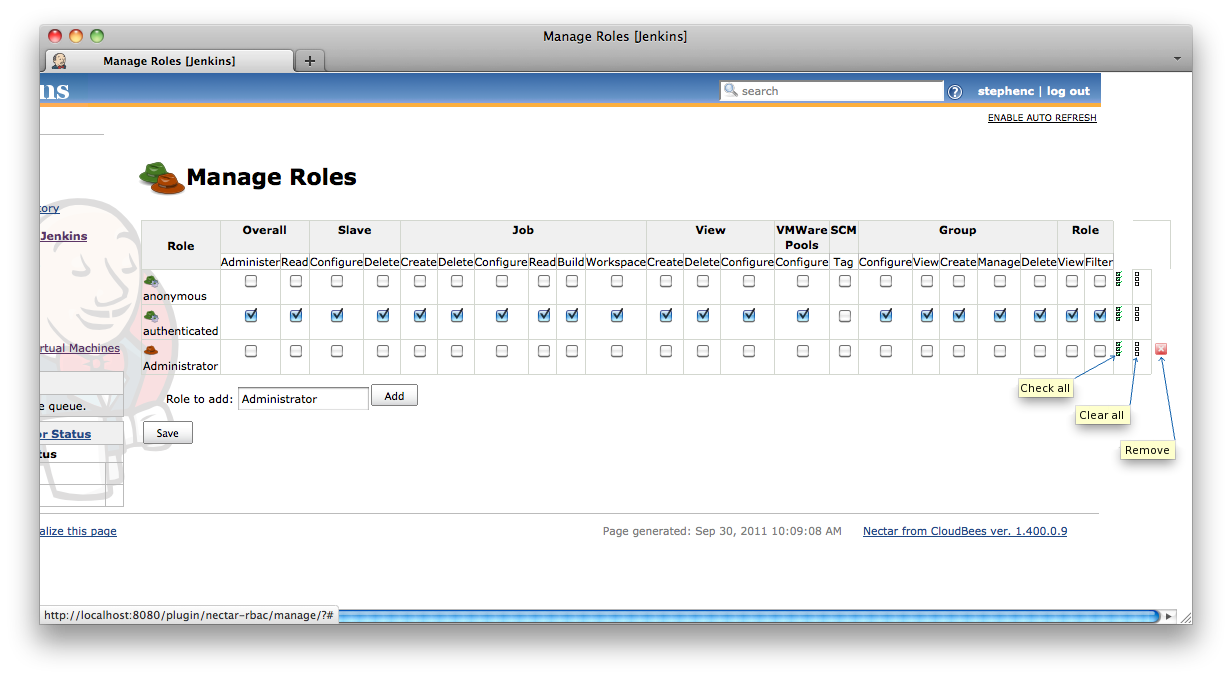
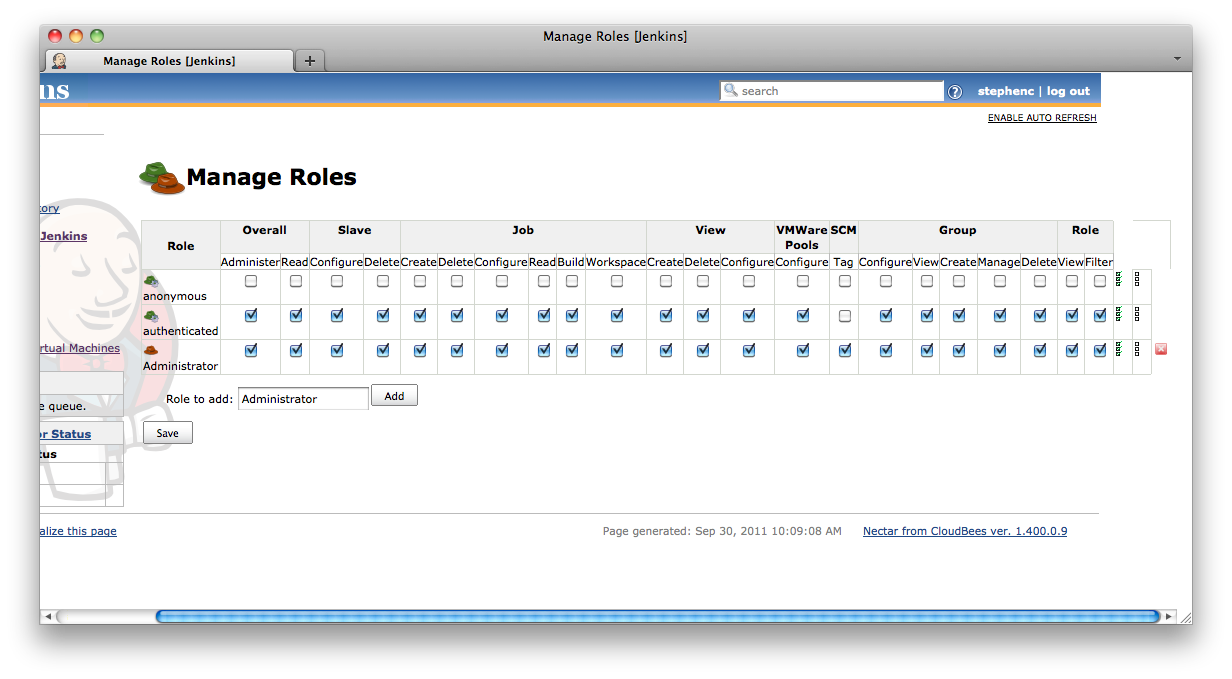
Clear all button to speed up clearing all the check boxes in a specific row. See Figure 8.7, “The three icons for: checking all the check boxes in a row; clearing all the check boxes in a row; and removing the role.” and Figure 8.8, “After clicking on the Check all icon for the Administrator role”
Tip
If you install the Extended Read Permission plugin you will see another permission: to be able to view, but not change, configuration of objects such as jobs. This can be useful for certain roles; for example, a developer role might be granted this permission so that developers can more easily debug build failures while still requiring a project administrator to make changes to the job setup.
Note
Sometimes one permission will automatically imply other permissions. For example, Overall/Administer usually implies every other permission (running Groovy scripts may be excluded). When you have checked the overarching permission but not other permissions it implies, these other permission checkboxes will be shown with a colored background to remind you that they are also implicitly part of the role.
Figure 8.7. The three icons for: checking all the check boxes in a row; clearing all the check boxes in a row; and removing the role.
 |
If you need to delete a role, there is a ![]() remove button at the far right of the row for all of the user defined roles.
remove button at the far right of the row for all of the user defined roles.
Normally roles are filterable: anyone with the Role/Filter permission on an object such as a folder is allowed to block that role from propagating into the object from its parent (such as Jenkins overall), possibly while allowing another group defined on the object to explicitly grant it. (See the section called “Configuring and managing role filters”.) For some roles it is undesirable to permit this: a Jenkins administrative role ought to be valid anywhere in the system, so that a project manager cannot accidentally block even site administrators from seeing an otherwise private project. (That situation could be considered a kind of lockout.) For such roles you should uncheck the Filterable checkbox to make sure the role applies globally.
Once you have defined all the roles you require, you can save that configuration by clicking on the Save button.
Warning
Care should be taken when removing the Overall Administer permission, from roles, as it is possible to lock yourself out of administrative access. There are some safeguards which will protect you from obvious ways of locking out administrative access, however, as you may legitimately want to remove your own administrative access, the safeguards can only protect the obvious issues. See the section called “Recovering from a lock-out” for details on how to restore access to the system in the event of a lock-out.
Groups can be defined at any point in Jenkins where the ![]() groups action is available. The following classes of objects support group definitions out of the box:
groups action is available. The following classes of objects support group definitions out of the box:
- Jenkins itself
- Jobs
- Maven modules in a Maven project
- Slaves
- Views
- Folders
Note
Other objects added by plugins can support group definitions if the required support is built into the plugin itself, or is added by an additional plugin. However, in general, the objects need to have been designed to allow other plugins to contribute actions in order for the group definition support to be possible.
Where an object does not support group definitions, the groups are inherited from the object’s parent.
Tip
While you can define groups on a view, and in general manage which roles are available to whom on the view, such permissions do not apply to jobs which happen to be displayed in the view, since they might also be encountered in other views (such as All). Permissions granted on a view only affect operations on the view itself, such as changing its list of columns. To control access to a set of jobs in one place, you must move them into a folder.
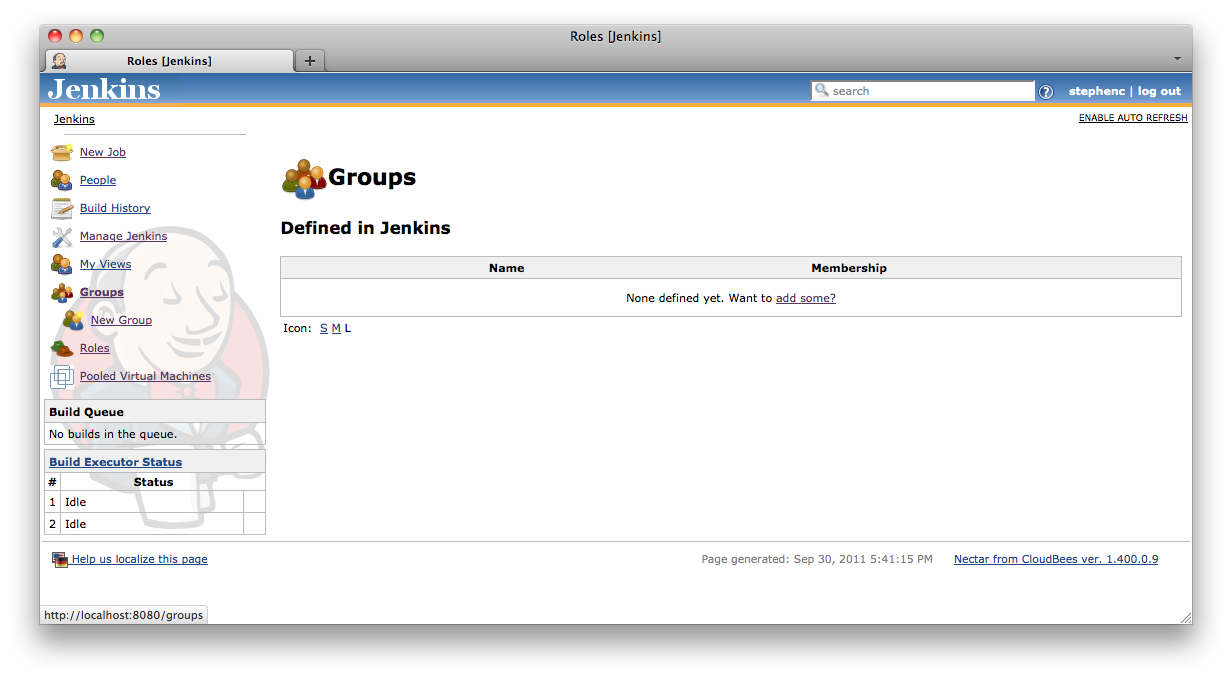
Clicking on the ![]() groups action will bring you to a screen similar to that shown in Figure 8.9, “The initial groups screen for the root of a Jenkins instance”
groups action will bring you to a screen similar to that shown in Figure 8.9, “The initial groups screen for the root of a Jenkins instance”
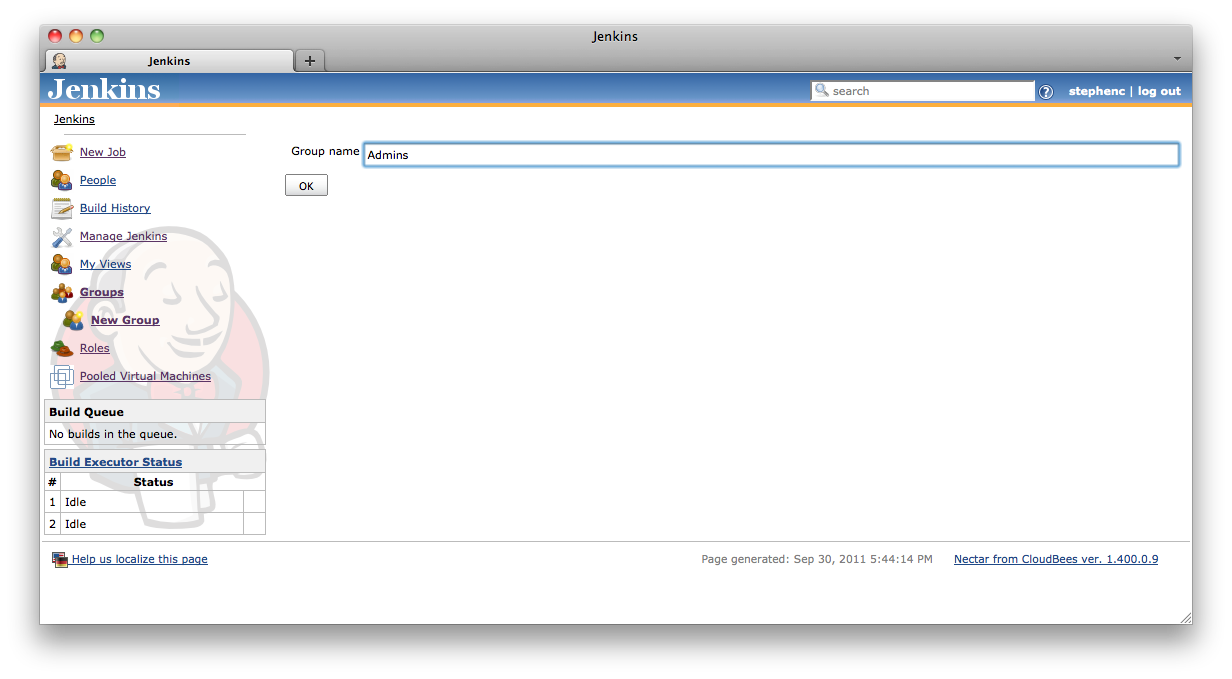
You create a group using the ![]() New Group action which will prompt for the group name as in Figure 8.10, “Creating a new group”. Groups can be renamed after they are created. Group names are case sensitive and whitespace is allowed (although it can be confusing). When a group is created with the same name as a group from the parent context, it will hide the group from the parent context, however the permissions granted to members of the group will not be removed.
New Group action which will prompt for the group name as in Figure 8.10, “Creating a new group”. Groups can be renamed after they are created. Group names are case sensitive and whitespace is allowed (although it can be confusing). When a group is created with the same name as a group from the parent context, it will hide the group from the parent context, however the permissions granted to members of the group will not be removed.
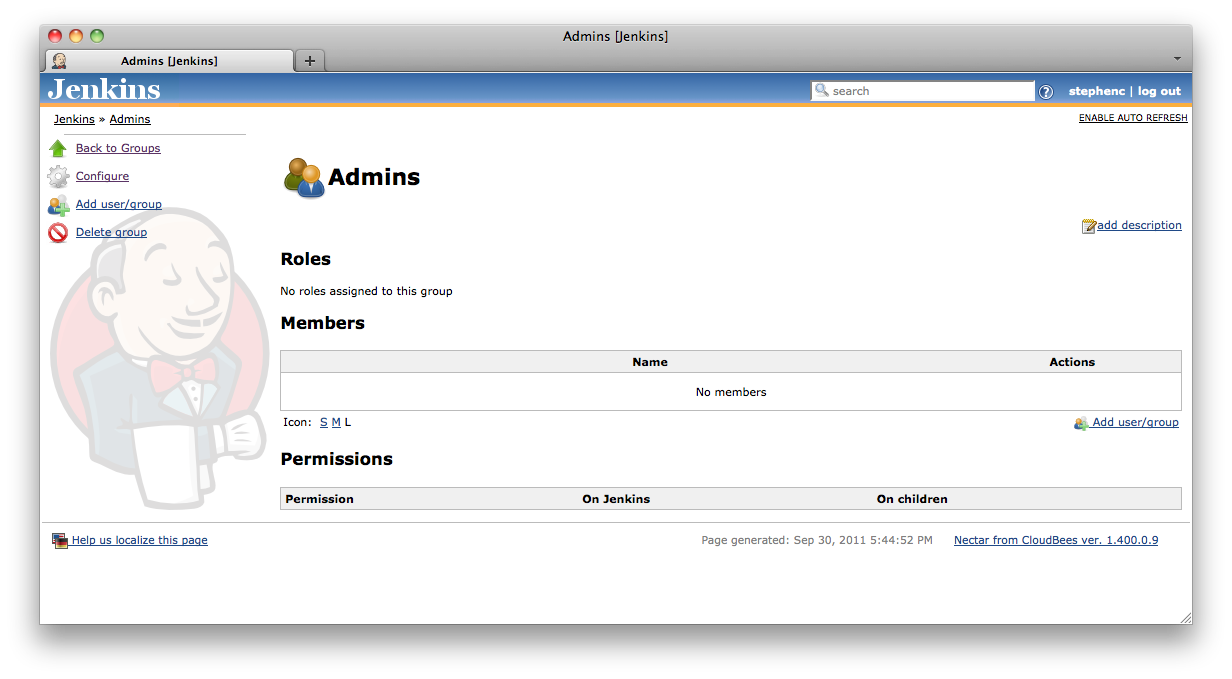
After the group has been created, depending on the effective permissions of the user creating the group, one of two screens will be displayed. Users with the Group Configure permission will be shown the Configuration screen (Figure 8.11, “Configuring a group”), otherwise the user will be taken straight to the group details screen (Figure 8.12, “Managing a group”). This differentiation is key to effectively allowing administrators to delegate some of the administrative responsibility.
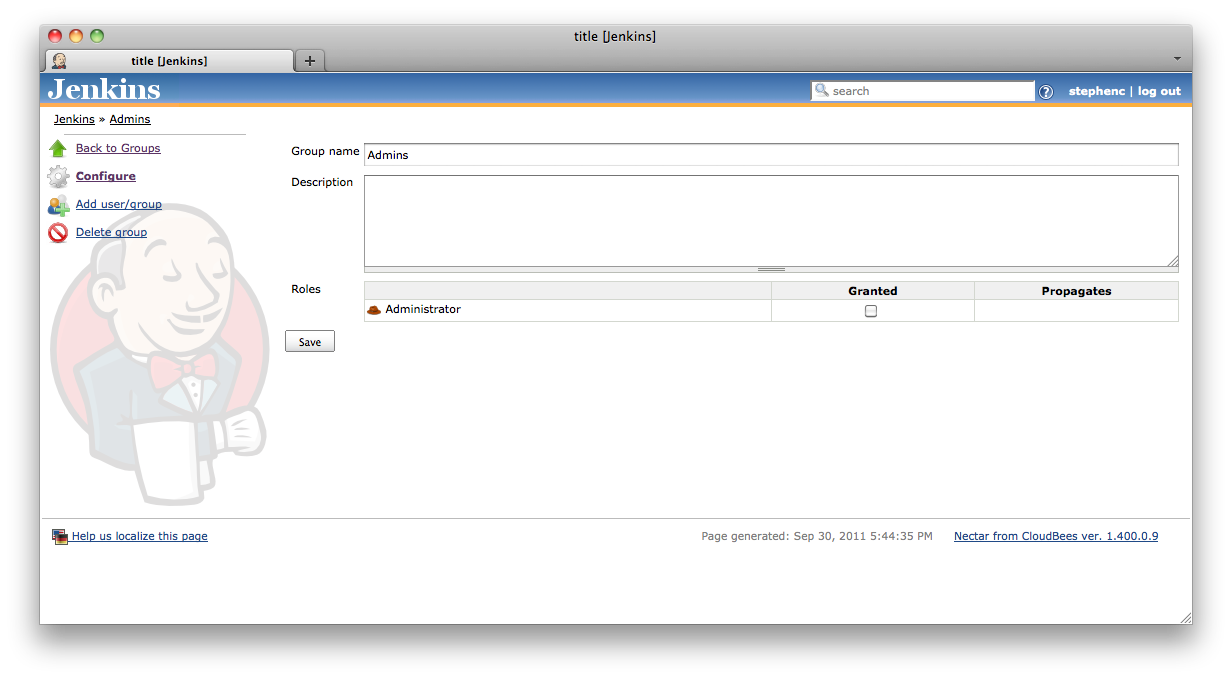
The Configuration screen is the screen where roles are assigned to a group. By restricting access to this screen, an administrator can ensure that groups cannot be created with permissions greater than those intended by the administrator. The Group Manage permission can then be assigned to specific users in order to allow them to manage the membership of groups without risking them escalating their own permissions by the addition of extra roles to groups they belong to.
Where a role is granted to a group, the role can be granted in one of two modes. Be default the role is granted in the Propagates mode. This means that the role will be available in child contexts. By clearing the Propagates checkbox, you can create a pinned role ( ![]() ) that is only available on the specific object that the group is created on. Some examples where a pinned role can be useful would be:
) that is only available on the specific object that the group is created on. Some examples where a pinned role can be useful would be:
- A pinned group creation role at the root allows creating groups at the root while preventing creating groups on jobs.
- A pinned role in a Maven Project job which allows building the job in order to prevent users from triggering builds of individual modules within the Maven Project job.
- When using the Folders plugin, a pinned group creation role on a folder allows creating groups at the in the folder while preventing creating groups on sub-folders.
After the configuration has been saved, the user will be taken to the group details screen (Figure 8.12, “Managing a group”).
The ![]() Add user/group action is used to add a member to the group. After clicking the action you will be prompted to enter the id of the user/group to add (Figure 8.13, “Adding a member to a group”).
Add user/group action is used to add a member to the group. After clicking the action you will be prompted to enter the id of the user/group to add (Figure 8.13, “Adding a member to a group”).
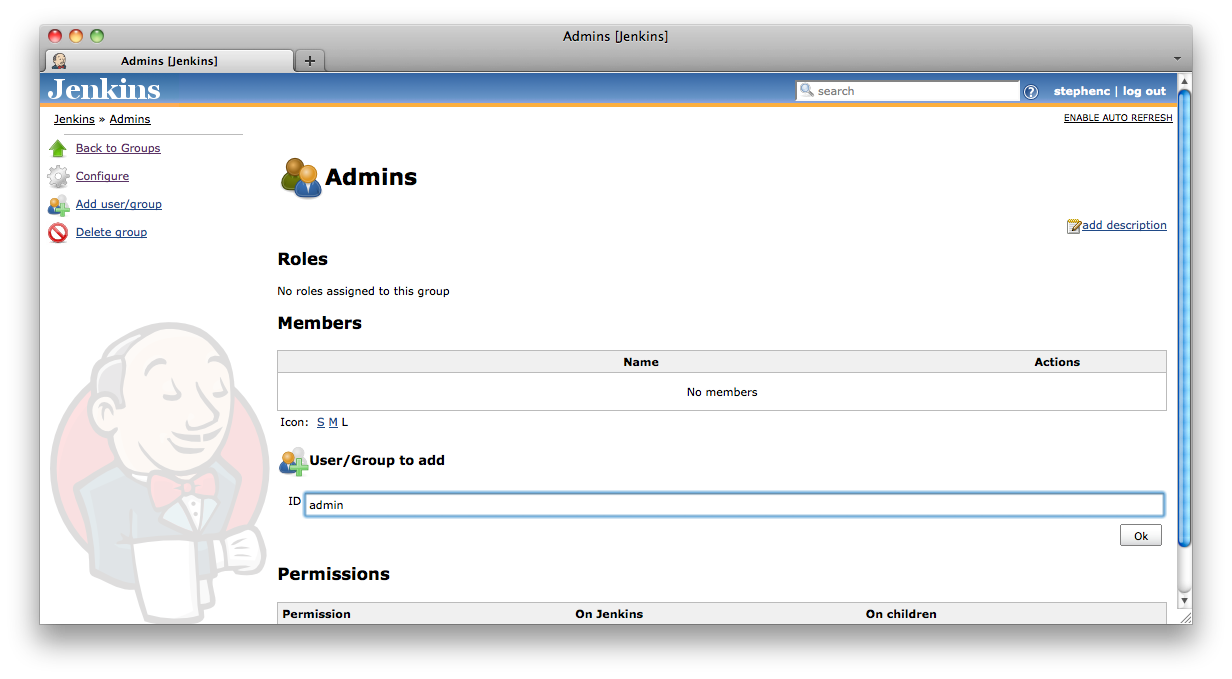
The ID that you enter can be any of:
 A user id
 A group name from the current context
- A group name from any of the parent contexts
 An external group id from the security realm
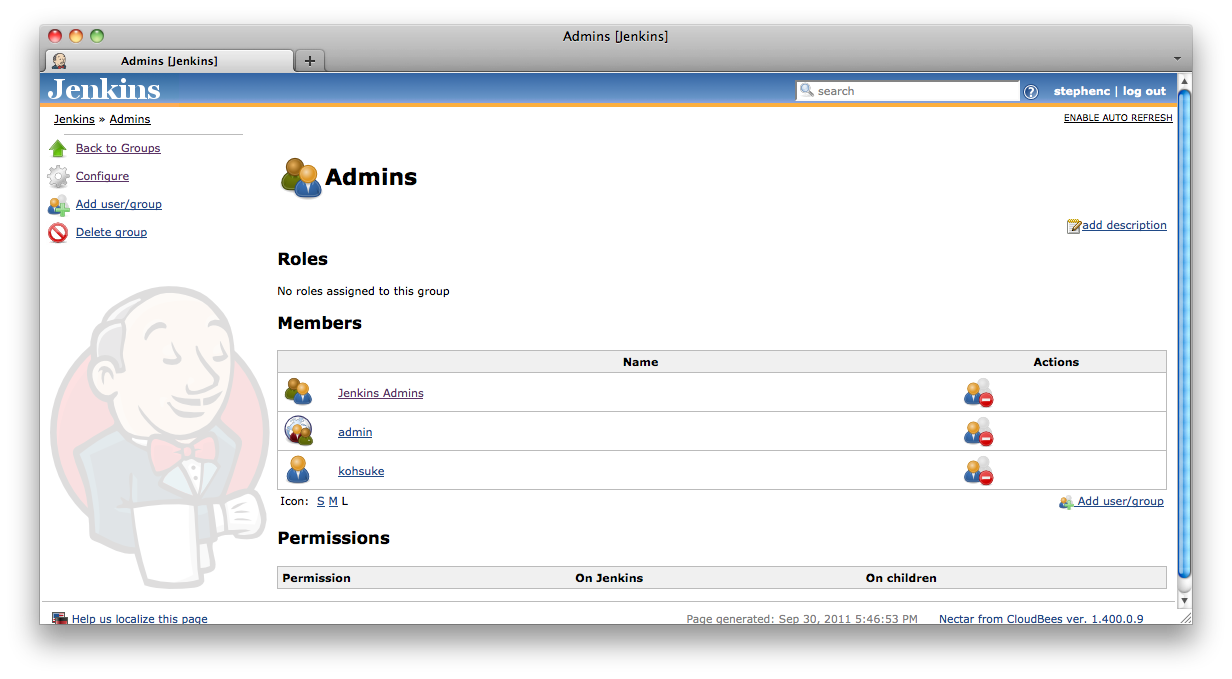
You can add as many members as you like. Figure 8.14, “A group with multiple members: another group; an external group; and a user” shows a group containing three members, one of each type. Circular membership is permitted, i.e. a group can have as a member a group that it is a member of. When adding external groups the http:// Jenkins-URL /whoAmI page can be useful to figure out what the external group IDs actually are.
Members of a group can be removed by clicking on the member’s ![]() remove icon. There is a two step confirmation for removing a member and you must confirm the removal by clicking on the
remove icon. There is a two step confirmation for removing a member and you must confirm the removal by clicking on the ![]() confirmation icon. (Figure 8.15, “Removing a member from a group requires two step confirmation”)
confirmation icon. (Figure 8.15, “Removing a member from a group requires two step confirmation”)

Role filters can be defined at any point in Jenkins where group definitions are supported and roles are inherited from a parent of that object. By default the following objects will support role filtering:
- Jobs
- Maven modules in a Maven project
- Slaves
- Views
- Folders
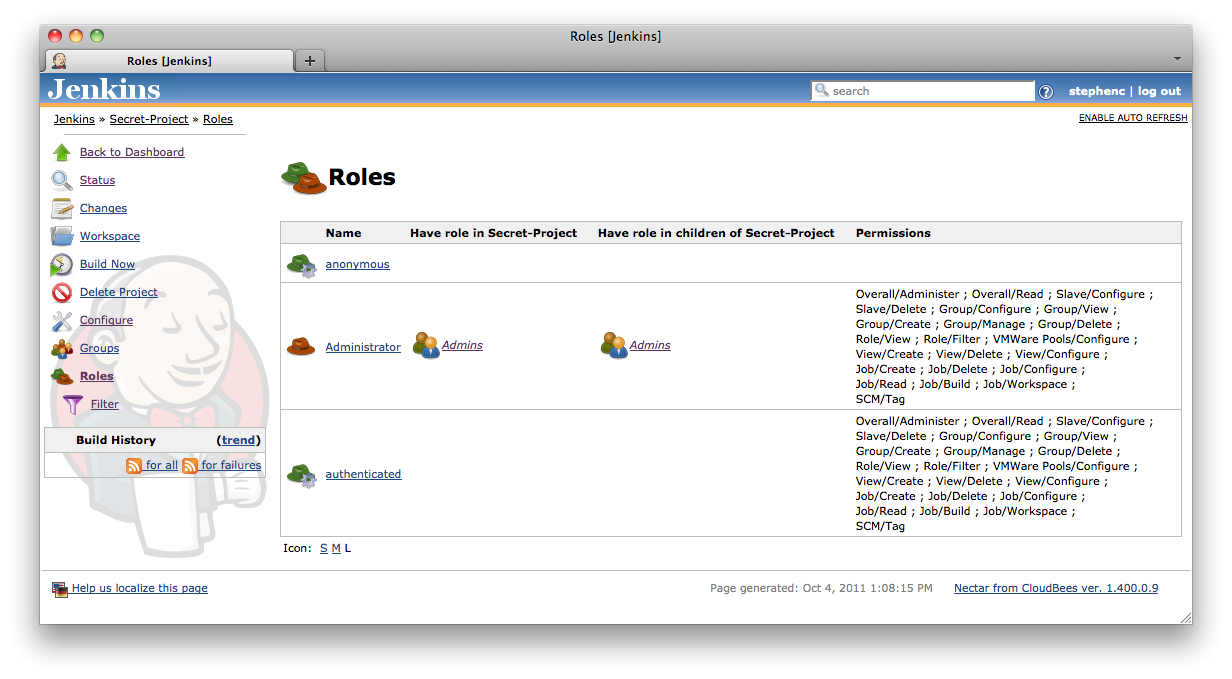
Clicking on the ![]() roles action will bring you to a screen similar to that shown in Figure 8.16, “The roles screen for a job within a Jenkins showing the roles, their permissions, and the groups that are assigned to each of the roles for this object and its children”.
roles action will bring you to a screen similar to that shown in Figure 8.16, “The roles screen for a job within a Jenkins showing the roles, their permissions, and the groups that are assigned to each of the roles for this object and its children”.
Figure 8.16. The roles screen for a job within a Jenkins showing the roles, their permissions, and the groups that are assigned to each of the roles for this object and its children
 |
If the object supports role filters then the ![]() Filter action will be available from that screen. Clicking on the
Filter action will be available from that screen. Clicking on the ![]() Filter icon will bring you to a screen similar to that shown in Figure 8.17, “The role filter screen for a job within a Jenkins instance where two roles are being filtered out”
Filter icon will bring you to a screen similar to that shown in Figure 8.17, “The role filter screen for a job within a Jenkins instance where two roles are being filtered out”
Figure 8.17. The role filter screen for a job within a Jenkins instance where two roles are being filtered out
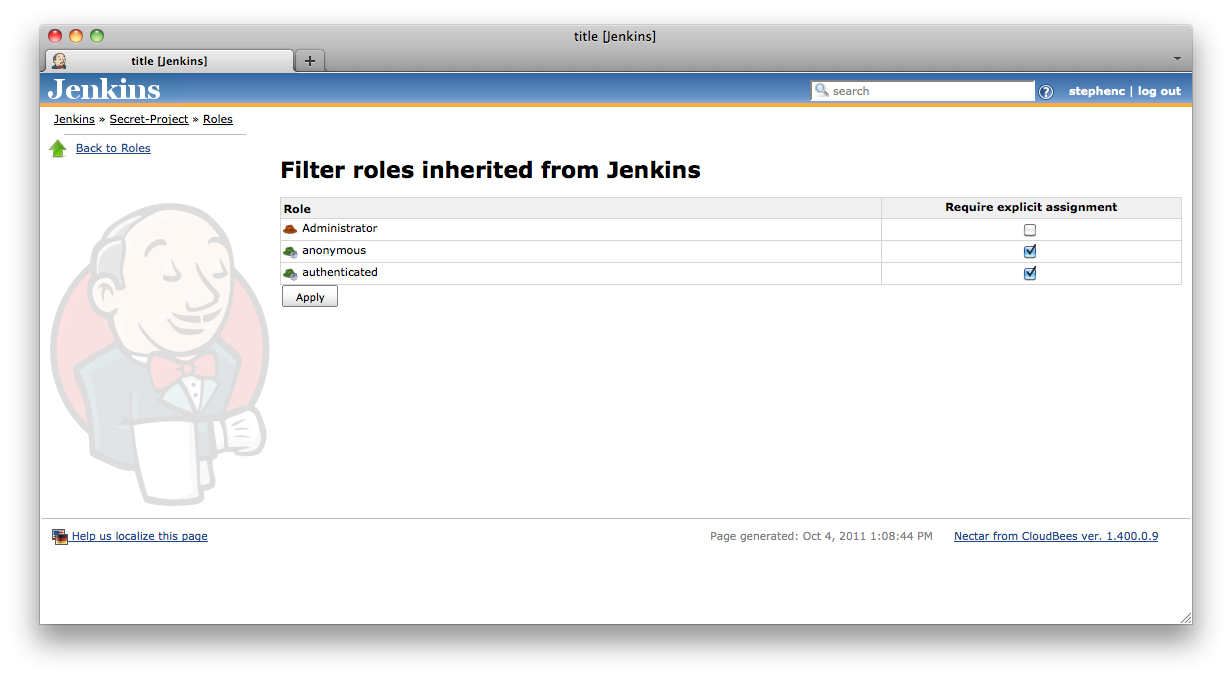 |
To filter a role, you just check the corresponding check-box. When a role is filtered, then the role is not available on that object to users unless there is a group defined within that object which the user is a member of and which has been assigned that role.
As mentioned in the section called “Configuring and managing roles”, administrators can mark certain important roles as being unfilterable. In such a case they will not appear in the Filter Roles page at all.