Before we dive into gory details, let’s create and use a simple template as it’s an easier way to wrap your head around the concept of templates. In this tutorial, we’ll create a template build step that says “hello”.
When this plugin is enabled, when you click New Job among other options you will see several kinds of templates you can create. We want to create a template that we can use as a builder, akin to “Execute shell script”, “Execute Windows batch file”, or “Invoke Ant”, that you can use in configuring free-style projects. So we choose “builder template”.
The name you enter here will be used as an identifier referred to from jobs using the template, as well as a default display name. There are no particular characters that are banned from this name, but it is good practice to use simple punctuation and no spaces. Just as with jobs, you can set a more pleasant display name later.
In this tutorial, we name it “Say Hello World”, and click “OK.”
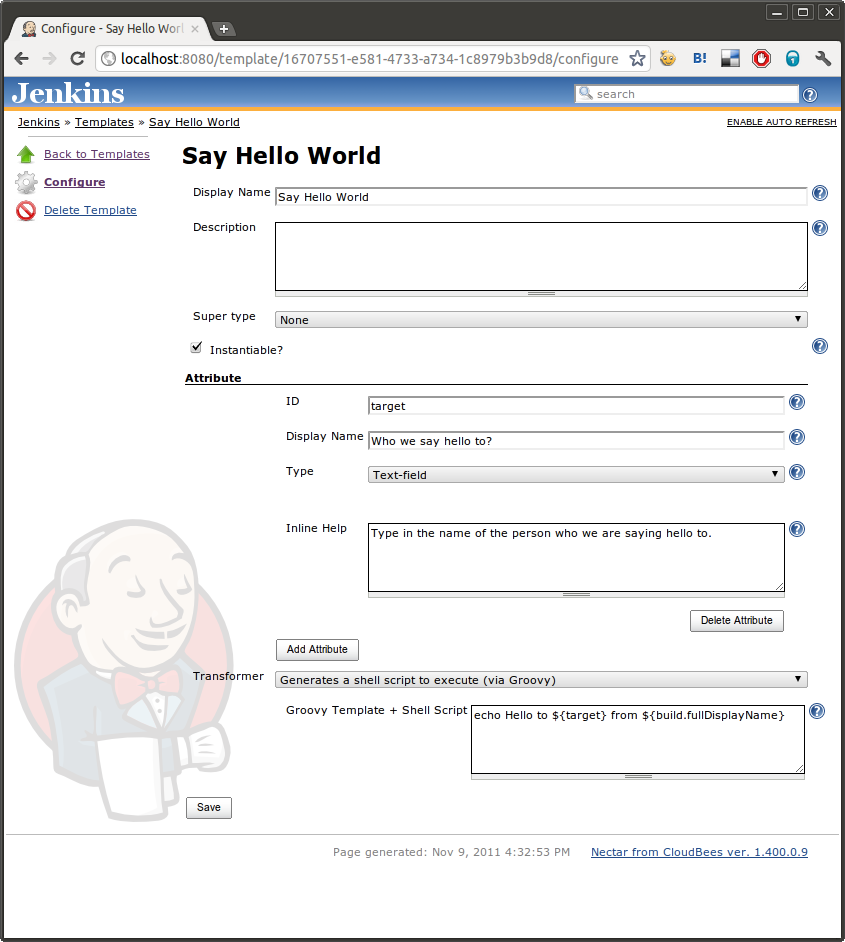
The next page that appears is the configuration page of this template. There are two main things to configure here: attributes and a transformer.
When you define a template, you first ask yourself “what do I want my users to enter when they use my template?” The answer to that question becomes attributes. In this hello world builder, we want the user to configure who we are saying hello to, so we define one attribute named “target” for this purpose. The user should see the single text field for this, so we choose the type accordingly. The display name and inline help are self-explanatory. They control what the user will see when they are editing their free-style projects to use our new builder.
The second question you should ask when you define a template is “how does it execute?” (Or, more generally, “how does it map to the terms Jenkins understands?”) The answer to that question becomes the transformer. In this tutorial, our builder will turn into a shell script that says hello. (Your real template would probably turn into a shell script that gets some real work done—or your template can translate into any other builders, but see the rest of the user guide for that.) So we’ll choose “generate a shell script to execute via Groovy”.
In the text area, we’ll enter the shell script that this build step is going to execute, but with expressions here and there of the form \${… } (because this is a Groovy template). ${target} refers to the actual value of the target attribute we defined above, and ${build.fullDisplayName} is a Groovy expression to access the getFullDisplayName() method (which returns the full name of the build) of the build object, which refers to the current build in progress. ${build.fullDisplayName} needs to be quoted because this is going to look like test #1, and # gets interpreted by shell as a comment sign unless you quote it.
Figure 10.1, “Configuring a hello world builder” captures this template configuration. When you are done, click “Save” to save this template. Your template is now ready.
Now that we have our first builder template, let’s create a free-style project that actually uses it. Go back to the Jenkins top page, and create a new free-style project. You’ll be taken to the configuration page. This part of Jenkins should already be familiar to you.
When you click “add build step”, you should see the newly created “Say Hello World” builder. You click it, and you see the say hello world builder added to your project. And you see the “target” attribute you defined in the configuration page, as depicted in Figure 10.2, “Using a hello world builder”.
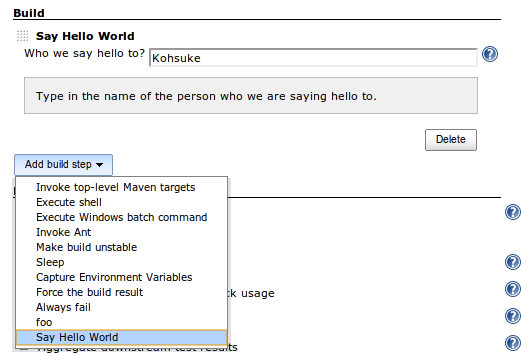
I configured this project to say hello to Kohsuke. Click save, and schedule a new build. In its console output, you should see something like this:
Example console log.
[workspace] $ /bin/sh -xe /tmp/hudson2322666548865862105.sh
+ echo Hello to Kohsuke from test #1
Hello to Kohsuke from test #1
Finished: SUCCESS
So the template is running as expected.
Let’s change the definition of the template, and see how it affects the instances.
We’ll go back to the template definition by going back to the top page, clicking the “Templates” link in the left, and clicking the configuration icon on the right to the “Say Hello World” template.
Instead of saying hello, now we make it say good evening. Click “Save” to save this new definition:

Now, when you update the template definition, all the uses of this template automatically reflect the change you made. So without revisiting the configuration page of the freestyle job, let’s simply schedule another build and see its console output:
Example console log after template updated.
[workspace] $ /bin/sh -xe /tmp/hudson2322666548865862105.sh
+ echo Good evening to Kohsuke from test #2
Good evening to Kohsuke from test #2
Finished: SUCCESS
Our change was indeed reflected.