In the second tutorial, we look at a more complex template that templatizes a whole job.
To set the context for this tutorial, look at Jenkins-on-Jenkins (Figure 10.4, “Jenkins on Jenkins”), which is the Jenkins server that the Jenkins community runs for itself. On this Jenkins, there are a large number of jobs that build the community-maintained Jenkins plugins:
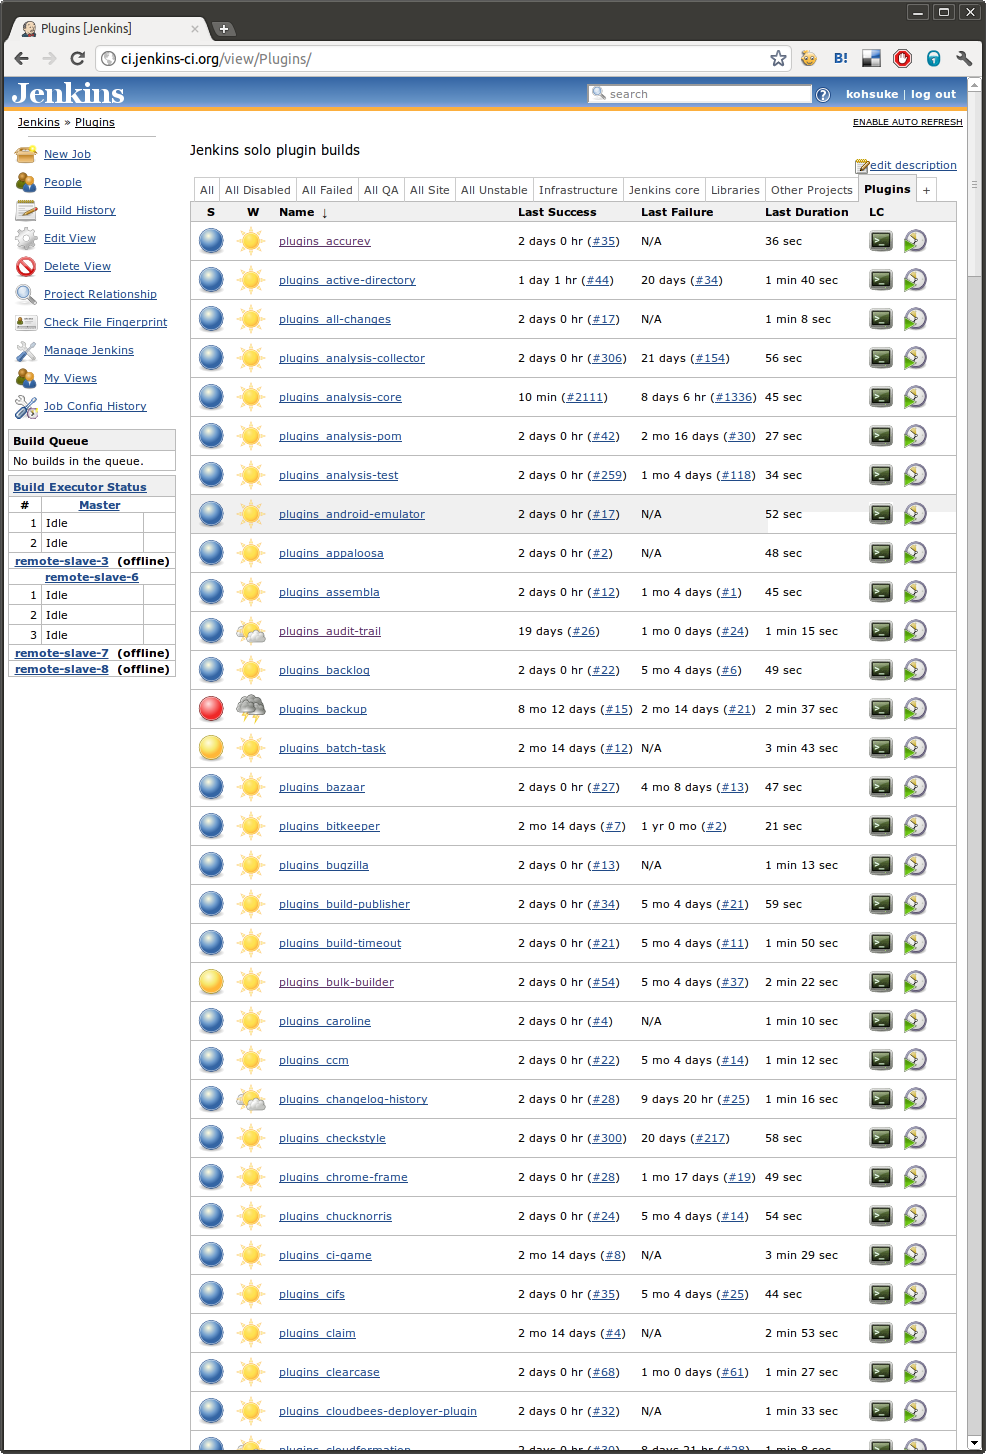
The actual configuration of all these jobs are almost identical. They each check out a Git repository, run mvn -e clean install, send an e-mail at the end of the build, and update JIRA issues that are discovered in the commit messages.
Each time we add a new plugin job, we copy from one of the existing jobs, change the name, and then call it done. But if tomorrow we want to install a new plugin (say we start sending the results to IRC via the IRC plugin) and make a mass change to all the jobs, that’s hopelessly tedious.
This is a prime use case for the template plugin. So let’s see how we could turn jobs like these into a template.
First, we go to the top page, click the New Job link, and select Job Template and provide a name. If our template were for building Jenkins plugins, we might call it “Jenkins Plugin”.
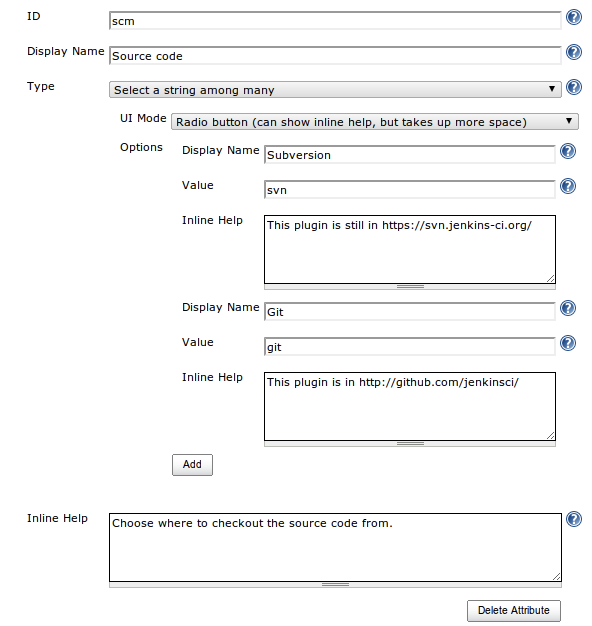
As with the previous tutorial, we just ask ourselves “what does the user [such as a plugin developer] need to configure”, and in our case it just involves one question, which is whether the sources are in Git or still in Subversion. (Set aside from the name attribute, which is there by default.)
So in the attribute, we define the “scm” attribute to be a choice between Git and Subversion as shown in Figure 10.5, “"SCM" attribute in the template”:
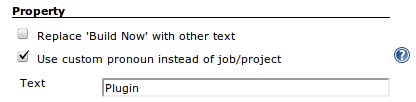
Further down below, we configure the template to refer to jobs as “plugins.” While this change is purely cosmetic and only affects what’s shown in the HTML for humans, it nonetheless makes it easier for users to understand, because in this context, “plugin” is a well-defined technical term that has specific meaning, while “job” is not.
Unlike the previous tutorial where we defined a builder template in terms of the transformation into a shell script that we execute, defining a transformation for a job template is more involved.
The idea here is that we need to tell the template plugin how our model definition (that consists of the name attribute and the scm attribute) maps to the actual job definition that Jenkins understand (in our case that’s Maven2 job type). We do this by defining a transformation from the model into the XML persisted form of the Maven2 job type. The template plugin uses this transformation to obtain the XML, then load it up to Jenkins so that it understands how to run it.
So in this tutorial, we use “Jelly based transformation”. Jelly is a template language that generates an XML. It is similar to JSTL (the tag library for Java Server Pages), and as long as your transformation doesn’t have a complex computation, it’s a reasonable choice.
The best way to define this transformation is by doing “programming by example”—that is, we manually configure one representative project, then obtain its XML representation. Let us assume you are starting with a Maven project which checks out code from a Git server. We’ll obtain its XML representation by simply adding config.xml to the job’s URL: http://your-jenkins/job/this-job/config.xml. (Some web browsers fail to display the actual XML when browsing such URLs. Try using View Source or Save functions in such cases, or use a separate download tool like curl or wget.) Later we will see that there is a shortcut, the Load Prototype button (currently only supported for Groovy transformations).
Next, we take this XML and insert variables where appropriate. For example, you see an occurrence of some-repo in the Git configuration, so we replace that with \${name} as below:
<scm class="hudson.plugins.git.GitSCM">
  <userRemoteConfigs>
    <hudson.plugins.git.UserRemoteConfig>
      ...
      <url>git://your-server/\${name}.git</url>
    </hudson.plugins.git.UserRemoteConfig>
  </userRemoteConfigs>
There’s one more reference of some-repo down in the root module, but this is an inferred value. (We can tell because we are never asked to enter this information in the configuration page.) So we can simply remove the entire <rootModule> element. Unless you know the internals of Jenkins, this is a bit of a trial-and-error. Similarly, if you want to keep XML concise, you can remove a large number of elements from the configuration XML and Jenkins will still happily read it and provide default values. (Again, this involves a bit of trial-and-error in the general case, although there are some rules of thumb. For example, boolean fields are always safe to remove, as are most string fields.)
We also need another XML from a plugin that’s building in Subversion to complete this transformation. You can spot the section that configures Subversion, so we do the same variable insertion, and the result is as follows:
<scm class="hudson.scm.SubversionSCM">
  <locations>
    <hudson.scm.SubversionSCM_-ModuleLocation>
      <remote>https://your-server/trunk/\${name}</remote>
    </hudson.scm.SubversionSCM_-ModuleLocation>
  </locations>
  ...
</scm>
Now, we want to switch between two fragments depending on the value of the scm attribute. To do this, we use a tag library from Jelly that does the switch/case equivalent, called choose/when (XSLT has the same elements that do the same thing.) So where we had the scm tag, we add the following fragment:
<j:choose xmlns:j="jelly:core">
  <j:when test="${scm=='git'}">
    <scm class="hudson.plugins.git.GitSCM">
      <configVersion>2</configVersion>
      <userRemoteConfigs>
        <hudson.plugins.git.UserRemoteConfig>
          <name>origin</name>
          <refspec>+refs/heads/*:refs/remotes/origin/*</refspec>
          <url>git://your-server/\${name}.git</url>
        </hudson.plugins.git.UserRemoteConfig>
      </userRemoteConfigs>
      <branches>
        <hudson.plugins.git.BranchSpec>
          <name>master</name>
        </hudson.plugins.git.BranchSpec>
      </branches>
      <buildChooser class="hudson.plugins.git.util.DefaultBuildChooser"/>
      <gitTool>Default</gitTool>
      <submoduleCfg class="list"/>
    </scm>
  </j:when>
  <j:when test="${scm=='svn'}">
    <scm class="hudson.scm.SubversionSCM">
      <locations>
        <hudson.scm.SubversionSCM_-ModuleLocation>
          <remote>https://your-server/trunk/\${name}</remote>
        </hudson.scm.SubversionSCM_-ModuleLocation>
      </locations>
      <workspaceUpdater class="hudson.scm.subversion.UpdateUpdater"/>
    </scm>
  </j:when>
</j:choose>
See Jelly tag library reference for more about these tags. The entire transformation Jelly script will look something like this:
<?xml version='1.0' encoding='UTF-8'?>
<maven2-moduleset>
  <actions/>
  <description></description>
  <properties>
    <hudson.plugins.disk__usage.DiskUsageProperty/>
  </properties>

<j:choose xmlns:j="jelly:core">
  <j:when test="\${scm=='git'}">
    <scm class="hudson.plugins.git.GitSCM">
      <configVersion>2</configVersion>
      <userRemoteConfigs>
        <hudson.plugins.git.UserRemoteConfig>
          <name>origin</name>
          <refspec>+refs/heads/*:refs/remotes/origin/*</refspec>
          <url>git://your-server/\${name}.git</url>
        </hudson.plugins.git.UserRemoteConfig>
      </userRemoteConfigs>
      <branches>
        <hudson.plugins.git.BranchSpec>
          <name>master</name>
        </hudson.plugins.git.BranchSpec>
      </branches>
      <buildChooser class="hudson.plugins.git.util.DefaultBuildChooser"/>
      <gitTool>Default</gitTool>
      <submoduleCfg class="list"/>
    </scm>
  </j:when>
  <j:when test="\${scm=='svn'}">
    <scm class="hudson.scm.SubversionSCM">
      <locations>
        <hudson.scm.SubversionSCM_-ModuleLocation>
          <remote>https://your-server/trunk/\${name}</remote>
        </hudson.scm.SubversionSCM_-ModuleLocation>
      </locations>
      <workspaceUpdater class="hudson.scm.subversion.UpdateUpdater"/>
    </scm>
  </j:when>
</j:choose>

  <canRoam>true</canRoam>
  <jdk>(Default)</jdk>
  <triggers class="vector">
    <hudson.triggers.SCMTrigger>
      <spec>*/15 * * * *</spec>
    </hudson.triggers.SCMTrigger>
  </triggers>
  <goals>-e clean install</goals>
  <defaultGoals>package</defaultGoals>
  <mavenName>maven-3.0.3</mavenName>
  <mavenValidationLevel>0</mavenValidationLevel>
  <aggregatorStyleBuild>true</aggregatorStyleBuild>
  <reporters/>
  <publishers />
  <buildWrappers/>
</maven2-moduleset>
Now we save the configuration, and our job template is ready.
Go back to the top page, and click “New Job”. You’ll see the newly created template as one of the options:
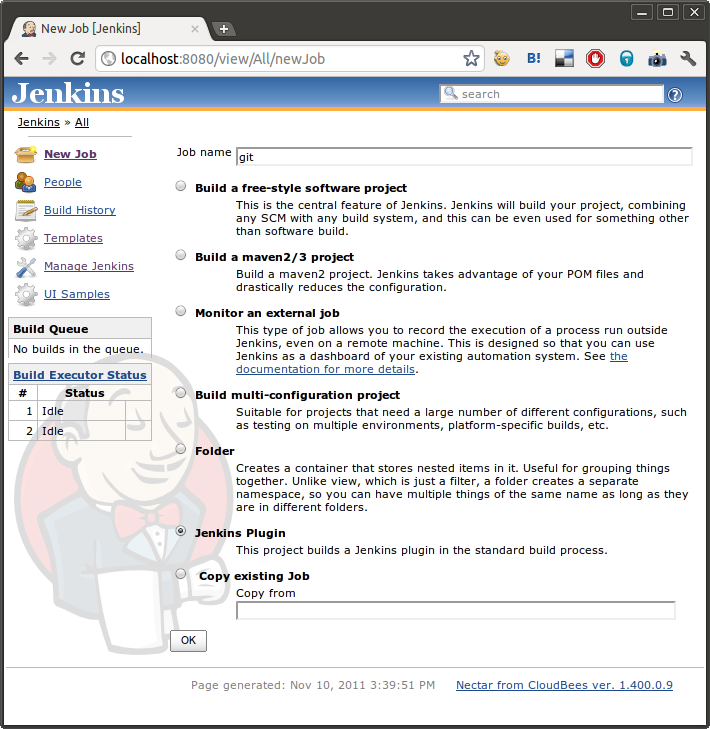
So we type in the name of the plugin that we want to build, say “git”, then click OK. The configuration page of this job cannot be any simpler:
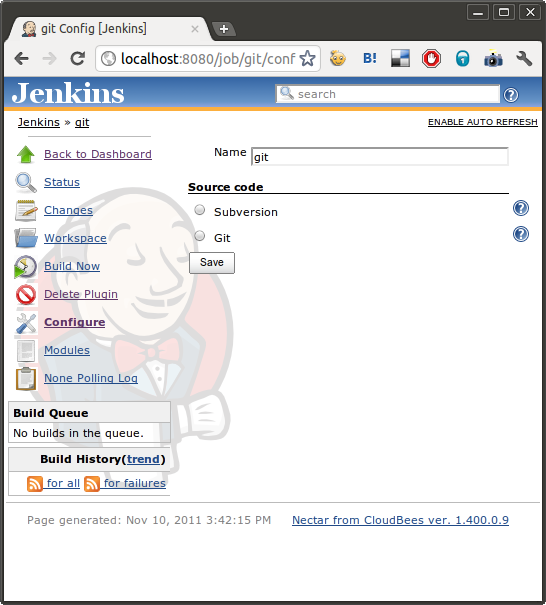
The git plugin lives in the Git repository, so choose that, and save. Let’s schedule a new build, and see it build the plugin.