
Compute can be configured so that the virtual machine instances of different projects (tenants) are in different subnets, with each subnet having a different VLAN tag. This can be useful in networking environments where you have a large IP space which is cut up into smaller subnets. The smaller subnets are then trunked together at the switch level (dividing layer 3 by layer 2) so that all machines in the larger IP space can communicate. The purpose of this is generally to control the size of broadcast domains. It can also be useful to provide an additional layer of isolation in a multi-tenant environment.
![[Note]](../common/images/admon/note.png) | Note |
|---|---|
The terms network and subnet are often used interchangeably in
discussions of VLAN mode. In all cases, we are referring to a range of IP
addresses specified by a subnet (e.g.,
|
Running in VLAN mode is more complex than the other network modes. In particular:
IP forwarding must be enabled
The hosts running nova-network and nova-compute must have the
8021qkernel module loadedYour networking switches must support VLAN tagging
Your networking switches must be configured to enable the specific VLAN tags you specify in your Compute setup
You will need information about your networking setup from your network administrator to configure Compute properly (e.g., netmask, broadcast, gateway, ethernet device, VLAN IDs)
The network_manager=nova.network.manager.VlanManager option specifies VLAN
mode, which happens to be the default networking mode.
The bridges that are created by the network manager will be attached to the
interface specified by vlan_interface, the example above uses the
eth0 interface, which is the default.
The fixed_range option deprecated
in Grizzly and should be set to
fixed_range='' so that Nova
determines a CIDR block which describes the IP address
space for all of the instances: this space will be
divided up into subnets. This range is typically a
private network. The example above uses
the private range
172.16.0.0/12.
The network_size option refers to
the default number of IP addresses in each network,
although this can be overridden at network creation
time . The example above uses a network size of
256, which corresponds to a
/24 network.
Networks are created with the nova network-create command. Here is an example of how to create a network consistent with the above example configuration options, as root:
# nova network-create example-net --fixed-range-v4=172.16.169.0/24 --vlan=169 --bridge=br169 --project-id=a421ae28356b4cc3a25e1429a0b02e98
This creates a network called example-net associated with
tenant a421ae28356b4cc3a25e1429a0b02e98. The subnet is
172.16.169.0/24 with a VLAN tag of 169
(the VLAN tag does not need to match the third byte of the address, though it is a
useful convention to remember the association). This will create a bridge interface
device called br169 on the host running the nova-network service.
This device will appear in the output of an ifconfig
command.
Each network is associated with one tenant. As in the example above, you may
(optionally) specify this association at network creation time by using the
--project_id flag which corresponds to the tenant ID. Use the
keystone tenant-list command to list the tenants and
corresponding IDs that you have already created.
The nova network-create command supports many configuration options, which are displayed when called with the nova help network-create:
usage: nova network-create [--fixed-range-v4 <x.x.x.x/yy>]
                           [--fixed-range-v6 CIDR_V6] [--vlan <vlan id>]
                           [--vpn <vpn start>] [--gateway GATEWAY]
                           [--gateway-v6 GATEWAY_V6] [--bridge <bridge>]
                           [--bridge-interface <bridge interface>]
                           [--multi-host <'T'|'F'>] [--dns1 <DNS Address>]
                           [--dns2 <DNS Address>] [--uuid <network uuid>]
                           [--fixed-cidr <x.x.x.x/yy>]
                           [--project-id <project id>] [--priority <number>]
                           <network_label>

Create a network.

Positional arguments:
  <network_label>       Label for network

Optional arguments:
  --fixed-range-v4 <x.x.x.x/yy>
                        IPv4 subnet (ex: 10.0.0.0/8)
  --fixed-range-v6 CIDR_V6
                        IPv6 subnet (ex: fe80::/64
  --vlan <vlan id>      vlan id
  --vpn <vpn start>     vpn start
  --gateway GATEWAY     gateway
  --gateway-v6 GATEWAY_V6
                        ipv6 gateway
  --bridge <bridge>     VIFs on this network are connected to this bridge
  --bridge-interface <bridge interface>
                        the bridge is connected to this interface
  --multi-host <'T'|'F'>
                        Multi host
  --dns1 <DNS Address>  First DNS
  --dns2 <DNS Address>  Second DNS
  --uuid <network uuid>
                        Network UUID
  --fixed-cidr <x.x.x.x/yy>
                        IPv4 subnet for fixed IPS (ex: 10.20.0.0/16)
  --project-id <project id>
                        Project id
  --priority <number>   Network interface priority
In particular, flags to the nova network-create command can be
used to override settings from nova.conf:
--bridge_interfaceOverrides the
vlan_interfaceconfiguration option
To view a list of the networks that have been created, as root:
# nova network-list
The nova command-line tool does not yet support network modifications. To modify an existing network, you must use the nova-manage command. Use the nova-manage network modify command, as root:
# nova-manage network modify --help
Usage: nova-manage network modify <args> [options]

Options:
  -h, --help            show this help message and exit
  --fixed_range=<x.x.x.x/yy>
                        Network to modify
  --project=<project name>
                        Project name to associate
  --host=<host>         Host to associate
  --disassociate-project
                        Disassociate Network from Project
  --disassociate-host   Disassociate Host from Project
The nova command-line tool does not yet support network deletions.. To delete an existing network, you must use the nova-manage command. To delete a network, use nova-manage network delete, as root:
# nova-manage network delete --help
Usage: nova-manage network delete <args> [options]

Options:
  -h, --help            show this help message and exit
  --fixed_range=<x.x.x.x/yy>
                        Network to delete
  --uuid=<uuid>         UUID of network to delete
Note that a network must first be disassociated from a project using the nova network-disassociate command before it can be deleted.
Creating a network will automatically cause the Compute database to populate with a list of available fixed IP addresses. You can view the list of fixed IP addresses and their associations with active virtual machines by doing, as root:
# nova-manage fix list
If users need to access the instances in their project across a VPN, a special VPN instance (code named cloudpipe) needs to be created as described in the section titled Cloudpipe — Per Project VPNs.
To configure your nodes to support VLAN tagging, install the
vlan package and load the 8021q kernel
module, as
root:
# apt-get install vlan
# modprobe 8021q
To have this kernel module loaded on boot, add the following line to
/etc/modules:
8021q
Here is an example of settings from /etc/nova/nova.conf for a
host configured to run nova-network in VLAN mode
network_manager=nova.network.manager.VlanManager
vlan_interface=eth0
fixed_range=172.16.0.0/12
network_size=256
In certain cases, the network manager may not properly tear down bridges and VLANs when it is stopped. If you attempt to restart the network manager and it does not start, check the logs for errors indicating that a bridge device already exists. If this is the case, you will likely need to tear down the bridge and VLAN devices manually. It is also advisable to kill any remaining dnsmasq processes. These commands would stop the service, manually tear down the bridge and VLAN from the previous example, kill any remaining dnsmasq processes, and start the service up again, as root:
# stop nova-network
# vconfig rem vlan169
# ip link set br169 down
# brctl delbr br169
# killall dnsmasq
# start nova-network
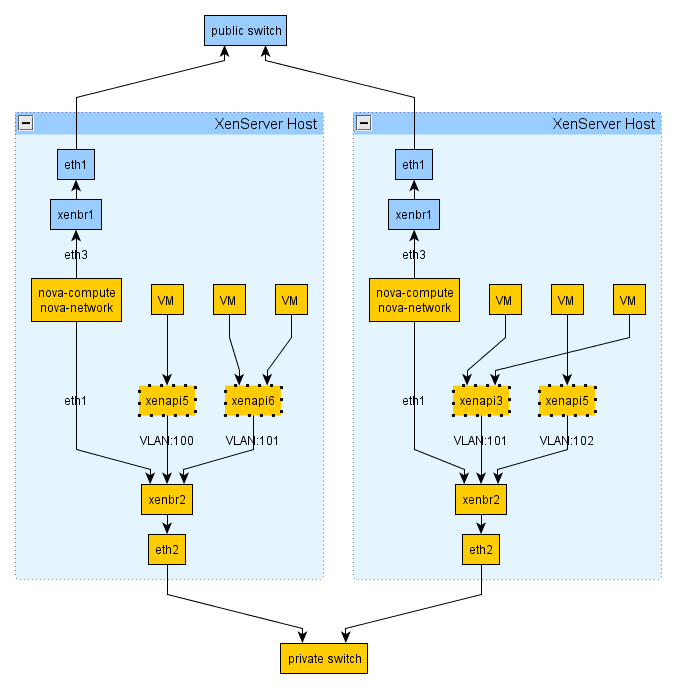
VLAN networking works quite differently with the XenAPI driver, compared to the libvirt driver. The following figure shows how your setup might look:
Here is an extract from a nova.conf
file in a system running the above setup:
network_manager=nova.network.manager.VlanManager
xenapi_vif_driver=nova.virt.xenapi.vif.(XenAPIBridgeDriver or XenAPIOpenVswitchDriver)
vlan_interface=eth1
public_interface=eth3
multi_host=True
force_dhcp_release=True
send_arp_for_ha=True
flat_injected=False
firewall_driver=nova.virt.xenapi.firewall.Dom0IptablesFirewallDriver
You should notice that
vlan_interface
refers to the network interface on the Hypervisor and
the network interface on the VM running the OpenStack
services.
As with before public_interface
refers to the network interfce on the VM running the
OpenStack services.
With VLAN networking and the XenAPI driver, the following things happen when you start a VM:
First the XenServer network is attached to the appropriate physical interface (PIF) and VLAN unless the network already exsists.
When the VM is created, its VIF is attached to the above network.
The 'Openstack domU', i.e. where nova-network is running, acts as a gateway and DHCP for this instance. The DomU does this for multiple VLAN networks, so it has to be attached on a VLAN trunk. For this reason it must have an interface on the parent bridge of the VLAN bridge where VM instances are plugged.
To help understand VLAN networking with the XenAPI further, here are some important things to note:
A physical interface (PIF) identified either by (A) the vlan_interface flag or (B) the bridge_interface column in the networks db table will be used for creating a XenServer VLAN network. The VLAN tag is found in the vlan column, still in the networks table, and by default the first tag is 100.
VIF for VM instances within this network will be plugged in this VLAN network. You won't see the bridge until a VIF is plugged in it.
The 'Openstack domU', i.e. the VM running the nova network node, instead will not be plugged into this network; since it acts as a gateway for multiple VLAN networks, it has to be attached on a VLAN trunk. For this reason it must have an interface on the parent bridge of the VLAN bridge where VM instances are plugged. For example, if
vlan_interfaceis eth0 it must be plugged in xenbr1, eth1 --> xenbr1, etc.Within the Openstack domU, 'ip link' is then used to configure VLAN interfaces on the 'trunk' port. Each of this vlan interfaces is associated with a dnsmasq instance, which will distribute IP addresses to instances. The lease file for dnsmasq is constantly updated by nova-network, thus ensuring VMs get the IP address specified by the layer3 network driver (nova IPAM or Melange).
With this configuration, VM instances should be able to get the IP address assigned to them from the appropriate dnsmasq instance, and should be able to communicate without any problem with other VMs on the same network and with the their gateway.
The above point (3) probably needs some more explanations. With Open vSwitch, we don't really have distinct bridges for different VLANs; even if they appear as distinct bridges to linux and XenServer, they are actually the same OVS instance, which runs a distinct 'fake-bridge' for each VLAN. The 'real' bridge is the 'parent' of the fake one. You can easily navigate fake and real bridges with ovs-vsctl.
As you can see I am referring to Openvswitch only. This is for a specific reason: the fake-parent mechanism automatically imply that ports which are not on a fake bridge are trunk ports. This does not happen with linux bridge. A packet forwarded on a VLAN interfaces does not get back in the xenbrX bridge for ethX. For this reason, with XenAPI, you must use Open vSwitch when running VLAN networking with network HA (i.e. mult-host) enabled. On XenServer 6.0 and later, Open vSwitch is the default network stack. When using VLAN networking with XenAPI and linux bridge, the default networking stack on XenServer prior to version 6.0, you must run the network node on a VM on a XenServer that does not host any nova-compute controlled instances.
Text in this section was adapted from an email from Vish Ishaya on the OpenStack mailing list.
There is an issue with the way Compute uses dnsmasq in VLAN mode. Compute starts up a single copy of dnsmasq for each VLAN on the network host (or on every host in multi_host mode). The problem is in the way that dnsmasq binds to an IP address and port. Both copies can respond to broadcast packets, but unicast packets can only be answered by one of the copies.
As a consequence, guests from only one project will get responses to their unicast DHCP renew requests. Unicast projects from guests in other projects get ignored. What happens next is different depending on the guest OS. Linux generally will send a broadcast packet out after the unicast fails, and so the only effect is a small (tens of ms) hiccup while the interface is reconfigured. It can be much worse than that, however. There have been observed cases where Windows just gives up and ends up with a non-configured interface.
This bug was first noticed by some users of OpenStack who rolled their own
fix. In short, on Linux, if you set the SO_BINDTODEVICE
socket option, it will allow different daemons to share the port and respond to
unicast packets, as long as they listen on different interfaces. Simon Kelley,
the maintainer of dnsmasq, has integrated a fix for the issue in dnsmaq version 2.61.
If upgrading dnsmasq is out of the question, a possible workaround is to minimize lease renewals with something like the following combination of config options.
# release leases immediately on terminate
force_dhcp_release
# one week lease time
dhcp_lease_time=604800
# two week disassociate timeout
fixed_ip_disassociate_timeout=1209600
